Installation Instructions: DF4 ALUMINUM FORD F150 5’6” BED LENGTH 2015-CURRENT • • • • TOOLS REQUIRED Adjustable wrench (that opens to about 1”) 1/2” open end wrench #2 Phillip screwdriver 3/8” socket • • • • • 7/16” deep socket 7/32” Allen wrench 1/2” drill bit Wire cutters T30 Torx Driver Watch short installation videos at www.decked.com/video | Register your system at www.decked.com/warranty FOLLOW US: @DECKEDUSA | #DECKEDUSA VERSION 4 DECKED.COM | SERVICE@DECKED.COM | 208.806.
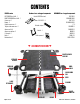
CONTENTS DECKED carton LEFT/DRIVER deck half - 1 RIGHT/PASSENGER deck half - 1 Center vert - 1 Drawer - 2 Cabside ammo can - 2 Tailgate side ammo can - 2 Ammo can lid - 4 Ammo can window - 2 C-channel - 2 Ruler - 1 Hardware box - 1 Hardware box - unbagged components (inside DECKED carton): Shims - DF4 & DF5 - 3 Weather strips - 2 Handle - 1 Bottle opener - 1 HARDWARE box - bagged components PREP DF4 - 1 C-CHANNEL HW - 1 BOLT 1 FS - 1 CS AMMO CANS - 1 J7 - 2 DRAWER 1 - 1 DRAWER 3 - 1 HANDLE - 1 WHEELS - 1
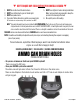
▼ HEY! TORQUE BOY: READ BEFORE YOU INSTALL DECKED ▼ 1. DON’T be an idiot read the instructions. 2. DON'T over tighten bolts, get em' hand-tight. 3. DON'T use power tools. 4. If you don't follow directions and do use power tools: 5. DON'T over tighten J-hooks during installation. Make 'em good and snug enough to keep the system from moving in the bed. 6. Nice job if you’re still reading . 1). Set clutch at a very low setting. 2). If you blow it, see NOTE.
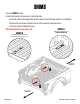
SHIMS • There are 3 SHIMS provided: • Using the information in the respective circular detail views: a) Clean the surfaces thoroughly where the shims will be located (isopropyl alcohol is recommended). b) Remove the layer of tape on the bottom of the shim to expose the adhesive surface. c) Place the shim and apply with pressure. DETAIL A NOTE: Repeat DETAIL A on passenger side. Center shim over cabside bolt (blue). Repeat on passenger side. DETAIL B Center shim between floor beads shown.
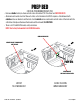
PREP BED (JUST LIKE YOUR MOMMA TAUGHT YOU.) • Remove cabside factory tie-downs on both sides of truck bed (T30 Torx driver) and SAVE THE BOLTS. • Aluminum and coated steel don’t like each other, so the Aluminum Ford F150’s require a shim between both cabside ammo can brackets and the truck. Install cabside ammo can brackets on both sides of the truck with the soft rubber shim placed between the bracket and the sidewall; BAG PREP DF4. • There is a LEFT and RIGHT bracket, verify orientation.
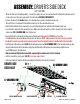
ASSEMBLY: DRIVER’S SIDE DECK (LET’S DO THIS!) • There are three pre-installed gaskets – one on the center vert, one on each underside of the decks where they rest on the center vert. Do yours look weird? See them here: DECKED.COM/GASKETS • Place C-channel on the inside ledges of a cabside ammo can and a tailgate ammo can. • The end of the C-channel with the endplate must rest on the cabside ammo can.
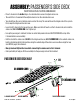
ASSEMBLY: PASSENGER’S SIDE DECK (NOW YOU’RE ACTUALLY GETTING SOMEWHERE!) • Place C-channel on the inside ledges of a cabside ammo can and a tailgate ammo can. • The end of the C-channel with the endplate must rest on the cabside ammo can. • You should have the correct tailgate ammo can for this step. The axle will be on the tailgate side of the system. If not, swap the tailgate ammo cans now. • Loosely bolt C-channel to the two ammo cans.
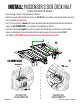
INSTALL: PASSENGER’S SIDE DECK HALF (OK, FINE, PAT YOURSELF ON THE BACK) • Seat passenger side deck on the upstanding vert bosses. • Bolt the passenger side deck half to the center vert; BAG B1. Make sure all bolts connecting the deck to the center vert are snug, but no power tools. • Use 1 1/2” bolt to bolt deck, cabside ammo can and bracket together by aligning bracket with the cabside lip of ammo can; BAG CS AMMO CANS. Use screwdriver to align grab nuts on bracket.
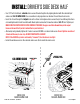
INSTALL: DRIVER’S SIDE DECK HALF • Use 1 1/2” bolt to bolt deck, cabside ammo can and bracket together by aligning bracket with the cabside lip of ammo can; BAG CS AMMO CANS. Use screwdriver to align grab nuts on bracket. You will have 4 extra nuts. • Insert the J-hook through the tailgate hole on the driver side tailgate ammo can and loop J-hook through tie down or mounting bracket in bed. Assemble with black spherical washer, flat washer and nut; BAG J7. Don’t tighten yet.
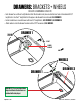
DRAWERS: BRACKETS + WHEELS (SO EASY A CHIMPANZEE CAN DO IT) • Each drawer has a left and a right bracket. Bolt the brackets into place via bottom two holes in bracket with 3/4" length bolts. Use the 2" length bolt for the upper cabside wall hole in bracket; BAG DRAWER 1. • Install a tube brace in each drawer with two 3/4" length bolts; BAG DRAWER 1, BAG DRAWER 3. • Attach wheels onto the drawer brackets with a 7/32" hex wrench; BAG WHEELS.
INSTALL: DRAWER HANDLES • One drawer handle assembly needs to be installed. • Save yourself the headache, watch this short installation video: DECKED.com/videohandle. • From the underside of drawer, place the springs into the cavities on either side of the handle slots, red spring=right spring; BAG HANDLE. NOTE: Each spring arm should point inward, not outward. • Install a clevis pin through each outside drawer hole and through spring; BAG HANDLE.
INSTALL: DRAWERS (HOPEFULLY YOU’RE STILL WEARING YOURS.) • Save yourself the headache, watch this short installation video: DECKED.com/videotailgatewheels. • Install the drawer by sliding wheels into their two channels (C-channel and center vert), and slide drawer all the way forward until closed. • Install the remaining tailgate side wheels onto their axles; BAG WHEELS.
INSTALL: (PARTY THETIME!)FUN STUFF CAUTION: These are small gauge screws – light, hand-tightening is all that is required. • Center and screw on the ruler/edge guard; BAG FINAL FS. • Screw on the bottle opener; BAG FINAL FS. • Install lock core plugs; BAG FINAL FS, or install locks if purchased. IMPORTANT: Grab your favorite beverage, crack ‘er open in the bottle opener and make a toast to your truck. You did it.
DECKED 3-YEAR LIMITED WARRANTY (a.k.a. LEGAL MUMBO JUMBO) LIKE YOUR HIGH SCHOOL GUIDANCE COUNSELOR USED TO SAY, “HELP ME, HELP YOU”. REGISTER YOUR PRODUCT! IT’S QUICK, IT’S SECURE, AND IT’S THE BEST WAY TO HELP US HELP YOU IN THE RARE EVENT THAT YOUR ACTS OF AWESOMENESS LEAD TO A WARRANTY ISSUE. PLUS, AS AN ADDED BONUS, YOU WILL BE THE FIRST TO KNOW OF PRODUCT IMPROVEMENTS OR ISSUES SPECIFIC TO YOUR MODEL. GO TO DECKED.