
Installation Guide


Cap Rail
Insert Rail
To p Rail
Traditional, Baroque, Arc balusters and Face-Mount Glass balusters Place
the top rail in position. Attach the rail to each bracket by pre-drilling with a 1/8" drill bit
and using three 1" screws. Tip: Use a driver extension bit to avoid marring the rail
or post sleeve with the drill chuck.
Step 12 Traditional, Baroque, Arc balusters and Face-Mount Glass balusters
Start the first baluster on-center of the center of the rail and work out to each end.
Using the baluster as a guide, drill 9/64" holes in the rails at each baluster location. Use
a 2x4 as a spacer block to space the next baluster. Working toward the ends,
drill and attach each baluster with the screws provided (fig. 5).
Step 13 (optional) Cut the cap rail and cap rail insert to length. (Note: the cap rail
will be 1/2" longer than the top and bottom rails.) Center the cap rail insert on top of
the top rail and pre-drill seven 1/8" pilot holes. Attach the cap rail insert to the top rail
with seven 1/2" screws. Apply exterior-grade metal construction adhesive to the mating
edges of the insert rail. Position cap rail over the insert rail (fig. 6). Install by pressing
down, starting from one end and working to the other until the cap rail snaps into
place. Gently tap with a rubber mallet if needed.
Angled Railings: For 22.5° rail angles, cut the cap rail and cap rail insert to length
and angle using a miter saw. Sand the ends and apply touch-up paint as needed
(sold separately). Attach to the top rail following the steps above.
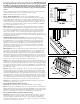
45° rail angles will require a cap rail wedge on top of the 45° adaptor (fig. 7). The cap
rail wedge will be cut out of the cap rail. The wedge will require a straight cut on the
end in contact with the post and a 22.5° cut on the opposite end. The distance from
the post to the wide edge of the wedge is 1-3/4". Cut two cap rail and insert wedges
using a miter saw and install to the top of the 45° adaptors following the steps above.
The cap rail will require a 22.5° cut on both ends to match the width of the cap rail
wedges. Measure the distance between the installed wedges and cut both ends
to length and angle using a miter saw. Sand the cut ends and apply touch-up paint
as needed (sold separately) to make the seam less noticeable. Attach the cap rail
to the top rail following the steps above.
Step 14 Apply exterior-grade metal construction adhesive to the inside edges of the
post caps and place over each post sleeve.
Step 1 Cedar or pressure-treated pine 4x4 railing posts provide the structural strength
for the railing. The length of each structural post is determined by the total of the stair
stringer width (7-1/4") + decking thickness (1") + railing height (36" or 42")= 44-1/4” or
50 -1/4”.
Step 2 Position, plumb with a level, and clamp the rail post on the interior face of the
stair stringer. Plumb again. The 4x4 railing post should be bolted to the inside of the
stair stringer using two 1/2" x 6" galvanized carriage bolts. Corner posts use a third
carriage bolt inserted through the adjacent joist (refer to figure 2b). Ground-level
posts should be set in concrete.
Step 3 Complete stair tread installation prior to installing post sleeves. Trim 4x4 post
sleeves to length. If using post caps, post sleeves should be a minimum of 1-1/2"
longer than the overall railing height (fig. 3). Allow an additional 1-1/2" in your calculation
if installing the optional cap rail. Example: For a 36" high railing, trim post sleeve to a
minimum of 37-1/2" (39" with cap rail plus the height of the riser. If your railing height is 36",
add 1-1/2" plus 7" for riser). Post sleeve can be left longer if desired.
Some wood preservatives may cause an undesirable reaction when directly in contact
with aluminum. The inside of the post sleeve includes a liner to prevent direct contact
with treated structural posts. If your decking is pressure-treated, place shims under the
post sleeve or run a bead of caulk along the bottom edge of the post prior to installing
the post sleeve. This will keep the aluminum from direct contact with the treated decking
and will be concealed by the post base trim. Slide a trimmed post sleeve over each
4x4 railing post. Slide post base trim over each post sleeve. Add a bead of caulk to the
underside of the post base trim when using treated decking.
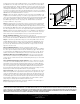
Step 4 Measure the distance between installed post sleeves to determine the length
of the top and bottom rails. Lay bottom rail on stairs with the pre-drilled holes facing
down. The distance between the post and first baluster should be less than 4" and
equal on both ends. Mark the angle and length. Do the same with the top rail. Remove
an additional 1/4" on both ends (1/2" overall) for the bracket to fit between the rail and
post. Trim the top and bottom rails to length with the same angle (fig. 8).
Step 5 Determine the spacing of the balusters, 4-1/2" maximum on-center (7-1/2"
on-center if using glass balusters, 4-1/4" on-center if using Ellipse balusters), and
equal spacing for the end spacing (see step 7 of the in-line instructions for details).
Top View
Wood Post
2x4 Rail
Aluminum
Post Sleeve
45˚Adaptor
Stair Rail
Bracket
Cap Rail Wedge
Stair Railing Installation Instructions
fig. 6
fig. 7
45° Angle
Installation
Top and
Bottom Rail
Figure 8