
Installation Guide


Fasteners
For ease of installation, our Stowaway fastener
fits into the slot on each side of the deck board
to eliminate pre-drilling and provide a fastener-free
deck surface. The deck boards require traditional
fasteners on the outside and inside edges of
the deck. Begin by fastening the outside edge of
the first board to the rim joist every 16". For this,
we recommend using 2-1/2" corrosion-resistant,
composite wood deck screws. These screws
help minimize the common “mushroom” effect
that sometimes occurs when using standard
fasteners. They can also reduce the amount of
pre-drilling and countersinking.
If using ordinary coarse-thread deck screws,
always pre-drill a pilot hole and countersink prior
to driving screws. Screws should be driven flush
with the surface. Do not over-tighten. Use one
fastener per board every 16". For any decking
where two boards meet end-to-end over a joist,
add additional blocking. Always predrill a pilot
hole when fastening within 1-1/2" of board ends,
whether using composite or wood screws. Do
not over-tighten screws at board ends.
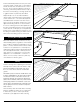
On the other side of the board, place a Stowaway
hidden fastener into the slot and center on the joist
(fig. 3). Install the preset screw at a 90° angle
through the Stowaway fastener and drive flush. Do
not over-tighten. The fastener wings must remain
level with the joist for the next board to fit correctly
(fig. 4). Install one Stowaway fastener at each joist
location. Slide the next board into place so the
wings on the previous fasteners fit into the slot
on the side of the board. Make sure the side gap
between the boards is 1/4".
To keep the interior boards from moving over time,
we recommend pinning the boards at the center
of their length using a #8, 2" stainless steel screw.
This holds the deck board in place at the center
of each board and allows the decking to expand/
contract at the ends. Pre-drill in the slot of the
deck board with an 1/8" drill bit (fig. 5a). Drive
screw into the slot so it’s flush with the bottom of
the groove (fig. 5b). This will allow you to properly
fit a Stowaway hidden fastener into the slot. Install
a Stowaway hidden fastener clip over the screw
and centered over the joist. Fasten using preset
screw at a 90° angle through the Stowaway hidden
fastener and drive flush with the clip (fig. 6). The
fastener wings must remain level with the joist for
the next board to fit correctly (fig. 4).
NOTE: To predrill a groove on one side of deck
board, we recommend using a 5/32" T-slot cutter.
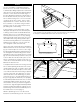
Fasten the outside edge of the first board to the rim joist with screws. Pre-drill and countersink all deck
screws, regardless of type, that are within 1-1/2" of the end of the deck board. On the other side of
the board, place a Stowaway hidden fastener into the slot and center on the joist.
fig. 2
Warning.eps
Deck boards
If desired, the board profile
may be concealed with fascia
Fig.2.eps
Fig.1.eps
Joist
fig. 3
fig. 4
fig. 5a
fig. 5b
Page 2