
Owner manual

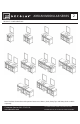

JORDAN MODULAR SERIES
Customer Service: 561-274-2110
www.decolav.com
LET YOUR DREAMS COME ALIVE, YOUR PASSIONS
BECOME REALITY, BE THE ENVY OF YOUR NEIGHBORS
®
6
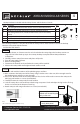
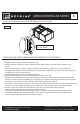
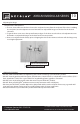
INSTALLING THE VANITY DRAWER AND THE SUPPORT LEG TO THE VANITY
Connecting Wood Screws
( 3 per side, 6 Total)
Figure D
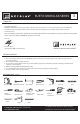
o Unpack the Vanity Drawer, Vanity and Support Leg.
o Remove the door and drawers from the Vanity Drawer and the Vanity. (This will make installation a lot
easier)
o Look inside the Vanity, you will see 2 holes near the top of the Vanity. These holes are bored halfway
through from the factory. On the side that you wish to hook the Vanity Drawer to, bore the holes all the way
through using a .394” (10 mm) drill bit.
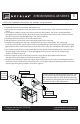
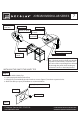
o Lay Vanity and Vanity Drawer on the oor, back down.
o Slide the Vanity Drawer next to the Vanity lining up the holes at the top.
o Using the connecting bolts and T-nuts attach the drawer console to the Vanity. The T-nuts go on the Vanity
Drawer side and the Connecting Bolts go on the Vanity side. Tighten connecting bolts and insert three small
wood screws into the holes in the T-nut. This will lock the T-nut in place. Figure E
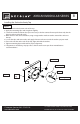
o There will be 3 unused holes below the T-nut holes on the Vanity Drawer. These holes are for connecting screws.
Install the 3 screws through the Vanity Drawer and into the vanity using a cordless screwdriver. Figure E
o Place the support leg next to the Vanity Drawer. Line up the the preinstalled insert nut holes
with the holes in the end panel of the drawer console. Figure E
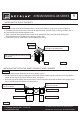
o Using the connecting bolts attach the support leg to the Vanity Drawer. Only 2 connecting bolts will be
used. At the bottom of the Vanity Drawer there are 3 screw holes (below the T-nut holes) Install screws
into the support leg using a cordless screwdriver. Figure E
INSTALLING A DRAWER CONSOLE AND THE SUPPORT LEG TO THE VANITY