
Instructions / Assembly
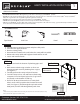
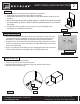
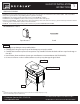
Table Of Contents

Customer Service: 561-274-2110
www.decolav.com
LET YOUR DREAMS COME ALIVE, YOUR PASSIONS
BECOME REALITY, BE THE ENVY OF YOUR NEIGHBORS
®
2
•191010•
VANITY INSTALLATION INSTRUCTIONS
STEP #3
o Install countertop and sink per manufacturers instructions.
o Knobs/pulls are located inside the vanity for shipping.
o Attach knobs/pulls in the pre-drilled holes on the doors/drawers with the screws
provided.
o NOTE: SINK NOT INCLUDED ON SOME MODELS, COUNTER TOP NOT INCLUDED
ON SOME MODELS, FAUCET, WATER SUPPLIES, DRAIN AND WASTE SYSTEM NOT
INCLUDED.
o Install faucet, water supplies, drain and waste system according to the
manufacturer’s installation instructions.
HINGE ADJUSTMENT
o The rear screw will move the door closer to the end panel or away from the
end panel. If the door is rubbing the end panel, use this adjustment screw.
Remember to adjust both hinges on the door for the desired clearance.
o To get the doors even across the top and bottom edges of the doors use the
side to side adjustment screw. Remember to adjust both hinges on the door
for the correct position.
o Doors were adjusted at the factory prior to shipping but due to the variances
in home walls and oors the hinges may need slight adjustment.
Side to Side Adjustment
Front to back adjustment
Figure C
Figure D
Attaching the Legs
o Remove the legs from the package.
o Position Leg over the pre-bored screw hole.
o Using the supplied screws attach the leg to the bottom of the vanity.
o Repeat for the remaining legs.
Leg
Washer
Screw
Figure E