
Full Product Manual

8
THINGS TO KNOW BEFORE YOU BEGIN!
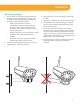
1 . The camera should be installed between 8 to 13ft above the area to be monitored.
2 . For best results install the camera NO MORE than 100ft away from the monitor’s position to maintain a
strong signal between the camera and monitor.
3 . Before mounting the camera, ensure there are no obstructions in the camera’s view.
4 . Place the camera in the most strategic place where it can provide the most detailed video of your home or
business. Having the camera in the open for people to see can help deter criminals.
5 . To cover large, dark areas such as backyards, garages, and driveways, place camera in a strategic
location, such as on the roof or deck. This way, more area is covered by the camera.
6 . Ensure that the camera is positioned to avoid glare. Be sure to position camera away from direct sunlight or
indoor lighting.
7 . For best results, light in front of the camera should be around the same brightness as the light around the
area or object being monitored.
8 . Decide whether the camera will be wall-mounted, or mounted on a desk/table top. We recommend that
the mount is secured using the included screws and hardware for all installations.
INITIAL SET UP
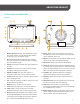
Monitor Camera(s)
CamViewSleep Zoom DeleteMenu
OK
1
3
4
2
• Plug in the power cord labeled for the monitor
into the DC port on back of the monitor
• Plug the other side of the power cord into a
power outlet
• Press and hold the power button on the top right
of the monitor to turn the unit on.
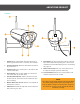
• Plug the cord labeled for Camera
into the camera
• Plug the other side of the power cord into
a power outlet
• Attach the antenna
• Pair cameras if not paired upon powering
the camera
INSTRUCTION