PHOENIXM2 User Manual 1
IMPORTANT! PLEASE READ DO NOT RETURN THIS PRODUCT TO THE STORE Please contact a DEFENDER® customer support representative first regarding any additional information on product features, specifications or assistance with setup. Please contact us via one of the methods below: Contact us form: www.defender-usa.com/contact Online web chat: www.defender-usa.com WARRANTY INFORMATION We take quality very seriously.
IMPORTANT! PLEASE READ THANK YOU You’ve made a fine choice to protect what you value most. FCC This Device Compiles with part 15 of the FCC Rules Operation is subject to the following two conditions: (1) this device may not cause harmful interference, and (2) this device must accept any interference received, including interference that may cause undesired operation FCC note: the manufacturer is not responsible for any radio or tv interference caused by unauthorized modifications to the equipment.
TABLE OF CONTENTS IMPORTANT! PLEASE READ DO NOT RETURN THIS PRODUCT TO THE STORE.........................................................................................................................................2 WARRANTY INFORMATION........................................................................................................................................................................2 WARRANTY TERMS.......................................................................................
ABOUT YOUR PRODUCT FEATURES Digital Wireless Technology: Superior digital frequency with a wireless range up to 150 feet (optimal range) that ensures clear video and audio. The convenience of a digital wireless signal also allows you to set your system up in just a matter of minutes. Motion Detection Settings: Motion detection gives you the option to record only when movement is detected to conserve your SD card memory. Your system will start recording and alert you when motion is detected.
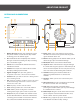
ABOUT YOUR PRODUCT BUTTONS AND CONNECTIONS Monitor 1 5 2 3 16 4 17 cam 1 18 6 7 0707/ 01 / 17/ 2015 / 2017 8 Cam View Sleep 19 1112 : 45 : 45 : 08 : 08 Zoom Delete DC IN 5V Menu 1 4 OK 2 3 9 10 11 12 13 14 15 20 21 1. Motion Record: Prompts the monitor to record only when motion is detected. To stop motion recording, press this button again. 12. Zoom: While in live view mode, pressing zoom will allow 1X zoom on the picture. Pressing zoom again will zoom back out. 2.
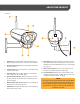
ABOUT YOUR PRODUCT Camera 1 3 4 2 PAIR 8 9 7 10 5 6 1. Antenna: This removable antenna allows for a better signal between the camera and monitor. 2. Camera Housing: Made of anodized aluminum to prevent rust. 8. Pair Button: Located at the back of the camera. Press this button when pairing the camera and monitor. For more information, please see Pairing on page 18. 3. Camera Lens: The camera lens is located in the center of the LEDs. 9. Power Connection: This 6 ft.
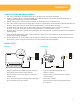
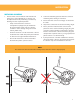
INSTRUCTION THINGS TO KNOW BEFORE YOU BEGIN! 1. The camera should be installed between 8 to 13ft above the area to be monitored. 2. For best results install the camera NO MORE than 100ft away from the monitor’s position to maintain a strong signal between the camera and monitor. 3. Before mounting the camera, ensure there are no obstructions in the camera’s view. 4. Place the camera in the most strategic place where it can provide the most detailed video of your home or business.
INSTRUCTION INSTALLING CAMERAS 1. Decide if the camera will be wall-mounted or sitting on a desk/tabletop. The camera can be adjusted for many mounting scenarios by rotating it to the required position. • Keep in mind that the camera is microphone equipped. If you would like to record audio, make sure the camera is within a close enough range to record sound (within 6 ft).
INSTRUCTION RECORD Setting Duration for Motion Record Allows you to set the length of time the unit will record once motion is no longer being detected. 1. Press the Menu button 2. Select Record 3. Select Duration 4.
INSTRUCTION Accessing the Record Schedule 1. Press the Menu button 2. Select Record 3. Select Schedule Recording 4.
INSTRUCTION Understanding the Schedule Screen 1 2 3 4 5 1. Day of the week: Use the LEFT or RIGHT navigation arrow keys on the joystick to change the day at the top. Corresponding record schedule for that day will appear below. 2. Time: The record schedule uses a 24 hour clock. 3. Camera: Each camera can have a different record schedule. 4. Record schedule: • Grey - No recording has been set for that time • Blue - Continuous record has been set for that time.
INSTRUCTION Setting up Schedule Record 1. Press the Menu button 2. Select Record 3. Select Schedule Recording 4.
INSTRUCTION SETTING EACH CAMERA(S) FOR SCHEDULE RECORDING 1 2 3 4 5 1. Camera: To select the camera you would like to set up a Record Schedule for, use RIGHT or LEFT navigation arrows to move the Green box over the desired camera(s). Select OK to select each camera you wish to set a Record Schedule for. When selected, the box will turn Blue. 2. Setting the Time: Use the navigation arrows until the Green box is around the time you would like to change.
INSTRUCTION Setting Motion Record To enable Motion Recording, select the Motion button on the top of the screen. You will now see a Red moving man icon . The camera will now start recording when motion is detected. NOTE: If Scheduled Recording is set up and motion is enabled, the unit will record based on the Scheduled Recording by default. Setting Sensitivity for Motion Detection 1. Press the Menu button 2. Select Detect 3. Select the camera(s) you would like to set the sensitivity level for.
INSTRUCTION NOTE: The higher the sensitivity level the farther the motion will be detected. The lower the sensitivity, the closer the monitor will pick up 5. Select the desired sensitivity level 5. Select OK and you will return to the Video Motion Detect page 6. Select OK and you will return to the Video Motion Detect page NOTE: The higher the sensitivity level the farther the motion will be detected.
INSTRUCTION 3. Select File Overwrite 4. Select Yes to confirm the overwrite or No, to return to the Record Menu NOTE: If File Overwrite is not enabeled and the SD card becomes full, recording will stop. CAMERA OPTIONS Pairing Cameras Connecting the camera and monitor will allow the camera live feed screen and recorded to the SD card. If you have purchased an additional camera it is necessary to follow the pairing process.
INSTRUCTION 3. Select Pairing 4. Select which camera you would like to pair and the pair screen will appear with a 30 second count down cam 1 PAIR 07 / 01 / 2015 5. Using the thin white pairing tool, push the pairing button on the back of camera before time runs out 11 : 45 : 08 6.
INSTRUCTION Turning Cameras On/Off 1. Press the Menu button 2. Select Camera 3. Highlight which camera you would like to turn On or Off 4.
INSTRUCTION 5. Select OK to confirm the selection 6. You will see a Please Wait message. When complete you will return to the Camera Setup page Adjusting Camera Brightness 1. Press the Menu button 2.
INSTRUCTION 3. Select Brightness 4. Using the LEFT or RIGHT navigation arrows, highlight the camera you would like to adjust and change the Brightness 5. When the desired camera is highlighted in Blue press the RIGHT or LEFT navigation arrows until you reach the desired brightness level (1 low - 6 High) 6.
INSTRUCTION Changing the Camera Resolution The Frames Per Second can vary depending on the number of cameras paired with the unit. Please see the chart after the steps to understand the frames per second ratio and the changes to the frames per second when connecting more than one camera. 1. Press the Menu button 2. Select Camera 3. Select Resolution 4.
INSTRUCTION 5. When the desired camera is highlighted in Blue, use the LEFT or RIGHT navigation arrows to change the Resolution 6. Press OK to save the settings and you will return to the Camera Setup Page Frames per second ratio: Number of Cameras QVGA VGA 1 Camera N/A 30 fps 2 Camera 30 fps 15 fps 3 Camera 30 fps 7.5 fps 4 Camera 30 fps 7.
INSTRUCTION MONITOR SETTINGS Setting the Date and Time 1. Press the Menu button 2. Select Settings 3. Select Date and Time 4.
INSTRUCTION 5. When highlighted, use the UP or DOWN navigation arrows to make changes 6. Press OK to save the setting and you will return to the Settings page Returning to Default Settings 1. Press the Menu button 2.
INSTRUCTION 3. Select Default Settings, press OK 4. Select Yes if you wish to set Default Settings or No to return to the Settings page NOTE: This will change the monitor back to the default settings. It will not delete footage from the SD card 5. If Yes is selected you will see a "Restore Default Settings" message. Select Yes to confirm.
INSTRUCTION Formatting Memory 1. Press the Menu button 2. Select Settings 3. Select Format Memory 4.
INSTRUCTION NOTE: Formatting the memory will delete the recorded footage from the SD Card, it will not change the settings 5. If you Select Yes, "Formatting Please Wait" will appear. The screen will return to the Settings page Changing the Time Zone 1. Press the Menu button 2.
INSTRUCTION 3. Select Time Zone 4. Use UP or DOWN navigation arrows to choose the desired Time Zone. Select the correct Time Zone and you will return to the Settings page Daylight Savings 1. Press the Menu button 2.
INSTRUCTION 3. Select Time Zone 4. Use the RIGHT navigation arrow to highlight the Box next to Automatically adjust Clock for Daylight Savings Time 5. Use the UP navigation arrow until the Check mark appears. This will allow Daylight Savings Time to occur at the appropriate time. Leave the box blank if you do not wish for the time to change when Daylight Savings Time occurs 6.
INSTRUCTION Firmware Update 1. Insert the SD card into the included adapter 2. Insert the adapter into the SD card reader (not included) on your PC or Mac NOTE: A firmware Update should only be applied if available and recommended by a Defender representative. 1 Cam View Sleep Zoom Delete Menu 4 OK 2 3 3. Download the latest firmware and transfer it to the Main Folder on the SD card 4.
INSTRUCTION 5. Press the Menu button 6. Select Settings 7. Select Firmware Upgrade 8.
INSTRUCTION CAUTION: During the firmware update do not remove the power supply 9. Select SD Card, and Yes to confirm. The system will take a few minutes to install the latest firmware. After upgrading the new Firmware, the monitor will automatically reboot Setting Alert An alarm will sound from the unit to alert you when motion has been detected. This also controls the beeps from the monitor when pressing buttons 1. Press the Menu button 2.
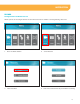
INSTRUCTION 3. Use the LEFT or RIGHT navigation arrows to set Alarm Volume 4. Press OK to save the setting and return to the Main Menu page Playback Recorded Files 1. When in Live Viewing Mode, select the OK button. The Recording File List (below) will appear a b 2. Once you have selected the date from which you would like to view files, a list of files will appear c a. Date: You can change the date by using the UP or DOWN navigation arrows. Select OK when the desired date has been found. b.
8X 16X 8X 16X INSTRUCTION When watching videos you have the following options: 07 / 01 / 2015 a 1 11 : 45 : 08 b 2 Cam View Sleep Zoom Delete Menu OK c 3 d 4 5e a. UP arrow/1: Pause b. RIGHT arrow/2: Fast Forward 3. Use the UP and DOWN navigational arrows until the Red box is around the desired file, then select OK. The recording will play on screen. 9 10 11 12 c. DOWN arrow/3: Stop d. LEFT arrow/4: Rewind 13 e. Menu button/5: Exit back to file list Deleting Individual Recorded Files 1.
TROUBLESHOOTING No Picture/Signal • Make sure all the connections are secure and properly connected. Found on page 8 • Make sure your monitor is plugged into a power source from the 5V DC input on the back. Found on page 8 • Make sure there is nothing obstructing the view of the camera. • Try re-pairing the camera and monitor. Found on page 17 • The area may be too bright or dark, try moving the unit.
SPECIFICATIONS Monitor Monitor Type Screen Size Wireless Frequency Channel Frequencies Number of Cameras Supported Output Terminal Resolution Speaker Maximum SD Card Size Compression File Type Operation Mode Scheduled Recording Automatic Overwrite when Full Motion Activated Alert Post Motion Recording Audio Activated Recording Digital Zoom Auto-Scanning Camera LCD Monitor 7" monitor 2400Mhz~2483.
www.DEFENDER-USA.