
Product Manual
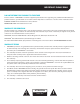
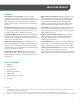

BUTTONS AND CONNECTIONS
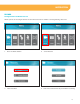
Monitor
Cam View Sleep Zoom Delete Menu
OK
1
3
4
2
1
5
6
7
8
9 10 11 12 13 14 15
2 3 4
07 / 01 / 2015 11 : 45 : 0807 / 17 / 2017 12 : 45 : 08
cam 1
DC IN 5V
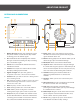
19
20
16 17
21
18
1 . Motion Record: Prompts the monitor to record
only when motion is detected. To stop motion
recording, press this button again.
2 . Rec: Manual Record will prompt the monitor
to begin constant recording. To stop recording,
press this button again.
3 . Power: Press and hold this button to turn the
monitor on and off.
4 . Volume: This adjusts the volume of the audio
that plays through your monitor.
5 . Signal strength: Tells you how good the
reception is from the camera to the monitor.
6 . Camera: Tells you which camera is being shown
in live viewing mode.
7 . File: If the file symbol is visible it means you have
recorded footage stored. If the icon is red, this
means the card is full.
8 . Date: Displays current date and time.
9 . Cam: Changes from one camera to another.
10. View: Allows you to change the cameras
viewing from single, split screen or quad view.
11. Sleep: When pressed allows the monitor screen
to turn off until motion is detected in front of the
camera(s). Once motion is detected in front of
the camera the monitor will turn back on.
12. Zoom: While in live view mode, pressing zoom
will allow 1X zoom on the picture. Pressing zoom
again will zoom back out.
13. Delete: During playback this button allows you to
delete single clips of recorded footage.
14. Menu/Exit: Enters and exits the Main Menu.
15. Joystick: Allows movement to navigate through
the menu. Pressing the joystick in will allow you to
select the menu option. In Live view press the joy
stick in to enter the Recording File List Menu.
16. Antenna: Raising the antenna allows for a
stronger signal between the camera and
monitor.
17. Speaker: Allows you to hear sound from your
camera.
18. SD Card Insert: The SD card will be inserted into
this area to record and save footage.
19. Talk: Allows for two-way communication,
pressing this button allows you to speak through
the monitor to the camera.
20. Power Input: Plug the small end of the included
power adapter marked monitor into this area,
and the other end to a power outlet.
21. Reset: Using a paper clip press and hold the
reset button to restore factory settings.
ABOUT YOUR PRODUCT