Unpacking Your Printer 1. Select a location for your printer. l Leave enough room to open the printer tray, covers, doors, and options. It is also important to allow enough space around the printer for proper ventilation.
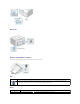
Rear View Operator Panel Button Functions The operator panel on the top right side of your printer has two LEDs and one button. LEDs LED Description The operator panel LEDs signify different things, depending on their sequence. LEDs that are off, on, and/or blinking indicate printer conditions, such as printer status, intervention (for example, out of paper and jammed paper), or service. For more information on what the LEDs sequence means and what you can do, see "Understanding the Operator Panel LEDs".
Manual feeding Press each time you load a sheet of paper in the tray, when you select Manual Feed for Source from your software application. For detailed information, see "Using Manual Feed Mode". To cancel a print job Press during printing. blinks red while the print job is cleared from both the printer and the computer, and the printer then returns to Ready mode. This may take some time depending on the size of the print job.
5. Unfold the toner cartridge handle and grasp it. Insert the cartridge into the printer until it snaps into place. 6. Close the front cover. Make sure that the cover is securely closed. If the cover is not firmly closed, printing errors may occur. NOTE: When printing text at 5% coverage, you can expect a toner cartridge life of approximately 1,000 pages for the starter toner cartridge that is shipped with the printer (2,000 pages for a standard toner cartridge).
Make sure that all four corners are flat in the tray. 4. Be careful not to overload the paper tray. Overloading may cause paper jams. 5. Squeeze the length guide and slide it until it lightly touches the end of the paper stack. Squeeze the width guide and move it toward the stack of paper until it lightly touches the side of the stack. NOTE: Improper adjustment of paper guides can result in paper jams.
CAUTION: Do not disassemble the printer when it is powered on. If you do, it may give you an electric shock. To power on the printer: 1. Plug one end of the power cord into the power cord connector at the back of the printer and the other end into a properly grounded outlet. 2. Press the power switch to power on the printer. Printing a Demo Page Print a demo page to make sure that the printer is operating correctly. 1. Wait approximately 30 seconds for the printer to warm up, then press and hold 2.
Finding Information What Are You Looking For? • Drivers for my printer • My User's Guide Find It Here Drivers and Utilities CD You can use the Drivers and Utilities CD to install/uninstall/reinstall drivers and utilities or to access your User's Guide. For details, see "Software Overview". Readme files may be included on your Drivers and Utilities CD to provide last-minute updates about technical changes to your printer or advanced technical reference material for experienced users or technicians.
Maintenance Cleaning Your Printer Maintaining the Toner Cartridge Ordering Supplies Cleaning Your Printer To maintain print quality, follow the cleaning procedures below, each time the toner cartridge is replaced or if print quality problems occur. NOTE: Do not touch the transfer roller located under the toner cartridge when cleaning inside the printer. Oil from your fingers may cause print quality problems.
CAUTION: Do not touch the transfer roller inside the printer. Oil from your fingers may cause print quality problems. 5. Reinsert the toner cartridge and close the front cover. 6. Plug in the power cord and power the printer on. Maintaining the Toner Cartridge Storing the Toner Cartridge Store the toner cartridge in the original packaging until you are ready to install it.
Redistributing Toner When the toner cartridge is near the end of its life, white streaks or light printing occur. on the printer's operator panel lights orange. Gently shake the toner cartridge from side-to-side 5 or 6 times to distribute the toner evenly and temporarily improve print quality. 1. Open the front cover. 2. Gently pull the toner cartridge out, being careful not to scratch against printer, and lift it up and away from the printer.
2. Pull the used toner cartridge out and lift it up and away from the printer. CAUTION: Avoid reaching too far into the printer. The fusing area may be hot. 3. Unpack a new toner cartridge. Hold the cartridge carefully and gently shake it from side-to-side 5 or 6 times to distribute the toner. NOTE: If toner comes into contact with your clothing, wipe the toner off with a dry cloth and wash your clothing in cold water. Hot water sets toner into fabric.
6. Unfold the toner cartridge handle and grasp it. Insert the cartridge into the printer until it snaps into place. 7. Close the front cover. Make sure that the cover is securely closed. If it is not firmly closed, printing errors may occur. Ordering Supplies You can order supplies using the Dell™ Toner Management System or by contacting Dell at www.dell.com/supplies.
Paper Handling Print Media Guidelines Verifying the Output Location Loading Print Media in the Paper Tray Using Manual Feed Mode Printing on Special Materials Print Media Guidelines Printer media includes paper, card stock, transparencies, labels, and envelopes. Your printer provides high quality printing on a variety of print media. Selecting the appropriate print media for your printer helps you avoid printing problems. To get the best possible print quality, use only high-quality, copier-grade paper.
l Store unused materials at temperatures between 15°C and 30oC (59°F to 86°F). The relative humidity should be between 10% and 70%. l During storage, you should use moisture-proof wrap, such as a plastic container or bag, to prevent dust and moisture from contaminating your paper. l Load special paper types one sheet at a time. l Only use materials specifically recommended for use with laser printers.
NOTE: If you print many pages, the surface of the output tray may become hot. Be careful not to touch the surface, and especially keep children away from the surface. NOTE: The paper output tray can hold up to 50 sheets of paper. Remove the pages so that the tray does not become overloaded. Loading Print Media in the Paper Tray Proper paper loading helps prevent paper jams and ensures trouble-free printing. Do not remove the paper in the tray while a job is printing. Doing so may cause a paper jam.
Adjust the paper length and width guides against the print material without bending it. 2. To print a document in Manual Feed mode, you must select Manual Feed for Source from the software application, and then select the appropriate paper size and type. For details, see "Paper Tab". 3. Press on the printer's operator panel to start feeding. Printing starts. NOTE: If you don't press the button after a pause, the paper will be automatically fed into the printer. 4.
NOTE: To prevent labels from sticking to each other, do not let the printed label sheets stack up as they are printed out. l Load a transparency in the tray with the side to be printed on facing up, and the top with the adhesive strip inserted first. NOTE: To prevent transparencies from sticking to each other, do not let the printed sheets stack up as they are printed out. NOTE: Place transparencies on a flat surface after removing them from the printer.
Printing Printing a Document Fitting Your Document to a Selected Paper Size Printer Settings Printing a Reduced or Enlarged Document Printing Multiple Pages on One Sheet of Paper Printing Posters Using Watermarks Using Overlays Printing on Both Sides of Paper (Manual Duplex) Setting Up a Locally Shared Printer Printing a Document The driver provided with your printer allows a wide variety of options.
Press . In Manual Feed mode, you can't cancel a print job by pressing . Your printer finishes printing the page that is moving through the printer and deletes the rest of the print job. Pressing than one print job is in the printer's memory, you need to press once for each job. cancels only the current job. If more To stop a print job from the Printers folder: NOTE: You can access this window simply by double-clicking the printer icon at the bottom right corner of the Windows desktop. 1.
options, such as Multiple Pages per Side and Poster. See step 3 in "Printing a Document" for more information on accessing printer properties. Property Orientation Description Orientation allows you to select the direction in which information is printed on a page. • Portrait prints across the width of the page, letter style. • Landscape prints across the length of the page, spreadsheet style. If you want to rotate the page 180-degrees, select 180 from the Rotate drop-down list.
Source Make sure that Source is set to the appropriate paper input mode. The Manual Feed source is used when printing on special materials. You need to load one sheet at a time into the paper tray. See "Using Manual Feed Mode". If the paper source is set to Auto Select, the printer automatically picks up print materials from the paper tray. Type Make sure that Type is set to Printer Default. If you load a different type of print material, select the corresponding paper type.
TrueType Options This option determines what the driver tells the printer about how to print the text in your document. Select the appropriate setting according to the status of your document. This option is available only when you use Windows 98. • Download as Bit Image: When this option is selected, the driver downloads the font data as bitmap images. Documents with complicated fonts, such as Korean or Chinese, or various other fonts, will print faster in this setting.
If you access printer properties through the Printers folder, you can view the Printer tab. You can adjust the printer configuration. 1. Click the Windows Start menu. 2. For Windows 98/Me/2000, select Settings and then Printer. For Windows XP, select Printers and Faxes. 3. Select the Dell Laser Printer 1100 icon. 4. Right-click on the printer icon and select Properties. 5. Click the Printer tab and set the options.
You can also restore the printer driver's default settings by selecting Printer Default from the list. Using Help Your printer has a help screen that can be activated by the Help button in the printer's properties window. These help screens give detailed information about the printer features provided by the printer driver. You can also click from the upper right hand corner, and then click on any setting.
3. Configure the poster option: You can select the page layout from 2x2, 3x3, or 4x4. If you select 2x2, the output will be automatically stretched to cover 4 physical pages. Specify an overlap in millimeters or inches to make it easier to reconstruct the resulting poster. 4. Click the Paper tab and select the paper source, size, and type. 5. Click OK and print the document.
1. To change the print settings from your software application, access printer properties. See step 3 in "Printing a Document". 2. From the Layout tab, select the paper orientation. 3. From the Double-sided Printing section, select either None, Long Edge, or Short Edge. 4. Click the Paper tab and select the paper source, size, and type. 5. Click OK and print the document. The printer prints every other page of the document first.
Printing a Reduced or Enlarged Document You can scale your print job on a page. 1. To change the print settings from your software application, access printer properties. See step 3 in "Printing a Document". 2. From the Paper tab, select Reduce/Enlarge from the Type drop-down list. 3. Enter the scaling rate in the Percentage input box. You can also click the or button. 4. Select the paper source, size, and type in Paper Options. 5. Click OK and print the document.
Creating a Watermark 1. To change the print settings from your software application, access printer properties. See step 3 in "Printing a Document". 2. Click the Extras tab and click Edit in the Watermark section. The Edit Watermark window appears. 3. Enter the text message you want to have printed in the Watermark Message box. The message displays in the preview image window. The preview image is provided so that you can see how the watermark will appear on the printed page.
Creating a New Page Overlay To use a page overlay, you must create a new page overlay containing your logo or image. 1. Create or open a document containing text or an image for use in a new page overlay. Position the items exactly as you wish them to appear when printed as an overlay. If needed, save the file for later use. 2. To change the print settings from your software application, access printer properties. See step 3 in "Printing a Document". 3.
If you have stored the overlay file you want to use on an external source, such as a CD or floppy disk, you can also load the file from that source when you access this Load Overlay window. After you select the file, click Open. The file is now shown in the Overlay List box and is available for printing. Select the overlay from the Overlay List box. 6. If necessary, select Confirm Page Overlay When Printing checkbox.
4. Click Start and select Printers from Settings. Double-click your printer name. 5. Click Properties in the Printer menu. 6. Click the Sharing tab and check the Shared As box. Fill in the Share Name field and then click OK. Setting Up the Client Computer 1. Right-click the Start button and select Explore. 2. Open your network folder in the left column. 3. Right-click the shared name and click Capture Printer Port. 4.
Regulatory Notices Electromagnetic Interference (EMI) is any signal or emission, radiated in free space or conducted along power or signal leads, that endangers the functioning of a radio navigation or other safety service or seriously degrades, obstructs, or repeatedly interrupts a licensed radio communications service.
Class A This equipment has been tested and found to comply with the limits for a Class A digital device pursuant to Part 15 of the FCC Rules. These limits are designed to provide reasonable protection against harmful interference when the equipment is operated in a commercial environment. This equipment generates, uses, and can radiate radio frequency energy and, if not installed and used in accordance with the manufacturer's instruction manual, may cause harmful interference with radio communications.
l EN 61000-3-2 — "Electromagnetic Compatibility (EMC) - Part 3: Limits - Section 2: Limits for Harmonic Current Emissions (Equipment Input Current Up to and Including 16 A Per Phase)." l EN 61000-3-3 — "Electromagnetic Compatibility (EMC) - Part 3: Limits - Section 3: Limitation of Voltage Fluctuations and Flicker in Low-Voltage Supply Systems for Equipment With Rated Current Up to and Including 16 A." l EN 60950-1 — "Safety of Information Technology Equipment.
BSMI Notice (Taiwan Only) If you find a or mark on the regulatory label on the bottom, side, or back panel of your Printer, the following section is applicable: NOM Information (Mexico Only) The following information is provided on the device(s) described in this document in compliance with the requirements of the official Mexican standards (NOM): Exporter: Dell Inc. One Dell Way Round Rock, TX 78682 Importer: Dell Computer de México, S.A. de C.V. Paseo de la Reforma 2620 - 11° Piso Col.
Avenida Soles No. 55 Col. Peñon de los Baños 15520 México, D.F. Model number: Dell Laser Printer 1100 Supply voltage: 110~127 VAC Frequency: 50 Hz/60 Hz Current Consumption: 4.0 Arms Output voltage: +5 VDC, +24 VDC Output current: 0.8 Arms(+5 VDC), 1.
Software Overview After setting up your printer and connecting it to your computer, you must install the drivers and utilities from the Drivers and Utilities CD included with your printer. If you purchased a Dell™ computer and your printer at the same time, the drivers and utilities are automatically installed. You don't need to install them. The Drivers and Utilities CD contains the following: l Dell Printer Driver– allows your computer to communicate with your printer.
To choose an individual component to install, select Custom Installation. You can also change the destination folder. 5. When the installation has been completed, you may print a test page. Click Finish to complete the installation and close the wizard. You are now ready to print. Uninstalling Software You should remove the printer driver if you are upgrading the software or if your driver installation fails. You can remove the software using the Drivers and Utilities CD or the Windows uninstall.
Specifications Printer Specifications Paper Specifications Printer Specifications Item Specifications and Description Print Speed Up to 14 ppm in A4 (15 ppm in Letter) Resolution 600 x 600 dpi First Printing Time 10 seconds Warm-up Time 30 seconds Power Rating AC 110~127 V (USA, Canada) / 220~240 V (Others), 50 / 60 Hz Power Consumption 300 W average during operation / Less than 6 W in sleep mode Acoustic Noise Stand by: Less than 30 dB; Printing: Less than 50 dB; Sleep mode: Background nois
Supported Sizes of Paper Paper Dimensionsa Weight Capacityb • 60 to 90 g/m²ond (16 to 24 lb) for the paper tray • 60 to 163 g/m² bond (16 to 43 lb) for manual feed mode • 150 sheets of 75 g/m² bond (20 lb) paper for the paper tray Plain Paper Letter 8.5 x 11 in. (216 x 279 mm) A4 8.27 x 11.7 in. (210 x 297 mm) A5 5.83 x 8.27 in. (148 x 210 mm) Executive 7.25 x 10.5 in. (184.2 x 266.7 mm) Legal 8.5 x 14 in. (215.9 x 355.6 mm) JIS B5 7.17 x 10.1 in. (182 x 257 mm) ISO B5 6.93 x 9.84 in.
The following problems may cause print quality deviations, jamming, or even damage to the printer: Symptom Problem with Paper Solution Poor print quality or toner adhesion, problems with feeding Too moist, too rough, too smooth, or embossed; faulty paper lot Try another kind of paper, between 100-400 Sheffield, 4%~5% moisture content. Dropout, jamming, curl Stored improperly Store paper flat in its moisture-proof wrapping.
l The best way to store an opened ream of paper is to rewrap it tightly in its moisture-proof wrapping. If the printer environment is subject to extremes, unwrap only the amount of paper to be used during the day's operation to prevent unwanted moisture changes.
Dell™ Laser Printer 1100 User's Guide Click the links to the left for information on the features, options, and operation of your printer. For information on other documentation included with your printer, see "Finding Information". To order replacement toner cartridges or supplies from Dell: 1. Double-click the Dell Toner Reorder Program icon on your desktop. OR 2. Visit Dell's website, or order Dell printer supplies by phone. www.dell.
Troubleshooting Clearing Jams in the Paper Tray Understanding the Operator Panel LEDs Troubleshooting Checklist Solving General Printing Problems Solving Print Quality Problems Clearing Jams in the Paper Tray Occasionally, paper jams during a print job. Some causes could be: l The tray is overfilled. l The front cover or top cover has been opened during a print job. l The adjustable paper guides are not properly positioned. l Paper that does not meet paper specifications has been used.
NOTE: Failed pages will not reprint. Reprint the failed pages. 2. If you cannot see the paper in the output tray or the paper does not move when pulled, stop pulling and open the top cover and the inner cover. CAUTION: The top and inner cover themselves may also be hot due to the heat roller(located underneath the inner cover). Allow the printer to cool before opening the covers. 3. Loosen the paper if it is caught in the heat roller. Then remove the paper by gently pulling it out.
Fuser Area Jam NOTICE: The fuser area is hot. Take care when removing paper from the printer. 1. Open the front cover. 2. Gently pull the toner cartridge out, being careful not to scratch against the printer, and lift it up and away from the printer. 3. Remove the paper by gently pulling it toward you. 4. Check that there is no other paper in the printer. 5. Reinstall the toner cartridge and close the front cover. Your printer resumes printing the document from failed pages.
l Do not mix paper types in the paper tray. l Use only recommended print materials. See "Paper Specifications". l Ensure that the recommended print side of print materials is facing up in the paper tray. Understanding the Operator Panel LEDs The operator panel LEDs signify different things, depending on their sequences. LEDs that are off, on, and/or blinking indicate printer conditions such as printer status, intervention (for example, out of paper and jammed paper), or service.
Check Suggested Solutions Check the power cord and the power switch. Check the power source by plugging into another outlet. Make sure that In Ready mode, Press and hold demo page. is on. to print a lights green. If lights or blinks green, go to "Understanding the Operator Panel LEDs". • If a demo page does not print, check the paper supply in the paper input tray. • If the paper jams in the printer, go to "Clearing Jams in the Paper Tray". Check the demo page to see if it is printed correctly.
printer. See "Paper Specifications". The printer prints, but the text is wrong, garbled, or incomplete. Pages print, but are blank. There may be debris inside the printer. Open the front cover and remove the debris. The printer cable is loose or defective. Disconnect the printer cable and reconnect. Try a print job that you have already printed successfully. If possible, attach the cable and printer to another computer and try a print job that you know works. Finally, try a new printer cable.
• A single sheet of paper may be defective. Try reprinting the job. • The moisture content of the paper is uneven or the paper has moist spots on its surface. Try a different brand of paper. See "Paper Specifications". • The paper lot is bad. The manufacturing process can cause some areas to reject toner. Try a different kind or brand of paper. • The toner cartridge may be defective. See "Vertical repetitive defects". • If these steps do not correct the problems, contact a service representative.
• Check the paper type and quality. Both high temperatures and humidity can cause paper curl. See "Paper Specifications". • Turn over the stack of paper in the paper tray. Also try rotating the paper 180° in the paper tray. Wrinkles or creases • Ensure that the paper is loaded properly. • Check the paper type and quality. See "Paper Specifications". • Turn over the stack of paper in the paper tray. Also try rotating the paper 180° in the paper tray.