Dell™ 5130cdn Color Laser Printer User's Guide Before Beginning Dell™ 5130cdn Color Laser Printer User's Guide Finding Information About the Printer Setting Up the Printer (Printer Setup) Prepare Printer Hardware Install Optional Accessories (if applicable) Connect Printer to Computer or Network Perform Initial Settings Install Printer Drivers on the Windows Computers Install the PPD File on Macintosh Computers Using Your Printer Dell Printer Configuration Web Tool Know Your Printer Printer Settings Unders
As for RSA BSAFE RSA BSAFE software, produced by RSA Security Inc., has been installed on this printer. ____________________ UNITED STATES GOVERNMENT RESTRICTED RIGHTS This software and documentation are provided with RESTRICTED RIGHTS. Use, duplication, or disclosure by the Government is subject to restrictions as set forth in subparagraph (c)(1)(ii) of the Rights in Technical Data and Computer Software clause at DFARS 252.227-7013 and in applicable FAR provisions: Dell Inc.
Back to Contents Page Dell™ 5130cdn Color Laser Printer User's Guide Click the links to the left for information on the features, options, and operation of your printer. For information on other documentation included with your printer, see "Finding Information." To order replacement toner cartridges or supplies from Dell: 1. Double-click the icon on your desktop. If you cannot find the icon on your desktop, follow the procedure below. a. Click DLRMM.
Back to Contents Page Finding Information NOTE: The following are options you can buy separately. USB cable Ethernet cable Parallel cable Wireless adapter 550-sheet feeder 1100-sheet feeder Hard disk Upgradable Memory Module Output Expander What are you looking for? Find it here Drivers and Utilities CD Drivers for my printer My User's Guide The Drivers and Utilities CD contains Setup Video, Maintenance Video, documentation, and drivers for your printer.
CAUTION: Read and follow all safety instructions in your Product Information Guide prior to setting up and operating your printer. Setup diagram How to set up my printer Troubleshooting "Troubleshooting" Express Service Code and Service Tag The Express Service Code and Service Tag are located on the right side of the toner cartridge inside the front cover and on the rear cover of your printer. See the Dell Support website at support.dell.
Back to Contents Page About the Printer Front, Side, and Back View Operator Panel Securing the Printer Ordering Supplies The following illustrations show the standard Dell™ 5130cdn Color Laser Printer and some optional accessories.
Right View 1 Duplexer 2 Right Hand Cover Handle 3 Multipurpose Feeder (MPF) 4 Power Switch 5 Transfer Roller 6 Fuser Left View Output Expander (optional) 1 Stacker Tray 2 H Transport Unit 3 Knob Rear View 4 Stapler Cartridge
1 Control Board Cover 2 Ethernet Port 3 Wireless Adapter Socket 4 USB Port 5 Parallel Port 6 Power Connector for Main Unit 7 Power Connector for Output Expander 8 Control Board NOTE: When you use the printer with the MPF opened, do not locate the printer in direct sunlight. Doing so may cause a malfunction or unnatural screen image. Provide enough room to open the printer tray, covers, and option. It is also important to allow space around the printer for proper ventilation.
For details, see the operating instructions supplied with the Kensington lock. Ordering Supplies You can order consumables from Dell on the Internet when using a networked printer. Enter the IP address of your printer in your web browser, launch the Dell Printer Configuration Web Tool, and click the Order Supplies at: to order toner for your printer. You can also order toner cartridges by the following method: 1.
Back to Contents Page Prepare Printer Hardware Removing Tape Removing the Drum Ribbons Installing the Toner Cartridges Loading Paper Removing Tape 1. Remove the tape from the printer. 2. Remove the instruction sheet from the printer. Refer to this sheet for setting up the drums and the toner cartridges. Removing the Drum Ribbons 1. Open the front cover. 2. Pull out the ribbons (8), then remove the packaging material from the front of the printer.
Installing the Toner Cartridges CAUTION: Before performing any of the following procedures, read and follow the safety instructions in your Product Information Guide. 1. Open the front cover. 2. Ready the toner cartridges for installation. 3. Shake the yellow cartridge 5 to 6 times to distribute the toner evenly.
NOTE: Do not touch the area shown in the illustration when you shake the cartridge. 4. Align the arrow on the cartridge with the arrow on the printer, and slide in the cartridge until it stops. 5. Repeat Step 2 to Step 4 to install magenta, cyan, and black cartridges. 6. Close the front cover. Loading Paper NOTE: To avoid paper jams, do not remove the tray while a printing is in progress. NOTE: Use only laser print media. Do not use ink jet paper in this printer.
3. Adjust the length guide to the size of paper to be loaded. 4. Before loading the paper, flex the sheets back and forth, and then fan them. Straighten the edges of the stack on a level surface. 5. Load paper into the tray with the recommended print side facing up. NOTE: Do not exceed the maximum fill line in the tray. Overfilling the tray may cause paper jams. 6. After confirming that the guides are securely adjusted, replace the paper tray into the printer. 7.
Back to Contents Page Install Optional Accessories (if applicable) Installing a 550-Sheet Feeder Installing a 1100-Sheet Feeder Installing both 550-Sheet Feeders and 1100-Sheet Feeder Installing an Output Expander Installing a Memory Module Installing a Hard Disk Installing a Wireless Adapter Configuring a Wireless Adapter You can make the printer more functional by installing the optional accessories.
CAUTION: You need three people to lift the printer. CAUTION: Be careful not to catch your fingers between the printer and the sheet feeder. 4. Tighten the two screws provided with the feeder using a coin or screw driver. 5. Secure the printer and the 550-sheet feeder with a plastic clamp-lock and the long screw provided with the feeder. 6. Insert the tray into the printer, and push it until it stops. 7. Remove the tray from the 550-sheet feeder.
8. Adjust the width guides to the size of paper to be loaded. 9. Adjust the length guide to the size of paper to be loaded. 10. Load paper into the tray with the recommended print side facing up. 11. Replace the tray to the 550-sheet feeder. 12. Connect the power cable to the printer and then to the power source. 13. Fix the power cable on the printer with the plastic fastener. 14. Turn on the printer.
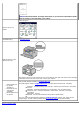
When Using the Operator Panel a. Press Menu button. b. Ensure Report/List is highlighted, and then press (Set) button. Printer Setting is displayed. c. Press (Set) button. The printer settings page is printed. d. Verify 550-Sheet Feeder is listed in the printer settings under Printer Options. If the feeder is not listed, turn off the printer, unplug the power cable, and reinstall the 550-sheet feeder. When Using the Dell™ Printer Configuration Web Tool a. Launch Dell Printer Configuration Web Tool.
Windows Vista x64, Windows Server® 2008 R2 x64, Windows Server 2008, and Windows Server 2008 x64. Windows ® 7/Windows 7 x64/Windows Server® 2008 R2 x64 1. Click Start® Devices and Printers. 2. Right-click the printer icon and select Printer properties. 3. When you use PCL driver, click the Options tab, and then select Get Information from Printer. When you use XPS driver, click the Option tab, and then ensure that Enable BiDirectional Communication check box is checked. If not, check the check box. 4.
If you cannot acquire the printer information using the Get Information from Printer automatically, try the following procedure: 1. Click the Device Settings tab, and then select any of the available trays from the Paper Tray Configuration. 2. Click Apply, and then click OK. 3. Close the Devices and Printers dialog box. Windows Vista/Vista x64 1. Click Start® Control Panel® Hardware and Sound® Printers. 2. Right-click the printer that uses the PS driver, and then select Properties from the displayed list.
the Paper Tray Configuration. 2. Click Apply, and then click OK. 3. Close the Printers dialog box. Mac OS® X 10.5.x 1. Select the Print & Fax in System Preferences. 2. Select the printer in Printers list, and click Options & Supplies. 3. Select Driver, select the options that have been installed on the printers, and then click OK. Mac OS X 10.3.x/10.4.x 1. Select the printer from the Printer List screen in Print Center (or Printer Setup Utility). 2.
4. Lift the printer and align the three guide pins of the optional 1100-sheet feeder with the holes at the bottom of the printer. Gently lower the printer onto the 1100-sheet feeder. CAUTION: You need three people to lift the printer. CAUTION: Be careful not to catch your fingers between the printer and the sheet feeder. 5. Tighten the two screws provided with the feeder using a coin or screw driver. 6.
8. Remove the tray from the 1100-sheet feeder. 9. Adjust the width guides to the size of paper to be loaded. 10. Adjust the length guide to the size of paper to be loaded. 11. Load paper into the tray with the recommended print side facing up. 12. Return the tray to the 1100-sheet feeder. 13. Connect the power cable to the printer and then to the power source. 14. Fix the power cable on the printer with the plastic fastener. 15. Turn on the printer.
NOTE: If a message displays telling you to make initial setup on the operator panel, always do as instructed. NOTE: The printer will automatically detect the attached tray(s) but will not detect the paper type. 16. Print a printer settings page to verify the 1100-sheet feeder is installed correctly by following the instructions. See "Printing Printer Settings Page." Printing Printer Settings Page When Using the Operator Panel a. Press Menu button. b.
NOTE: If you installed the 1100-sheet feeder after installing the printer driver, update your driver by following the instructions for each operating system. If the printer is on a network, update the driver for each client. To complete installation of the accessory, the printer driver must be updated to detect it.
3. Close the displayed active dialog box. When Using PS Driver Windows 7/Windows 7 x64/Server 2008 R2 x64 1. Click Start® Devices and Printers. 2. Right-click the printer that uses the PS driver, and then select Printer properties from the displayed list. 3. Click the Configuration tab, and then select Get Information from Printer. 4. Click Apply, and then click OK. 5. Click the Device Settings tab, and then confirm the paper tray configuration under Installable Options. 6.
the Paper Tray Configuration. 2. Click Apply, and then click OK. 3. Close the Printers and Faxes dialog box. Windows 2000 1. Click Start® Settings® Printers. 2. Right-click the printer that uses the PS driver, and then select Properties from the displayed list. 3. Click the Configuration tab, and then select Get Information from Printer. 4. Click Apply, and then click OK. 5. Click the Device Settings tab, and then confirm the paper tray configuration under Installable Options. 6.
CAUTION: When carrying the 550-sheet feeder, do not grasp the areas shown in the following illustration: 5. Gently lower the 550-sheet feeder onto the 1100-sheet feeder. 6. Tighten the two screws provided with the feeder using a coin or similar object. 7. Lift the printer and align the three guide pins of the 550-sheet feeder with the holes at the bottom of the printer. Gently lower the printer onto the 550-sheet feeder. CAUTION: You need three people to lift the printer.
NOTE: If a message displays telling you to make initial setup on the operator panel, always do as instructed. NOTE: The printer will automatically detect the attached tray(s) but will not detect the paper type. 20. Print a printer settings page to verify the 550-sheet feeder and 1100-sheet feeder are installed correctly by following the instructions below. See "Printing Printer Settings Page." Printing Printer Settings Page When Using the Operator Panel a. Press Menu button. b.
e. Press button until the paper type for the installed tray is highlighted, and then press (Set) button. f. Confirm that the selected paper type is marked with a bullet, and then press Menu button. NOTE: If you installed the 550-sheet feeder and the 1100-sheet feeder after installing the printer driver, update your driver by following the instructions for each operating system. If the printer is on a network, update the driver for each client.
When you use XPS driver, click the Option tab, and then remove the check mark from Enable Bi-Directional Communication check box. Select any of the available trays from the Paper Tray Configuration. 2. Click Apply, and then click OK. 3. Close the displayed active dialog box. When Using PS Driver Windows 7/Windows 7 x64/Server 2008 R2 x64 1. Click Start® Devices and Printers. 2. Right-click the printer that uses the PS driver, and then select Printer properties from the displayed list. 3.
If you cannot acquire the printer information using the Get Information from Printer automatically, try the following procedure: 1. Click the Device Settings tab, and then select any of the available trays from the Paper Tray Configuration. 2. Click Apply, and then click OK. 3. Close the Printers and Faxes dialog box. Windows 2000 1. Click Start® Settings® Printers. 2. Right-click the printer that uses the PS driver, and then select Properties from the displayed list. 3.
3. Place the output expander on the left side of the printer. CAUTION: Always hold the positions shown below when lifting the output expander. 4. Open the tray 1 slightly.
5. Open the front cover. 6. Grasp the tab of the upper panel to slightly pull it outwards, and then pull the panel forward to remove it from the printer. Repeat the procedure for the lower panel. 7. Close the front cover of the printer.
8. Insert the tray into the printer, and push until it stops. 9. Press the claw to unlatch the center output tray and lift the tray to remove it from the printer. 10. Place the H transport unit on the printer.
11. Attach the bracket as shown in the illustration below. 12. First, tighten the screw on the right side loosely for later adjustment. Then, tighten the other screw on the left side, and then tighten the right screw firmly. 13. Attach the plastic fastener to the printer to secure the cables. 14. Lift the output expander, align the hole on the expander with the bracket guide, and then hook the expander onto the bracket guide.
CAUTION: Always hold the marked positions when lifting the output expander. CAUTION: Check the space between the printer and output expander to confirm that the expander is connected properly. If the output expander does not fit in the printer, detach and install it again. 15. Remove the protective cardboard cover from the output expander, and then attach the stacker tray to the output expander. First, align the attachment side of tray to the printer.
16. Attach the parts as shown in the illustration below. 17. Remove the connector cover from the printer.
18. Insert the connector in the socket, and then attach the plastic fastener to the printer to secure the cables. 19. Attach the connector cover 2. NOTICE: Always keep the power cable away from cover closures. 20. Insert the connector in the socket, and then attach the plastic fastener to the printer to secure the cables.
21. Attach the connector cover 1. First, attach the left side of the connector cover 1 to the printer. Then close cover 1 as shown in the illustration. 22. Connect the power cable of the output expander to the printer as shown in the illustration. 23. Open the front door of the output expander.
24. Remove the packing material from the stapler cartridge. NOTE: Ensure that the metal part is lowered as shown in the illustration below. 25. Insert the stapler cartridge in the output expander. 26. Close the front door of the output expander. 27. Turn on the printer. NOTE: If a message displays telling you to make initial setup on the operator panel, always do as instructed. 28. Print a printer settings page to verify the output expander is installed correctly by following the instructions below.
Printing Printer Settings Page When Using the Operator Panel a. Press Menu button. b. Ensure Report/List is highlighted, and then press c. Printer Setting is displayed. Press The printer settings page is printed. (Set) button. (Set) button. d. Verify Output Expander is listed in the printer settings under Printer Options. If the output expander is not listed, turn off the printer, unplug the power cable, and reinstall the output expander. When Using the Dell™ Printer Configuration Web Tool a.
from Printer. 4. Click Apply, and then click OK. 5. Close the Devices and Printers dialog box. Windows Vista®/Vista x64 1. Click Start® Control Panel® Hardware and Sound® Printers. 2. Right-click the printer icon and select Properties. 3. Click the Options tab, and then select Get Information from Printer. 4. Click Apply, and then click OK. 5. Close the Printers dialog box. Windows Server 2008/Server 2008 x64 1. Click Start® Control Panel® Printers. 2. Right-click the printer icon and select Properties.
4. Click Apply, and then click OK. 5. Click the Device Settings tab, and then confirm Output Expander is available under Installable Options. 6. Close the Printers dialog box. If you cannot acquire the printer information using the Get Information from Printer automatically, try the following procedure: 1. Click the Device Settings tab, and then select Available for the Output Expander under Installable Options. 2. Click Apply, and then click OK. 3. Close the Printers dialog box.
select Show Info. 3. Select Installable Options, and select the options that have been installed on the printer, and then click Apply Changes. Mac OS 9 1. 2. 3. 4. Select a desktop printer related to the model. Click Printing on the System menu bar, and select Change Setup. Select Output Expander on the Change menu. Select the option that has been installed on the printer on the To menu, and then click OK. Installing a Memory Module Your printer comes with 256 MB of memory installed.
5. Check that the tabs are locked. 6. Install the control board cover. 7. Close the control board cover and rotate the screw clockwise. 8. Turn on the printer. 9. Print the printer settings page to verify that the memory is installed correctly by following the instructions below. See "Printing Printer Settings Page." Printing Printer Settings Page When Using the Operator Panel a. Press Menu button. b. Ensure Report/List is highlighted, and then press c. Printer Setting is displayed. Press (Set) button.
The printer settings page is printed. d. Verify Memory Capacity listed in the printer settings under General. If the memory capacity has not increased, turn off the printer, unplug the power cable, and reinstall the memory module. When Using the Dell Printer Configuration Web Tool a. Launch Dell Printer Configuration Web Tool. 1) Open the web browser. 2) Enter the IP address of your printer in the web browser. See "Dell Printer Configuration Web Tool." b. Select Printer Settings. c.
When you use XPS driver, click the Option tab, and then ensure that Enable Bi-Directional Communication check box is checked. If not, check the check box. 4. Click Apply, and then click OK. 5. Close the Printers dialog box. Windows Server 2008/Server 2008 x64 1. Click Start® Control Panel® Printers. 2. Right-click the printer and select Properties. 3. When you use PCL driver, click the Options tab, and then select Get Information from Printer.
5. Click the Device Settings tab, and then confirm the memory capacity on the Installable Options. 6. Close the Printers dialog box. If you cannot acquire the printer information using the Get Information from Printer automatically, try the following procedure: 1. Click the Device Settings tab, and then select memory size from Memory Capacity under Installable Options. 2. Click Apply, and then click OK. 3. Close the Printers dialog box. Windows Server 2008/Server 2008 x64 1.
3. Select Installable Options, and select the options that have been installed on the printer, and then click Apply Changes. 4. Click Apply, and then click OK. Mac OS 9 1. 2. 3. 4. Select a desktop printer related to the model. Click Printing on the System menu bar, and select Change Setup. Select Memory Capacity on the Change menu. Select the option that has been installed on the printer on the To menu, and then click OK. Installing a Hard Disk 1. Ensure that the printer is turned off. 2.
5. Attach the left side spacer to the control board. 6. Connect the hard disk cables to the connectors of the control board. 7. Replace the control board cover.
8. Close the control board cover and then rotate the screw clockwise. 9. Turn on the printer. NOTE: If a message displays telling you to make initial setup on the operator panel, always do as instructed. 10. Print the printer settings page to verify if the optional hard disk is installed correctly by following the instructions. See "Printing Printer Settings Page." Printing Printer Settings Page 11. When Using the Operator Panel a. Press Menu button. b.
c. Click the Printer Settings Report tab. d. Select Reports. e. Press the Start button in the Printer Settings. The printer settings report is printed. f. Verify if Hard Disk is listed in the printer settings under Printer Options. If it is not listed, turn off the printer, unplug the power cable, and reinstall the hard disk. NOTE: If you installed the hard disk after installing the PCL or PS printer driver, update your driver by following the instructions for each operating system.
If the printer information is not updated automatically after clicking Get Information from Printer, follow these steps: 1. Click the Options tab, and then select Hard Disk on the Items list box. 2. Select Available for the hard disk setting. 3. Click Apply, and then click OK. 4. Close the displayed active dialog box. When Using PS Driver Windows 7/Windows 7 x64/Server 2008 R2 x64 1. Click Start® Devices and Printers. 2.
Printer automatically, try the following procedure: 1. Click the Device Settings tab, and then select storage device from Storage Device under Installable Options. 2. Click OK. 3. Close the Printers and Faxes dialog box. Windows 2000 1. Click Start® Settings® Printers. 2. Right-click the printer that uses the PS driver, and then select Properties from the displayed list. 3. Click the Configuration tab, and then select Get Information from Printer. 4. Click Apply, and then click OK. 5.
* 1 : PEAPV0 MS-CHAPV2 only. * 2 : This item is available only when the optional hard disk is installed. NOTE: When the Wireless Adapter is installed, you cannot use IEEE 802.1x authentication and /or the Ethernet port for a wired connection. Verifying the Contents of Box NOTE: To complete wireless setup you will require the Drivers and Utilities CD that comes with your printer. The configuration utility and drivers can also be downloaded from support.dell.com.
2. Remove the cap from the wireless adapter socket. 3. Align the connector and the three protrusions of the wireless adapter with the four holes and insert the adapter. NOTE: Ensure that the adapter is fully inserted and secured. 4. Reconnect the power cable and turn on the printer. NOTE: If a message displays telling you to make initial setup on the operator panel, always do as instructed. 5.
The Printer Settings page is printed. 6. Verify that the Network (Wireless) section exists. NOTE: For more information on configuring the Wireless Adapter see "Configuring a Wireless Adapter." Determining the Wireless Network Settings You need to know the wireless network settings to use your printer as a wireless device. For details of the settings, contact your network administrator. Wireless Settings Security Settings SSID Specifies the name that identifies the wireless network.
* 2 WPS-PBC (Wi-Fi Protected Setup-Push Button Configuration) is a method to authenticate and register devices required for wireless configuration, by pressing the button provided on the access point via wireless routers, and then performing WPS-PBC setting on the operator panel. This setting is available only when the access point supports WPS. NOTE: The optional wireless adapter must be installed on the printer.
10. On the Complete Wireless Settings screen, click Next to complete the wireless setup and close the Wireless Setting Tool. Easy Setup Navigator restarts. 11. Follow on-screen instructions to finish configuring the wireless adapter. Using Advanced Setup to Configure a Wireless Adapter Select Advanced Setup to configure your wireless adapter with one of the following: Ethernet Operator Panel Dell Printer Configuration Web Tool WPS-PIN WPS-PBC USB Ethernet 1.
On the Enter IPv4 Address Settings screen, select each setting, and then click Send to send the wireless settings to the printer. When IPv6 Only is selected: On the Enter IPv6 Address Settings screen, select each setting, and then click Send to send the wireless settings to the printer. When Dual Stack (both IPv4 and IPv6) is selected: a. On the Enter IPv4 Address Settings screen, select each setting, and then click Next. b.
6. Press button until PIN Code is highlighted, and then press (Set) button. 7. Write down the 8-digit PIN code displayed on the first line of the panel display or press Code is highlighted, and then press The PIN code is printed. button until Print PIN (Set) button. 8. Ensure Start Configuration is highlighted, and then press (Set) button. 9.
3. Select Advanced, and then click Next. 4. Select USB, and then click Next. The instruction video starts. 5. Follow on-screen instructions until the Wireless Setting Tool button appears. 6. Click Wireless Setting Tool to start wireless setup. The Wireless Setting Tool starts. 7. Comments appear about connectivity. Click Next. NOTE: When the printer has already been connected, this screen does not appear. In addition, this screen will not change to the next screen until the printer is connected. 8.
NOTE: If your computer provides a wireless adapter tool, change the wireless settings using this tool. Or you can change the wireless settings using the tool provided with the operating system. See the instructions below. For Windows XP and Windows Server 2003: a. Select Network Connections from Control Panel. b. Right-click Wireless Network Connection and select Properties. c. Select the Wireless Networks tab. d. Ensure the check box for Use Windows to configure my wireless network settings is checked.
For Windows Server 2008: a. Open Control Panel. b. Select Network and Sharing Center. c. Select Connect to a network. d. Select dell_device from the network items listed in Connect to a network. e. Select Connect Anyway in the warning dialog box indicating you are entering an unsecured area. f. Click Close in the dialog box after confirming the connection is a success. For Windows Server 2008 R2 and Windows 7: a. Open Control Panel. b. Select Network and Internet. c. Select Network and Sharing Center. d.
5. Create wireless setting of the printer on Dell Printer Configuration Web Tool. 6. Reboot the printer. 7. Restore the wireless settings on your computer. NOTE: If your computer provides a wireless adapter tool, change the wireless settings using this tool. Or you can change the wireless settings using the tool provided with the operating system. See the instructions below. For Windows XP and Windows Server 2003: a. Select Network Connections from Control Panel. b.
c. Select Network and Sharing Center. d. Select Connect to a network. e. Select the setting you send to the printer from the network items listed in Connect to a network. f. Select Connect Anyway in the warning dialog box indicating you are entering an unsecured area. g. Click Close in the dialog box after confirming the connection is a success. For Windows Server 2008: a. Open Control Panel. b. Select Network and Sharing Center. c. Select Connect to a network. d.
Network name (SSID): dell_device Network Authentication: Open Data encryption: Disabled Ad hoc network: checked i. Click the Move up button to move the newly added SSID to the top of the list. j. Click OK to close the Property dialog box. NOTE: When your operating system is earlier than Windows 2000, select your settings according to the instructions in the manual of the wireless settings tool provided by your wireless device manufacturer. For Windows Vista: a. Open Control Panel. b.
e. Select dell_device from the network items listed in the available network list, and click Connect. 2. Check the IP address on your computer. 3. Set the IP address on the printer. a. Press Menu button. b. Scroll to Admin menu. c. Select Network. d. Select TCP/IP. e. Select Get IP Address. f. Select Panel. g. Scroll back to IP Address. h. Manually enter the IP address using the directional buttons on the control panel and press enter button. IP Address 172.031.000.041* 4.
NOTE: If your computer provides a wireless adapter tool, change the wireless settings using this tool. Or you can change the wireless settings using the tool provided with the operating system. See the instructions below. For Windows XP and Windows Server 2003: a. Select Network Connections from Control Panel. b. Right-click Wireless Network Connection and select Properties. c. Select Wireless Network tab. d. Ensure the check box for Use Windows to configure my wireless network settings is checked. e.
b. Select Network and Internet. c. Select Network and Sharing Center. d. Select Connect to a network. e. Select the setting you send to the printer from the network items listed in the available network list, and click Connect. f. Enter the Security key and click OK, if necessary.
Back to Contents Page Connect Printer to Computer or Network Connect Printer to Computer or Network Print and Check the Printer Settings Page Assign an IP Address Verify the IP Settings Using the Reset Button Your Dell™ 5130cdn Color Laser Printer interconnection cable must meet the following requirements: Connection type Connection specifications Ethernet 10 Base-T/100 Base-TX/1000 Base-T Wireless IEEE802.11b/802.11g/802.11n USB USB 2.
USB Cable Microsoft ® Windows ® 2000, Windows XP, Windows XP 64-bit Edition, Windows Server® 2003, Windows Server 2003 x64 Edition, Windows Server 2008, Windows Server 2008 64-bit Edition, Windows Server 2008 R2 64-bit Edition, Windows Vista®, Windows Vista 64-bit Edition, Windows 7, Windows 7 64-bit Edition and Mac OS ® X or later operating systems support USB connections. Some UNIX ® and Linux computers also support USB connections.
Network Connection To attach the printer to a network: 1. Ensure that the printer, computer and any other connected devices have been turned off and all cables have been disconnected. 2. Connect the network cable or wireless adaptor. 1 Ethernet Port 2 Wireless Adapter Socket NOTE: To use the wireless adapter, be sure to disconnect the network cable.
4. Select Reports. 5. Click the Start button in the Printer Settings. The printer settings report is printed. Assign an IP Address NOTE: When you assign an IP address manually in IPv6 Mode, use the Dell Printer Configuration Web Tool. To open the Dell Printer Configuration Web Tool, use the link local address. (To check a link local address, see "Print and Check the Printer Settings Page.
15. Press button until Gateway Address is highlighted, and then press 16. Repeat Step 8 to Step 9 to set Gateway Address, and then press (Set) button. (Set) button. 17. Turn off the printer, and then turn it on again. When Using the Dell Printer Configuration Web Tool (for IPv4 Mode) 1. Enter the IP address of your printer into the web browser. If you do not know how to launch the Dell Printer Configuration Web Tool, see "Dell Printer Configuration Web Tool.
If the printer is active on the network, you will receive a reply. Using the Reset Button Your printer is supplied with an electric leakage detector, which prevents electric shock or fire due to electric leakage by automatically cutting circuits inside the printer. When electric leakage is detected, the RESET button is tripped. In this case, press the RESET button to turn the printer back on. If the RESET button trips again after pressing the RESET button, contact Dell.
Back to Contents Page Perform Initial Settings Turning On the Printer Set Initial Settings on the Operator Panel Turning On the Printer The connection port for the power cable is at the lower left on the back of the printer. 1. Connect the power cable to the printer. Then, fix the power cable on the printer with the plastic fastener. CAUTION: Do not use extension cords or power strips. CAUTION: The printer should not be plugged into a UPS system. 2.
Deutsch Español Dansk Nederlands Norsk Svenska 2. Set Time Zone appears. Specify the time zone, and then press (Set) button.
+05:00 UTC RUSSIAN FEDERATION +05:30 UTC RUSSIAN FEDERATION +05:45 UTC RUSSIAN FEDERATION +06:00 UTC RUSSIAN FEDERATION +06:30 UTC RUSSIAN FEDERATION +07:00 UTC RUSSIAN FEDERATION, PHILIPPINES, SINGAPORE, AUSTRALIA +08:00 UTC RUSSIAN FEDERATION, JAPAN, SOUTH KOREA +09:00 UTC RUSSIAN FEDERATION, AUSTRALIA +09:30 UTC RUSSIAN FEDERATION, AUSTRALIA +10:00 UTC RUSSIAN FEDERATION +11:00 UTC RUSSIAN FEDERATION, NEW ZEALAND +12:00 UTC +13:00 3. Date Format appears.
Back to Contents Page Install Printer Drivers on the Windows Computers Identify Printer Driver Pre-install Status Insert the Drivers and Utility CD Direct Connection Setup Network Connection Setup Setting Up for Shared Printing Setup Security Troubleshooting Instructions Identify Printer Driver Pre-install Status Before installing the printer driver on your computer, print the printer settings page to check your printer's IP address. When Using the Operator Panel 1. Press Menu button. 2.
NOTE: If the installation software does not automatically proceed to the next page, click Install. 4. Select either Typical Installation or Custom Installation from the installation wizard, and then click Install. If you select Custom Installation, you can select the specific software you want to install. 5. Click Finish to exit the wizard when the Congratulations! screen appears. If necessary, click Print Test Page to print a test page.
e. If you want to install the PostScript driver, select the PostScript Driver check box. 6. Select the software and documentation you want to install, and then click Next. You can specify folders in which to install the Dell software and documentation. To change the folders, click Browse. 7. Click Finish to exit the wizard when the Congratulations! screen appears. If necessary, click Print Test Page to print a test page.
6. Restart the computer. For Windows Server 2008 R2 and Windows 7: 1. Click Start® All Programs (for Windows 7 only)® Accessories (for Windows 7 only)® Run. 2. Type gpedit.msc, and then click OK. 3. Click Computer Configuration® Administrative Templates® Printers. 4. Right-click Allow Print Spooler to accept client connections and select Edit. 5. Select Enabled, and then click OK. 6. Restart the computer.
Disable User Account Control NOTICE: Disabling the User Account Control might leave the system vulnerable to virus attacks. NOTE: This step is required for Windows Vista, Windows Vista 64-bit Edition, Windows Server 2008, Windows Server 2008 64-bit Edition, Windows Server 2008 R2 64-bit Edition, Windows 7, and Windows 7 64-bit Edition. For Windows Vista: 1. Click start® Control Panel. 2. Select User Accounts and Family Safety. 3. Click User Accounts. 4. Click Turn User Account Control on or off. 5.
3. Select Folder Options. 4. From the View tab, clear the Use simple file sharing (Recommended) check box, and then click OK. 5. Click start® Control Panel. 6. Select Performance and Maintenance. 7. Select Administrative Tools. 8. Click Local Security Policy. 9. Click Local Policies® Security Options. 10. Right-click Network access: Sharing and security model for local accounts and select Properties. 11. Ensure Classic - local users authenticate as themselves is selected.
NOTE: The following are options you need to buy separately for shared printing. Ethernet cable Windows ® XP, Windows XP 64-bit Edition, Windows Server® 2003, Windows Server 2003 x64 Edition, Windows 2000 1. Click start® Printers and Faxes (Printers for Windows 2000). 2. Right-click this printer icon and select Properties. 3. From the Sharing tab, check the Share this printer (Share as for Windows 2000) check box, and then type a name in the Share name (Share as for Windows 2000) text box. 4.
1. On the Windows desktop of the client computer, double-click My Network Places. 2. Locate the host name of the server computer, and then double-click the host name. 3. Right-click the shared printer name, and then click Connect. Wait for the driver information to copy from the server computer to the client computer, and for a new printer object to be added to the Printers and Faxes (Printers for Windows 2000) folder. The copy time varies, based on network traffic and other factors.
When a test page prints successfully, installation is complete. Windows 7, Windows 7 64-bit Edition, Windows Server 2008 R2 64-bit Edition 1. On the Windows desktop of the client computer, click Start® your user name® Network (Start® Network for Windows Server 2008 R2). 2. Locate the host name of the server computer, and then double-click the host name. 3. Right-click the shared printer name, and then click Connect. 4. Click Install driver. 5.
c. Click File® Properties. d. From the General tab, click Print Test Page. When a test page prints successfully, installation is complete. Windows Vista, Windows Vista 64-bit Edition 1. Click start® Control Panel® Hardware and Sound® Printers. 2. Click Add a Printer to launch the Add Printer wizard. 3. Select Add a network, wireless or Bluetooth printer, and then click Next.
1. Click Start® Devices and Printers. 2. Click Add a Printer to launch the Add Printer wizard. 3. Select Add a network, wireless or Bluetooth printer. If the printer is listed, select the printer and click Next, or select The printer that I want isn't listed. Click Select a shared printer by name and type in the path of the printer in the text box, and then click Next.
a. Open the web browser. b. Enter the IP address of your printer in the web browser. See "Dell Printer Configuration Web Tool." 2. Select Printer Settings. 3. Click the Printer Maintenance tab. 4. Select Reset Defaults from the list at the left side of the page. The Reset Defaults page is displayed. 5. Click Start. The printer is turned off automatically to apply the settings.
Back to Contents Page Install the PPD File on Macintosh Computers Installing the PPD File The PPD (PostScript Printer Description) file describes print features and capabilities (such as paper sources, paper sizes, and duplexing) of a particular printer. To print data on Macintosh computers, the PostScript driver uses this data to command the printer properly. Installing the PPD File 1. Insert the Drivers and Utilities CD into your computer. 2. Launch the Drivers and Utilities CD. 3.
4. Click Print and Fax, and then click +. 5. Select IP from the menu. 6. Type the IP address of the printer being used in the Address area and select Line Printer Daemon - LPD from Protocol. 7. Select Select a driver to use... from Print Using and select Dell 5130cdn Color Laser from the list. NOTE: When printing is set up using IP printing, the queue name is displayed as blank. You do not need to specify it. 8. Click Add. 9.
When Using IP Printing 1. Click IP Printer on the Printer Browser dialog box, and select Line Printer Daemon - LPD from the Protocol menu. 2. Type the IP address for the printer being used to Address in the Protocol menu. 3. Select Dell from Print Using, and confirm Dell 5130cdn Color Laser is selected for the Model Name. NOTE: When printing is set up using IP printing, the queue name is displayed as blank. You do not need to specify it. 4. Click Add.
When Using IP Printing 1. Select IP Printing from the menu, and type the IP address for the printer being used in Printer Address. 2. Select Printer Type from the menu, and select LPD/LPR. 3. Select Dell from Printer Model, and confirm Dell 5130cdn Color Laser is selected for the Model Name. If it is not selected, select it. NOTE: When printing is set up using IP printing, the queue name is displayed as blank. You do not need to specify it. 4. Click Add.
Changes. NOTE: You must configure the print queue that was automatically created on a non-English version of Mac OS X 10.3 when a USB cable is connected to your computer.
Back to Contents Page Dell Printer Configuration Web Tool Overview Using the Dell Printer Configuration Web Tool Setting Up the Dell Printer Configuration Web Tool Page Display Format Changing the Settings of the Menu Items Overview NOTE: This web tool is not available unless the printer is connected to a network using a network cable or the wireless adapter.
The printer settings page is printed. If the IP address shows 0.0.0.0 (the factory default), an IP address has not been assigned. To assign one for your printer, see "Assign an IP Address." Using the Dell Printer Configuration Web Tool Use the Dell Printer Configuration Web Tool for: Printer Status Use the Printer Status menu to get immediate feedback on the printer supply status.
Use the E-Mail Alert menu to receive an e-mail when the printer needs supplies or intervention. Type your name or the key operator's name in the e-mail list box to be notified. Set Password Use the Set Password menu to lock the Dell Printer Configuration Web Tool with a password so that other users do not inadvertently change the printer settings you selected. NOTE: You must log in as an administrator to use this feature. Online Help Click Online Help to visit the Dell Support website.
German (Germany) [de-DE] French (France) [fr-FR] English (United States) [en-us] Danish [da-DK] Dutch (Netherlands) [nl-NL] Norwegian (Bokmal) [no] Swedish [sv-SE] Setting the Printer's IP Address to Non-Proxy 1. Select Internet Options from the Tools menu. 2. Click LAN Settings under Local Area Network (LAN) Settings in the Connections tab. 3. Do either of the following: Clear the Use a proxy server for your LAN check box under Proxy server.
Setting the Printer's IP Address to Non-Proxy 1. Select Options from the Tools menu. 2. Click Advanced tab. 3. Click Network on the Options dialog box. 4. Click Connection ® Settings. 5. When you use Firefox 2.0, do one of the following: Select the Direct connection to the Internet check box. Select the Auto-detect proxy settings for this network check box. Select the Manual proxy configuration check box, and then enter the printer's IP address in the No Proxy for edit box.
1 Dell 5130cdn Color Laser Displays the printer's product name. 2 IP Address Displays the printer's IP address. 3 Location Displays the printer's location. The location can be changed in Basic Information on the Print Server Settings page. 4 Contact Person Displays the name of the printer's administrator. The name can be changed in the Basic Information on the Print Server Settings page. 5 Event Panel Displays the condition of the printer.
3 Printer Settings Links to the Printer Settings Report menu. 4 Print Server Settings Links to the Print Server Reports menu. 5 Copy Printer Settings Links to the Copy Printer Settings menu. 6 Print Volume Links to the Print Volume menu. 7 Printer Information Links to the Printer Status menu. 8 Tray Settings Links to the Tray Settings menu. 9 E-Mail Alert Links to the Print Server Settings menu. 10 Set Password Links to the Security menu.
Set Password page in the Security menu. The user name cannot be changed. For more information, see "Set Password.
"Set Password" "Authentication System" "Kerberos Server" "LDAP Server" "Security" "LDAP Authentication" "SSL/TLS" "IPsec" "802.1x"* 3 "IP Filter" "Copy Printer Settings" "Copy Printer Settings" "Copy Printer Settings Report" "Print Volume" "Print Volume" "Dell ColorTrack" "Tray Settings" * 1 This item is available only when the RAM disk is on or the optional hard disk is installed. * 2 This item is available only when connecting the printer with a wireless network.
OK Indicates that there is some paper in the tray but the quantity is unknown. Paper Status Low Paper Trays Indicates that paper is running low in the tray. Add Paper Indicates that there is no paper in the tray. Capacity Displays the maximum capacity of the paper tray. Size Displays the size of paper in the tray. OK Output Status Full Tray Capacity Cover Status Indicates that the tray is available. Indicates that the tray is not available. Displays the maximum capacity of the paper tray.
Job List Purpose: To confirm the print jobs that are being processed. Click the Refresh button to update the screen. Values: ID Displays the job ID. Job Name Displays the file name of the job being printed. Owner Displays the job owner's name. Host Name Displays the name of the host computer. Job Status Displays the status of the job being printed. Host I/F Displays the status of the host interface. Job Submitted Time Displays the date the print job was submitted.
System Settings Power Saver Time-Sleep Displays the time for transition to the power saver mode (Sleep). Power Saver Time-Deep Sleep Displays the time for transition to the power saver mode (Deep Sleep). Control Panel Tone Displays whether to emit the tone when the operator panel input is correct. Off indicates that the tone is disabled. Invalid Key Tone Displays whether to emit the tone when the operator panel input is incorrect. Off indicates that the tone is disabled.
Parallel Settings Network Settings USB Settings PCL Settings PS Settings Secure Settings ECP Displays the ECP communication mode of the parallel interface. Adobe™ Protocol Displays PostScript communication protocol for each interface. Adobe Protocol Displays PostScript communication protocol for each interface. USB Port Displays whether the USB interface is enabled. Adobe Protocol Displays PostScript communication protocol for each interface. Paper Tray Displays the paper tray setting.
Paper Density Adjust BTR Adjust Fuser Expiration Time* 4 Displays the time to delete the files stored as Secure Print in the RAM disk or the hard disk drive. Recurrence* 4 Displays the period to repeat the setting. Weekly Settings* 4 Displays the day of the week to repeat the setting. Monthly Settings* 4 Displays the day of the month to repeat the setting. Plain Displays the paper density of plain paper. Label Displays the paper density of labels.
Non-Dell Toner Displays whether or not to use another manufacturer's toner cartridge. Date Format Displays the default date format. Time Format Displays the default time format; 12 Hour Clock or 24 Hour Clock. Clock Settings Time Zone Set Date Displays the date setting. Set Time Displays the time setting. Select Reorder URL Displays a link used for ordering consumables, which can be accessed from Order Supplies at: in the Left Frame.
Tray Settings Tray 5 Paper Type* 6 Displays the paper type setting of the fifth tray from the top. Tray 5 Paper Size* 6 Displays the paper size setting of the fifth tray from the top. Tray 5 Custom Size - Y* 6 Displays the length of custom size paper loaded in the fifth tray from the top. Tray 5 Custom Size - X* 6 Displays the width of custom size paper loaded in the fifth tray from the top. MPF Mode Displays the paper size and type when paper is loaded in the multipurpose feeder (MPF).
* 1 This item is available only when the RAM disk is on or the optional hard disk is installed. Printer Settings The Printer Settings tab includes System Settings, Parallel Settings, Network Settings, USB Settings, PCL Settings, PS Settings, and Secure Settings pages. System Settings Purpose: To configure the basic printer settings. Values: Power Saver Time-Sleep Sets the time for transition to the power saver mode (Sleep).
Duplex Mode Low Toner Alert Msg Specifies whether to show the message when the toner is short. Job Offset* 2 Specifies whether to offset the position of the output paper. Banner Sheet Offset*2 Specifies whether to put the banner sheet per offset print. Job Offset of Staple* 2 Specifies whether to staple the offset print. Stapler Cart. Empty* 2 Specifies whether to continue the print job when the stapler cartridge is empty.
Paper Tray Specifies the input tray. Paper Size Specifies the paper size. Custom Size -Y Specifies the length of custom size paper. Custom Size -X Specifies the width of custom size paper. Orientation Specifies how text and graphics are oriented on the page. 2 Sided Sets duplexing as the default for all print jobs. This item is available only when the duplexer is installed. Font Specifies the font from the list of registered fonts. Symbol Set Specifies a symbol set for the specified font.
NOTE: This menu sets a password to lock the operator panel. When changing the password for the Dell Printer Configuration Web Tool, click Set Password on the Left Frame and set the password. Data Encryption Purpose: To set whether to encrypt the data. Values: Encryption Data Encryption Encryption Key Sets whether to encrypt the data. Sets a key that is required to encrypt. Re-enter Encryption Key Enter the new key again to confirm.
PrintMeter, Clock Settings, and Web Link Customization pages. Paper Density Purpose: To specify the paper density. Values: Plain Sets the density of plain paper to Light or Normal. Label Sets the density of labels to Light or Normal. Adjust BTR Purpose: To specify the optimum voltage settings for printing for the transfer roller (BTR). To lower the voltage, set negative values. To increase, set positive values. The default settings may not give the best output on all paper types.
Values: Plain (60 to 90 gsm) Sets the temperature settings for the fuser for plain paper within the range of -6 to 6. Plain Thick Sets the temperature settings for the fuser for thick plain paper within the range of -6 to 6. (80/90 to 105 gsm) Transparency Sets the temperature settings for the fuser for transparencies within the range of -6 to 6. Covers (106 to 163 gsm) Sets the temperature settings for the fuser for cover paper within the range of -6 to 6.
Reset Defaults Purpose: To initialize the NV (non-volatile) memory. After executing this function to automatically restart the printer and rebooting the printer, all the menu parameters are reset to their default values. Values: Reset Defaults and restart printer Click Start to reset the default setting and restart the printer. Power On Wizard Click Start to start the power on wizard and perform initial setup.
Time Zone Specifies the time zone. Set Date Specifies the current date. Set Time Specifies the current time. Web Link Customization Purpose: To specify a link used for ordering consumables, which can be accessed from Order Supplies at: in the Left Frame. Values: Select Reorder URL Select the Regular or Premier URL to be linked to Order Supplies at:. Regular Displays the regular URL (http://accessories.us.dell.com/sna) that can be linked to Order Supplies at:.
IPv4* 3 TCP/IP Settings IPv6* 4 IPv4* 3 IPv6* 4 DNS LPD Port9100 Subnet Mask Displays the subnet mask. Gateway Address Displays the gateway address. Enable Stateless Address Displays whether to enable the stateless address. Use Manual Address Displays whether to set the IP address manually. Manual Address* 5 Displays the IP address. Stateless Address 1-3* 6 Displays the stateless addresses. Link Local Address* 6 Displays the link local address.
WSD FTP HTTP Maximum Sessions Displays the maximum number of connections received simultaneously by the client. Port Status Displays the WSD port status. Port Number Displays the WSD port number. Receive TimeOut Displays the receive time-out period. Notification Time-Out Displays the notification time-out period. Maximum Number of TTL Displays the maximum number of TTLs. Maximum Number of Notification Displays the maximum number of notifications. Port Status Displays the port status.
Address IP Filter (IPv4)* 9 printer. Address Mask Displays the list of subnet mask that are permitted or denied access to the printer. Active Mode Displays whether to be permitted or denied access to the printer. * 1 This item is available only when connecting the printer with a wired network. * 2 This item is available only when connecting the printer with a wireless network. * 3 This item is displayed when IPv4 Mode is selected. * 4 This item is displayed when IPv6 Mode is selected.
E-Mail Server Settings Authentication POP3 Server Address Displays the POP3 (Post Office Protocol 3) server address. POP3 Port Number Displays the POP3 port number. Reply Address Designates the reply e-mail address sent with each E-mail Alert. SMTP Server Connection Displays the status of the SMTP server connection. E-Mail List 1 Displays the acceptable e-mail addresses for the E-Mail Alert feature specified in E-mail List 1.
Purpose: To specify whether to enable or disable printing ports and management protocol features. Values: Ethernet Settings Ethernet* 1 Auto Detects Ethernet transmission rate and the duplex settings automatically. 10Base-T Half-Duplex Selects 10Base-T Half-Duplex as the default value. 10Base-T Full-Duplex Selects 10Base-T Full-Duplex as the default value. 100Base-TX HalfDuplex Selects 100Base-TX Half-Duplex as the default value.
Mask TCP/IP Settings Manual Gateway Address Sets the gateway address. Enable Stateless Address Select the check box to enable the slateless address. Use Manual Address Select the check box to set the IP address manually. Manual Address Sets the IP address. To specify an IPv6 address, enter the address followed by a slash (/) and then "64". For details, consult your system administrator. Manual Gateway Address Sets the gateway address.
WSD FTP HTTP Telnet Receive Time-Out Sets the receive time-out period from 1 to 65,535 seconds. Notification Time-Out Sets the notification time-out period from 1 to 60 seconds. Maximum Number of TTL Sets the maximum number of TTL from 1 to 10. Maximum Number of Notification Sets the maximum number of notifications from 10 to 20. Password Sets the password for FTP. Re-enter Password Enter the password again to confirm it.
NOTE: The settings in the NetWare page will be valid only when NetWare or the printer is rebooted. Click the Apply New settings button to apply new settings. E-Mail Alert Purpose: To configure detailed settings for E-Mail Alert. This page can also be displayed by clicking E-Mail Alert in the Left Frame. Values: Primary SMTP Gateway Sets the primary SMTP gateway. SMTP Port Number Specifies the SMTP port number. This must be 25, 587 or between 5,000 and 65,535.
Bonjour (mDNS) Purpose: To configure the detailed settings for Bonjour. Values: Host Name Specifies the host name up to 63 alphanumeric characters and "-" (dash). The original setting will remain valid if no input is made. Printer Name Specifies the printer name up to 63 alphanumeric characters and symbol sets. The original setting will remain valid if no input is made. SNMP Purpose: To configure the detailed settings of SNMP.
Re-enter Community Name (Trap)* 1 Enter the community name used for trap again to confirm it. Select the check boxes to notify trap occurrence. In this case, specify the IP address and IP socket in the following format: IPv4 Specify the IP address and IP socket in the nnn.nnn.nnn.nnn:mmmmm format. Each section of "nnn" Trap is a variable value between 0 and 255. Note that values 127 and 224-254 are not valid for the first Notification 1-4 three-digits only.
Wireless Settings Network Type Specifies the network type from either Ad-Hoc or Infrastructure. MAC Address Displays the MAC address of the printer's wireless network adapter. Link Channel Displays the channel number of the printer's wireless connection. Link Quality Displays the quality of the printer's wireless network connection. Select the security method from the list.
* 1 For encryption, AES or TKIP method is used. * 2 This item is available only when the Infrastructure mode is selected for Network Type. * 3 For authentication and encryption by digital certificate, AES or TKIP method is used. * 4 This item is displayed only when the optional hard disk is installed and is set to On for encryption. * 5 To activate the setting, import a certificate which supports wireless LAN (server) on the SSL/TLS pages, and enable the relevant certificate in advance.
To specify the server authentication type, the server response time-out, or the search time-out. Values: Authentication System Settings Select the authentication system from the list. Server Response Time-Out Specifies the amount of time the printer should wait for response from the server. Sets the time period from 1 up to 75 seconds. Search Time-Out Specifies the amount of time the printer should wait for searching for the server. Sets the time period from 5 up to 120 seconds.
Text String Added to User Name Enter the added text string. SSL/TLS Purpose: To specify the settings for the SSL encryption communication to the printer, and set/delete the certificate used for IPsec, LDAPS, or Wireless LAN. Values: HTTP-SSL/TLS Communication* 1 Select the check box to enable the HTTP-SSL/TLS Communication. HTTP-SSL/TLS Communication Port Number Specifies the port number, which is not identical with that of HTTP for SSL/TLS. This must be 443 or between 8000 and 9999.
Certificate Details* 3 Category Displays the device to certificate selected at Certificate Management page or SSL/TLS page. Issued To Displays the device to certificate. Issuer Displays the issuer to certificate. Serial Number Displays the serial number of the device. Size of Public Key Display Size of Public Key. Valid From Displays the time the certificate is valid. Valid Until Displays the time the certificate is invalid. Status Displays whether certificate is valid or not.
Remote peers IPv6 address Specifies the IP address to connect to. Non IPsec communication policy Selects whether or not to communicate with a device which does not support IPsec. * 1 This item is effective only when the optional hard disk is installed and is set to On for encryption. NOTE: If IPsec is enabled with incorrect settings, you must disable it using the Reset IPsec menu on the operator panel. 802.1x Purpose: To specify the settings for IEEE 802.
To copy the settings to another printer, specify the IP address and password of the printer to which the settings are copied in the IP Address text box and Password text box. Then, click the Copy the settings to the Host in the above list button. Copying the settings is complete. The connection time-out period is 60 seconds. After that, you can check whether the settings were copied to this page.
To delete a user, click Delete to open the Delete User page. Clicking the Back button returns the screen to the status prior to deleting the user. To confirm or change the registered user, click Confirm/Change to open the Print User Settings page. User Registration* 2 User Registration No. Displays the user registration number. The Delete User button is displayed when the user is already registered. User Name Specifies the user name.
Size* Tray 3 Custom Size - Y* 1 Sets the length of custom size paper loaded in the third tray from the top. Tray 3 Custom Size - X* 1 Sets the width of custom size paper loaded in third tray from the top. Tray 4 Paper Type* 2 Sets the type of paper loaded in the fourth tray from the top. Tray 4 Paper Size* 2 Sets the size of paper loaded in the fourth tray from the top. Tray 4 Custom Size - Y* 2 Sets the length of custom size paper loaded in the fourth tray from the top.
Back to Contents Page Print Media Guidelines Paper Transparencies Envelopes Labels Storing Print Media Identifying Print Media and Specifications Print media is paper, labels, envelopes, and coated paper among others. Your printer provides high-quality printing on a variety of print media. Selecting the appropriate print media for your printer helps avoid printing troubles.
The amount of moisture in the paper affects both print quality and the ability of the printer to feed the paper properly. Leave the paper in its original packaging until you are ready to use it. This limits the exposure of the paper to moisture changes that can degrade its performance. Grain Direction Grain refers to the alignment of the paper fibers in a sheet of paper. Grain is either grain long, running the length of the paper, or grain short, running the width of the paper.
the paper package. Do not use paper that you have cut or trimmed yourself. Do not mix print media sizes, weights, or types in the same source. This may result in a paper jam. Do not remove the tray while a job is printing. Ensure that the paper is properly loaded in the tray. Flex paper back and forth, and then fan them. Straighten the edges of the stack on a level surface.
MPF Letterhead enters the printer first Selecting Pre-Punched Paper Pre-punched paper brands can differ in the number and placement of holes and in manufacturing techniques. However, it may not be possible to print on the paper to depending on the placement of holes on the paper. To select and use pre-punched paper: Test paper from several manufacturers before ordering and using large quantities of pre-punched paper.
Depending on the choice of envelopes, it is possible to expect variable levels of light wrinkling. It is recommended that you try a sample first before buying large quantities of any print media. See "Loading Print Media" for instructions on loading an envelope. When printing on envelopes: Use only high-quality envelopes that are designed for use in laser printers. Set the print media source to the MPF or tray 1.
Do not print within 1 mm (0.04 inches) of the die cut. Use full label sheets. Partial sheets may cause labels to peel off during printing, resulting in a jam. Partial sheets also contaminate your printer and your cartridge with adhesive, and could void your printer and cartridge warranties. Use labels that can withstand temperatures of 205°C (401°F) without sealing, excessive curling, wrinkling, or releasing hazardous emissions. Do not print within 1 mm (0.
(8.5 x 14 in.) Executive (7.25 x 10.5 in.) Y Y Y Y N Y Envelope #10 (4.125 x 9.5 in.) Y Y*3 N N Y N Monarch (3.875 x 7.5 in.) Y Y*3 N N Y N DL (4.25 x 8.75 in.) Y Y*3 N N Y N C5 (9 x 6.5 in.) Y Y*3 N N Y N Custom Y Y Y Y Y Y *1: In this mode, each page is output separately to the stacker tray. *2: In this mode, the document is sorted into sets or jobs and output to the stacker tray.
Coated Thick 163-216 Inkjet printer paper cannot be used. Transparency - Inkjet printer paper cannot be used. Label Normal - Inkjet printer paper cannot be used. Label Thick - Inkjet printer paper cannot be used.
Back to Contents Page Loading Print Media Capacity Print Media Dimensions Loading Print Media in Standard and Optional Trays Loading Print Media in the MPF Linking Trays Using the Duplex Function Using the Center Output Tray Using the Stacker Tray Loading print media properly helps prevent jams and ensures trouble-free printing. Before loading print media, identify the recommended print side of the print media. This information is usually on the print media package.
NOTE: To avoid paper jams, do not remove the tray while a printing is in progress. NOTE: Use only laser print media. Do not use ink jet paper in this printer. All trays are loaded the same way: 1. Remove the paper tray from the printer. 2. Adjust the width guides to the size of paper to be loaded. 3. Adjust the length guide to the size of paper to be loaded. 4. Before loading the paper, flex the sheets back and forth, and then fan them. Straighten the edges of the stack on a level surface.
5. Load paper into the tray with the recommended print side facing up. NOTE: Do not exceed the maximum fill line in the tray. Overfilling the tray may cause paper jams. 6. After confirming that the guides are securely adjusted, replace the paper tray into the printer. 7. Select the paper type from the operator panel if any print media other than plain print media is loaded.
NOTE: To print plain paper using the optional output expander, check if the lever is pulled down as shown in the illustration. 3. Load the envelope into the tray. When Loading Envelope#10, Monarch, or DL When Loading C5 NOTICE: Never use envelopes with windows, coated linings, or self-stick adhesives. These lead to paper jams and can cause damage to the printer.
NOTE: Ensure that you load an envelope with the flap completely closed. NOTE: If you do not load envelopes in the MPF right after they have been removed from the packaging, they may bulge. To avoid jams, flatten them as shown below when loading them in the MPF. NOTE: If envelopes are still not fed correctly, add some bending to the lead edge of the envelopes as shown in the following illustration. The amount of the bending shall be 5mm or less.
Loading Print Media in the MPF 1. Gently pull open the MPF cover. 2. Extend the extension tray. 3. Slide the width guides to the edge of the tray. The width guides should be fully extended. 4. Insert all media facing down and top edge first into the MPF. NOTE: Do not force the print media into the MPF.
5. Slide both width guides until they rest lightly against the edge of the print media stack. NOTE: Do not force the print media into the MPF. 6. Ensure the type setting for the MPF is set to the correct value for the print media you have loaded. 7. Select print media source, size, and type in your software program and select the print media size and type on the printer operator panel. Loading an Envelope in the MPF 1. Open the right hand cover. 2. Press down the lever to set the envelope mode.
When Loading Envelope#10, Monarch, or DL When Loading C5 NOTICE: Never use envelopes with windows, coated linings, or self-stick adhesives. These lead to paper jams and can cause damage to the printer. NOTE: Ensure that you load an envelope with the flap completely closed. NOTE: If you do not load envelopes in the MPF right after they have been removed from the packaging, they may bulge. To avoid jams, flatten them as shown below when loading them in the MPF.
following illustration. The amount of the bending shall be 5mm or less. Using the MPF Load only one size and type of print media during a single print job. To achieve the best possible print quality, use only high-quality print media that is designed for use in laser printers. For more guidelines on print media, see "Print Media Guidelines." Do not add or remove print media when there is still print media in the MPF or when the printer is printing from the MPF. This may result in a paper jam.
Using Booklet Print To use booklet print, you must select either Flip on Short Edge or Flip on Long Edge from the Duplex menu in the printer properties dialog box and then select Booklet Creation in the Booklet/Poster/Mixed Document dialog box displayed by clicking the Booklet/Poster/Mixed Document button.
The stacker tray holds up to: Discharging Not Stapled Paper size mode stapled In bulk 1,000sheet 50-set (SFP) or 750A4: P: 64gsm sheet A4: C2: 70gsm Letter: Business 4200: 20 lb Letter: Color Xpressions+: 24 lb (MPF) A4: Premier: 80gsm A4: Premier: 4-hole punched: 80gsm A4: Business: 80gsm A4: Colotech+: 90gsm Letter: Business 4200: 75gsm Letter: Digital Color Xpressions+: 90gsm/24 lb 750sheet 50-set Legal: Business 4200: 20 lb or 500Legal: Color Xpressions+: 24 lb sheet Legal: Digital Color Xpressions+
Back to Contents Page Operator Panel Using the Operator Panel Buttons Printing a Panel Settings Page Using the Operator Panel Buttons The operator panel has a liquid crystal display (LCD), eight buttons, and an indicator that blinks when the printer is ready to print, and when an error occurs. 1. Ready/Error indicator Lights up green when the printer is ready or sleeping and blinks when data is being received. Lights up yellow when an error occurs and blinks when an unrecoverable print error occurs.
Printing a Panel Settings Page The panel settings page shows current settings for the operator panel menus. When Using the Operator Panel 1. Press Menu button. 2. Ensure Report/List is highlighted, and then press 3. Press (Set) button. button until Panel Settings is highlighted, and then press (Set) button. The panel settings page is printed. When Using the Dell™ Printer Configuration Web Tool 1. Launch Dell Printer Configuration Web Tool. a. Open the web browser. b.
Back to Contents Page Printing Tips for Successful Printing Sending a Job to Print Canceling a Print Job Printing a Report Page Using the Stapling Function Using the Offset Function Using the Stored Print Function This chapter covers tips for printing, how to print certain lists of information from your printer, and how to cancel a job. Tips for Successful Printing Tips on Storing Print Media Store your print media properly. For more information, see "Storing Print Media.
5. Click OK or Print to send the job to the selected printer. Canceling a Print Job There are several methods for canceling a print job. Canceling From the Operator Panel To cancel a job after it has started printing: Press Cancel. Printing is canceled only for the current job. All the following jobs will continue to print. Canceling a Job From the Computer Running Windows Canceling a Job From the Taskbar When you send a job to print, a small printer icon appears in the right corner of the taskbar. 1.
By using the Report menu, you can print a variety of settings for your printer including printer settings, panel setting, and font list. The following describes two examples of printing from the Report menu. Printing a Printer Settings Page To verify detailed printer settings, print a printer settings page. A printed printer settings page also allows you to verify whether or not options have been installed properly.
Select PS Fonts List to print a listing of the fonts available to the PostScript ® 3™. 4. Press (Set) button. The message PCL Fonts List Printing or PS Fonts List Printing appears and remains on the operator panel until the page prints. The printer returns to the Ready to Print state after the font sample list prints. Using the Stapling Function When you use the staple function, you can staple each copy. The staple position is located at the upper-left of the paper corner.
cleared even when the printer is turned off. NOTE: Stored Print functions are available when: Enabling the RAM disk in the operator panel menu and setting "RAM Disk" to "Available" in the printer driver or Installing a hard disk in your printer and setting "Hard Disk" to "Available" in the printer driver The stored printing function includes the following job types. Secure Print You can store print jobs temporarily in printer memory to output at a specified time at the printer.
and Private MailBox Print require the password you specified in the driver when you sent the job. To print the stored documents, use the procedure below. 1. Press Menu button. 2. Press button until Print Menu is highlighted, and then press (Set) button. 3. Press button until your desirable job type is highlighted, and then press The stored document will be printed. (Set) button.
Back to Contents Page Printer Settings Printing a Printer Settings Page Using the Operator Panel to Change Printer Settings Using the Dell Printer Configuration Web Tool to Change Printer Settings Resetting Defaults You can change most printer settings from your software program. If your printer is attached to the network, you can change settings from the Dell ™ Printer Configuration Web Tool. To launch the Dell Printer Configuration Web Tool, type the printer's IP address in your web browser.
You can select menu items and corresponding values from the operator panel. When you first enter the menus from the operator panel, you see a bullet next to a value in the menus. This bullet indicates the factory default menu setting. These settings are the original printer settings. Factory defaults may vary for different countries. When you select a new setting from the operator panel, a bullet appears next to the setting to identify it as the current user default menu setting.
1. Press Menu button. 2. Ensure Report/List is highlighted, and then press 3. Printer Settings is displayed. Press (Set) button. (Set) button. The printer settings page is printed. Resetting Defaults After executing this function and rebooting the printer, all the menu parameters, except the parameters for the network, are reset to their default values. When Using the Operator Panel 1. Press Menu button. 2. Press button until Admin Menu is highlighted, and then press 3.
3. Ensure Network is highlighted, and then press 4. Press (Set) button. button until Reset Wireless or Reset LAN is highlighted, and then press 5. Start or Cancel message appears on the operator panel. Press 6. Turn off the printer, and then on again to apply the settings. Back to Contents Page (Set) button. (Set) button.
Back to Contents Page Understanding the Tool Box Menus The Tool Box allows you to diagnose the printer settings. NOTE: A Password dialog box appears the first time you try to change settings on Tool Box when Panel Lock is set on the printer. In this case, input the password you specified, and click OK to apply the settings. NOTE: For how to start Tool Box, see "Understanding Your Printer Software." Chart Print Purpose: To output various charts that can be used for the printer's diagnosis.
Back to Contents Page Understanding the Printer Menus Report/List Admin Menu Tray Settings Print Menu Panel Lock When your printer is configured as a network printer available to a number of users, the access to the Admin Menu menus can be limited. This prevents other users from using the operator panel to inadvertently change a printer user default that has been set by the administrator. In this case, you can access the Stored Document, and Tray Settings menus only.
See also: "Understanding Fonts", "Printing a Font Sample List." Job History Purpose: To print a detailed list of the print jobs that have been processed. This list contains the last 20 jobs. Error History Purpose: To print a detailed list of paper jams and fatal errors. Print Meter Purpose: To print the reports for the total number of pages printed. When printed using either the printer control panel or Dell Printer Configuration Web Tool, the report will be titled Print Volume Report.
Values: Auto* Detects the Ethernet settings automatically. 10Base Half Uses 10 base-T half-duplex. 10Base Full Uses 10 base-T full-duplex. 100Base Half Uses 100 base-TX half-duplex. 100Base Full Uses 100 base-TX full-duplex. 1000Base Full Uses 1000 base-T full-duplex. Status Purpose: To display the information on the wireless signal strength. Any change cannot be made on the operator panel to improve the status of the wireless connection. Values: Good Indicates good signal strength.
Select to configure the wireless setting without the access point such as a wireless router. Manual Setup Ad-hoc Push Button Control WPS PIN Code No Security Select to configure the wireless setting without specifying the security method from WEP. WEP Key Entry Specify the WEP 64bit Key to use through the wireless network. Up to 10 hexadecimal characters can be entered. (64Bit) Transmit Specify the transmit key from WEP Key 1, WEP Key 2, WEP Key Key 3, and WEP Key 4.
Protocol Purpose: To enable or disable each protocol. The change becomes effective after the printer is turned off and then on again. Values: LPD Port9100 IPP FTP NetWare WSD SNMP E-Mail Alert EWS Bonjour(mDNS) Telnet HTTP-SSL/TLS* 1 Enable* Enables the LPD port. Disable Disables the LPD port. Enable* Enables the Port9100 port. Disable Disables the Port9100 port. Enable* Enables the IPP port. Disable Disables the IPP port. Enable* Enables FTP. Disable Disables FTP.
Reject Rejects an access from the specified IP address. * 1 This item is only available for LPD or Port9100. IEEE 802.1x Purpose: To disable the IEEE 802.1x authentication. The change becomes effective after the printer is turned off and then on again. NOTE: This item is displayed only when the IEEE 802.1x authentication is enabled. NOTE: This item is available only when connecting the printer with a wired network. Reset LAN Purpose: To initialize wired network data stored in NV (non-volatile) memory.
Purpose: To specify the ECP communication mode of the parallel interface. The change becomes effective after the printer is turned off and then on again. Values: Disable ECP communication mode is disabled. Enable* ECP communication mode is enabled. Adobe Protocol Purpose: To specify PostScript communication protocol for parallel interface. You can configure the Adobe Protocol settings for parallel port. The change becomes effective after the printer is turned off and then on again.
Binary Used when no special processing is required for data. System Settings Use the System Settings menu to configure a variety of printer features. NOTE: Values marked by an asterisk (*) are the factory default menu settings. PowerSaver Time Purpose: To specify the time for transition to power saver mode. Values: Sleep Deep Sleep 15 min.* 5-30 min. 15 min.* 1-29 min. Specifies the time for transition to the power saver time (Sleep) in minutes.
Off* Does not emit a tone when toner or some other consumable is low. Low Toner Alert On Emits a tone when toner or some other consumable is low. Off* Does not emit a tone when the operator panel display is returned to the default settings by scrolling the loop menu. On Emits a tone when the operator panel display is returned to the default settings by scrolling the loop menu.
On Automatically outputs a log of completed jobs. Print logs can also be printed using the Report/List menu. NOTE: Restart your printer when you change the settings for the RAM Disk menu. Print ID Purpose: To specify a location where the user ID is printed. Values: Off* Does not print the user ID. Top Left Prints the user ID on the top left of the page. Top Right Prints the user ID on the top right of the page. Bottom Left Prints the user ID on the bottom left of the page.
* 2 This item is displayed only when an optional 1100-sheet feeder is installed on the printer. RAM Disk Purpose: To allocate memory to the RAM disk file system for the Secure Print, Proof Print, and Mailbox Print features. The change becomes effective after the printer is turned off and then on again. Values: Enable Allocate memory to the RAM disk file system. Disable Does not allocate memory to the RAM disk file system. Secure Print and Proof Print jobs will abort and be recorded to the job log.
paper size settings for the current job. Values: Off No tray size substitute accepted. Larger Size Substitutes paper of next largest size. When there is no larger paper size, the printer substitutes paper of nearest size. Nearest Size* Substitutes paper of nearest size. MPF Feed Substitutes paper from the MPF. mm/inch Purpose: To specify the default measurement unit displayed after the numeric value on the operator panel. Values: millimeter (mm) Selects millimeter as the default measurement unit.
Values: Off* Disables to overwrite the hard disk drive. 1Time Overwrites the hard disk drive once. 3Times Overwrites the hard disk drive 3 times. NOTE: This item is available only when the optional hard disk drive is installed. Secure Job Expiration Purpose: To specify the date and time to delete the files stored as Secure Print in the RAM disk or the hard disk drive.
Off* Enables to print the data with no authentication information. Internal Mode Restricts printing based on the print user information registered in the internal server. External Mode Restricts printing based on the print user information registered in the external server. No Account User Print Purpose: To specify whether to permit the printing of data with no authentication information. Values: Off* Rejects printing the data with no authentication.
Values: Off* Disables to offset the output paper. Offset per Set Offsets each copy before printing the next copy. Offset per Job Offsets each copy per paper job you specify. NOTE: This item is available only when the optional output expander is installed. Banner Sheet Offset Purpose: To specify whether to offset the output paper, and insert a banner sheet before the first page of each copy. Values: Off* Disables to insert the banner sheet after offsetting the output paper.
settings, and configure the security settings. NOTE: Values marked by an asterisk (*) are the factory default menu settings. F/W Version Purpose: To display the printer's firmware version. Service Tag Purpose: To display the printer's service tag. Paper Density Purpose: To specify paper density settings. Values: Plain Label Normal* Light Normal* Light Adjust BTR NOTICE: The print quality changes depending on the setting values you select for this item.
-6 - +6 Coated (106 to 163 gsm) 0* Coated Thick (164 to 216 gsm) 0* Envelope Recycled -6 - +6 -6 - +6 0* -6 - +6 0* -6 - +6 Adjust Fuser Purpose: To specify the optimum temperature settings for printing for the fuser. To lower the temperature, set negative values. To increase, set positive values. The default settings may not give the best output on all paper types. When the printed paper has curled, try to lower the temperature.
On* Automatically performs color registration adjustment. Off Does not automatically perform color registration adjustment. Color Registration Adjustment Purpose: To specify whether to manually perform color registration adjustment. Manual Color Registration Adjustments are required such as when the printer is initially installed and after the printer is moved. NOTE: The Color Registration Adjustment feature can be configured when Auto Registration Adjustment is set to Off.
1000m 2000m Specifies the altitude of the location where the printer is installed. 3000m 4000m Initialize PrintMeter Purpose: To initialize the print meter of the printer. When the print meter is initialized, the meter count is reset to 0. Reset Defaults Purpose: To initialize the NV (non-volatile) memory. After executing this function and rebooting the printer, all the menu parameters, except the parameters for the network, are reset to their default values.
Off* Does not use another manufacturer's toner cartridge. On Uses another manufacturer's toner cartridge. PCL Use the PCL menu to change printer settings that only affect jobs using the PCL emulation printer language. NOTE: Values marked by an asterisk (*) are the factory default menu settings. Paper Tray Purpose: To specify the input tray. Values: Auto* Automatically selects a tray according to the paper size and type settings of the printing job.
297 mm*/11.7 inch* Y Size 127 - 355 mm/5.0-14.0 inches Specifies the length of the custom size paper. *1 Denotes country-specific factory default values. NOTE: Selecting a custom size for the paper size prompts you to enter a custom length and width. 210 mm*/8.3 inch* 77 - 215 mm/3.0-8.5 inches Specifies the width of the custom size paper. Orientation Purpose: To specify how text and graphics are oriented on the page.
Albertus Md Albertus XBd Clarendon Cd Coronet Marigold Arial Arial It Arial Bd Arial BdIt Times New Times New It Times New Bd Times New BdIt Symbol Wingdings Line Printer Times Roman Times It Times Bd Times BdIt Helvetica Helvetica Ob Helvetica Bd Helvetica BdOb CourierPS CourierPS Ob CourierPS Bd CourierPS BdOb SymbolPS Palatino Roman Palatino It Palatino Bd Palatino BdIt ITCBookman Lt ITCBookman LtIt ITCBookmanDm ITCBookmanDm It HelveticaNr HelveticaNr Ob HelveticaNr
Font size refers to the height of the characters in the font. One point equals approximately 1/72 of an inch. NOTE: The Font Size menu is only displayed for typographic fonts. See also: "Pitch and Point Size." Font Pitch Purpose: To specify the font pitch for scalable monospaced fonts. Values: 10.00* 6.00-24.00 Specify the value in increments of 0.01. Font pitch refers to the number of fixed-space characters in a horizontal inch of type.
Purpose: To specify whether to perform the image enhancement feature. Image enhancement is a feature that makes the boundary line between black and white smoother to decrease jagged edges and enhance the visual appearance. Values: Off Disables the Image Enhancement feature. On* Enables the Image Enhancement feature. Hex Dump Purpose: To help isolate the source of a print job problem. With Hex Dump selected, all data sent to the printer is printed in hexadecimal and character representation.
Black* Prints in the black and white mode. Color Prints in the color mode. PostScript Use the PostScript menu to change printer settings that only affect jobs using the PostScript emulation printer language. NOTE: Values marked by an asterisk (*) are the factory default menu settings. PS Error Report Purpose: To specify whether the printer outputs error contents for a PostScript error. The change becomes effective after the printer is turned off and then on again.
Panel Settings Use the Panel Settings menu to set a password to limit access to the menus. This prevents items from being changed accidentally. NOTE: Values marked by an asterisk (*) are the factory default menu settings. See also: "Panel Lock." Panel Lock Purpose: To limit access to the menus. Values: Disable* Does not limit access to the menus. Enable Limits access to the menus. New Password Purpose: To set a password to limit access to the menus.
NOTE: Values marked by an asterisk (*) are the factory default menu settings. MPF Purpose: To specify the paper loaded in the MPF.
Specified MPF Mode Stop printing and show an error on the operator panel if the paper specified from the printer driver does not match the paper configured for the MPF from the operator panel. Driver Continue to print even if the paper specified from the printer driver does not match the paper Specified* configured for the MPF from the operator panel. Display Popup On* Specifies the size and type of paper loaded in the MPF. This item is available only when Panel Specified is selected for MPF Mode.
Tray 2 Purpose: To specify the paper loaded in the second tray from the top. Values: Plain(60 to 90 gsm)* Plain Thick (80/90 to 105 gsm) Paper Type Covers (106 to 163 gsm) Covers Thick (164 to 216g sm) Recycled Letter Head Auto* Monarch DL C5 Paper Size Envelope #10 X Size Custom Size Y Size 210 mm*/8.3 inch* 77 - 215 mm/3.0-8.5 inches 297 mm*/11.7 inch* 127 - 355 mm/5.0-14.0 inches Specifies the width of the custom size paper. Specifies the length of the custom size paper.
Tray 4 Purpose: To specify the paper loaded in the fourth tray from the top. Values: Plain (60 to 90 gsm)* Plain Thick (80/90 to 105 gsm) Paper Type Covers (106 to 163 gsm) Covers Thick (164 to 216g sm) Recycled Letter Head Auto* Monarch DL C5 Paper Size Envelope #10 X Size Custom Size Y Size 210 mm*/8.3 inch* 77 - 215 mm/3.0-8.5 inches 297 mm*/11.7 inch* 127 - 355 mm/5.0-14.0 inches Specifies the width of the custom size paper. Specifies the length of the custom size paper.
Print Menu The Print Menu provides document storing services with Secure Print, Private Mailbox Print, Public Mailbox Print, and Proof Print. NOTE: The Print Menu is displayed only when the RAM disk is set to on or the optional hard disk is installed. Secure Print Purpose: To specify printing and deleting the stored document. Values: Enter the password you specified on the printer driver. Select User ID All Document Print and Delete Deletes all documents from print memory after printing them.
Proof Print Purpose: To specify printing and deleting the stored document. Values: Enter the password you specified on the printer driver. Print and Delete Deletes all documents from print memory after printing them. Select User ID All Document document n (n is number) Print Prints all documents and save them in memory. Delete Deletes all documents from print memory. Print and Delete Deletes the specified document from print memory after printing it.
1. Press Menu button. 2. Press button until Admin Menu is highlighted, and then press 3. Enter the password, and then press 4. Press (Set) button. button until Panel Settings is highlighted, and then press 5. Panel Lock is displayed. Press 6. Press (Set) button. (Set) button. (Set) button. button until Disable is highlighted, and then press 7. Enter the current password, and then press (Set) button. (Set) button. 8.
Back to Contents Page Understanding Your Printer Software Printer Settings Utility Tool Box Use the Drivers and Utilities CD that came with your printer to install a combination of software programs, depending on your operating system. The following software programs can only operate on Windows. They cannot operate on Macintosh, UNIX, or Linux. Status Window The Status Window alerts you when an error or warning occurs, for example, when a paper jam occurs or toner is running low.
a. When you cannot get information from the printer automatically by two-way communication, a window that prompts you to type the Service Tag appears. Type your Dell printer Service Tag in the field provided. Your Service Tag is located inside the front cover of your printer. b. Select a URL from the Select Reorder URL list. c. Click Visit Dell printer supplies ordering web site. 4. If ordering by phone, call the number that appears under the Order by Phone heading.
2. The Quick Launch Utility window provides three buttons; Status Window, Updater, and Troubleshooting. To exit, click the X button at the top-right of the window. For details, click the Help button of each application. Status Window The Status Window button opens the Status Window. See "Status Window." Updater The Updater button updates the settings for the printer driver, firmware and service software.
For USB connection a. Select USB Connection. b. In the list on the Select Printer screen, select the target printer that you diagnose printer settings for. 4. Click OK. The Tool Box starts.
Back to Contents Page Printing Using ColorTrack (External Authentication) ColorTrack Settings Setting the Printer Driver With ColorTrack, you can restrict the number of pages that can be printed per user, specify the users who can print in color, and restrict the users who can access the printer, based on the user information registered on the external authentication server or the printer. To print using ColorTrack, you must set ColorTrack Settings and the printer driver.
When Using the Operator Panel You can specify only the settings of ColorTrack Mode, No Account User Print, and ColorTrack Error Report using the operator Panel. 1. Press Menu button. 2. Press button until Admin Menu is highlighted, and then press 3. Press button until System Settings is highlighted, and then press (Set) button. 4. Press button until ColorTrack Mode is highlighted, and then press (Set) button. 5. Press button until External Mode is highlighted, and then press 6.
Specify whether to automatically print error-related information if printing using ColorTrack results in an error. Setup Remote Authentication Click Setup Remote Authentication Page to display the Authentication System page. NOTE: This item is displayed only when External Mode is specified. Authentication System Specify the server authentication type, the server response time-out, or the search time-out. When Using the Dell™ Printer Configuration Web Tool 1. Launch Dell Printer Configuration Web Tool. a.
Specify the settings for the Kerberos Server. When Using the Dell™ Printer Configuration Web Tool 1. Launch Dell Printer Configuration Web Tool. a. Open the web browser. b. Enter the IP address of your printer in the web browser. See "Dell Printer Configuration Web Tool." 2. Select Print Server Settings. 3. Click the Security tab. 4. Select Kerberos Server. 5. Enter the primary server name or IP address, and the port address in Primary Server Name / IP Address & Port. 6.
the printer is turned off and then on again. NOTE: Specify the domain name with uppercase characters. Depending on your server, an error may occur if you specify the domain name with lowercase characters. LDAP Server Specify the directory server and the authentication method to execute LDAP authentication or to acquire information using LDAP, and specify the range and attributes for searching.
"xxxx" is a hexadecimal variable value. Backup IP Address / Host Name & Port Specify the backup IP address or the host name, and the port address, as necessary. Specify the backup IP address or the host name, and the port address after specifying the IP Address / Host Name & Port. The change becomes effective after the printer is turned off and then on again. NOTICE: Do not use the same port address as that of another port. NOTICE: Set the backup server after setting the main server.
LDAP Authentication Specify the LDAP server authentication method. When Using the Dell™ Printer Configuration Web Tool 1. Launch Dell Printer Configuration Web Tool. a. Open the web browser. b. Enter the IP address of your printer in the web browser. See "Dell Printer Configuration Web Tool." 2. Select Print Server Settings. 3. Click the Security tab. 4. Select LDAP Authentication. Confirm the authentication method. When adding a text string to the UserID, specify Enable for Use Added Text String.
Dell ColorTrack Mode Specify whether to allow general users to change settings related to authentication or whether general users must use the settings configured by the Administrator. Specify Group Name Specify the name of the belonging group to use when authenticating. If you specify a group that does not belong, authentication fails and the data is not printed. Also, the default group is set if Specify Group Name is not specified.
Back to Contents Page Using Digital Certificates Managing Certificates Setting the Features The authentication feature using digital certificates upgrades security when sending print data or setting data. This chapter describes how to manage digital certificates as follows.
8. Press (Set) button. The cursor moves to the next digit. 9. Repeat steps 7 and 8 to enter all of the digits, and then press (Set) button. When Using the Dell™ Printer Configuration Web Tool 1. Launch Dell Printer Configuration Web Tool. a. Open the web browser. b. Enter the IP address of your printer in the web browser. See "Dell Printer Configuration Web Tool." 2. Select Printer Settings. 3. Click the Printer Settings tab. 4. Select Secure Settings. 5. Click Data Encryption.
9. The Restart Printer button is displayed after generating the self-signed certificate, and then click the Restart Printer button. 10. Repeat steps 2 to 4 to display the SSL/TLS page after restarting the printer. 11. If the self-signed certificate is set correctly, since the HTTP- SL/TLS Communication column is set to Enable and a check box is displayed, select Enable. Importing a Digital Certificate NOTICE: Before importing a certificate file, back up the certificate file.
NOTE: The Certificate Management button is displayed only when the optional hard disk is installed and is set to On for encryption. 6. When setting a Wireless LAN (Server) certificate, select Trusted Certificate Authorities within Category. When setting a certificate of SSL Server, SSL Client, or IPsec, select Local Device. 7. Select the purpose of use from the Certificate Purpose list. 8. Click the Display the List button to display the Certificate List page.
See "Dell Printer Configuration Web Tool." 2. Select Print Server Settings. 3. Click the Security tab. 4. Select SSL/TLS. 5. Click the Certificate Management button to display the Certificate Management page. NOTE: The Certificate Management button is displayed only when the optional hard disk is installed and is set to On for encryption. 6. Select the category from the Category list. 7. Select the purpose of use from the Certificate Purpose list. 8.
6. Select the category from the Category list. 7. Select the purpose of use from the Certificate Purpose list. Click the Display the List button to display the Certificate List page. NOTE: If the list includes more than 20 certificates, press the Next button to display the next page. 8. Select the certificate to be exported. 9. Click the Certificate Details button to display the Certificate Details page. 10. To export the selected certificate, press the Export This Certificate button.
Setting LDAP-SSL/TLS Communication 1. Displays the SSL/TLS page. 2. Select Enable for LDAP-SSL/TLS Communication. 3. After restarting the printer, LDAP-SSL/TLS Communication is enabled. NOTE: This setting is available only when the optional hard disk is installed and is set to On for encryption.
2. Set the certificate to be used with Wireless LAN. For more information, see "Setting a Digital Certificate." 3. Confirm whether the certificate is set correctly. For more information, see "Confirming the Settings of a Digital Certificate." 4. Click the Print Server Settings tab. 5. Select Wireless LAN. 6. Select either of the following items from the list of Encryption of Secure Settings. WPA-Enterprise-AES/WPA2-Enterprise-AES WPA-Enterprise-TKIP 7.
Back to Contents Page Understanding Fonts Typefaces and Fonts Bitmapped and Scalable Fonts Resident Fonts Symbol Sets Typefaces and Fonts A font is a set of characters and symbols created with a distinct design. The distinct design is called a typeface. The typefaces you select add personality to a document. Well-chosen typefaces make a document easier to read. The printer has numerous resident fonts in PCL 5/PCL 6 and PostScript 3. See "Resident Fonts" for a listing of all resident fonts.
In proportional (or typographic) fonts, every character can have a different width. Since proportional fonts have characters with different widths, the font size is specified in point size, not pitch. Point size refers to the height of the characters in the font. A point is defined as 1/72 inch. The characters in a font printed at 24 point will be twice as large as the characters in the same font printed at 12 point.
If you plan to use many downloadable bitmapped or scalable fonts or if you plan to use many different sizes of scalable fonts, you may need to purchase additional memory for your printer. Resident Fonts Your printer is equipped with resident fonts stored permanently in print memory. Different fonts are available in PCL 5/PCL 6 and PostScript 3. Some of the most popular typefaces, like Courier and TimesNew (PCL 5/PCL 6)/Times New Roman (PostScript 3), are available for all printer languages.
Courier BdIt Clarendon Light Cooper Black LetterGothic Cooper Black Italic LetterGothic It Cooper Gothic 32BC LetterGothic Bd Cooper Gothic 33BC Coronet Albertus Md Courier Albertus XBd Courier Oblique Courier Bold Clarendon Cd Courier Bold Oblique Eurostile Medium Coronet Eurostile Bold Eurostile Extended No. 2 Marigold Eurostile Bold Extended No.
CourierPS Ob Hoefler Text Italic CourierPS Bd Hoefler Text Black CourierPS BdOb Hoefler Text Black Italic Hoefler Ornaments SymbolPS Joanna Joanna Italic Palatino Roman Joanna Bold Palatino It Joanna Bold Italic Palatino Bd Letter Gothic Palatino BdIt Letter Gothic Slanted Letter Gothic Bold ITCBookman Lt Letter Gothic Bold Slanted ITCBookman LtIt ITC Lubalin Graph Book ITCBookmanDm ITC Lubalin Graph Book Oblique ITCBookmanDm It ITC Lubalin Graph Demi ITC Lubalin Graph Demi Oblique Hel
Times Bold Italic Times New Roman Times New Roman Italic Times New Roman Bold Times New Roman Bold Italic Univers 45 Light Univers 45 Light Oblique Univers 55 Univers 55 Oblique Univers 65 Bold Univers 65 Bold Oblique Univers 57 Condensed Univers 57 Condensed Oblique Univers 67 Condensed Bold Univers 67 Condensed Bold Oblique Univers 53 Extended Univers 53 Extended Oblique Univers 63 Extended Bold Univers 63 Extended Bold Oblique Wingdings ITC Zapf Chancery Medium Italic Symbol Sets A symbol set is the col
ISO 17 Spanish ISO 21 German ISO 60 Norwegian v1 ISO 69 French Windows 3.
Back to Contents Page Understanding Printer Messages The printer operator panel displays messages describing the current state of the printer and indicates possible printer problems you must resolve. This topic provides a list of all printer messages, explains what they mean, and tells you how to clear the messages. NOTICE: When an error code is displayed, the print data remaining on the printer and the information accumulated in the memory of the printer are not secured.
Life Over NNN-NNN Replace Now XXX CRUM ID NNN-NNN Reseat XXX CRUM DATA NNN-NNN Reseat XXX XXX has reached its end of life. Replace XXX. Error NNN-NNN relates to printer problems. Order a new consumable at the website (www.dell.com/supplies). XXX indicates a consumable. See "Maintaining Your Printer." An unsupported consumable is installed. Replace the consumable with the supported one. Error NNN-NNN relates to printer problems. Order a new consumable at the website (www.dell.
Contact Support Env. Mode Error 010-910 Open Right Hand Cover and make a Envelope Lever the normal position. Open the right hand cover, and then lift up the The printer is in the envelope mode when envelope lever to clear the envelope mode. you print on plain paper. See "Loading an Envelope in the MPF." Close Right Hand Cover 016-XXX Certificate Fail Init Certificate Inquire of your system administrator to reconfigure the security settings. Certification error has occurred.
See "Contacting Dell." Press Format Error 016-387 Data Violation Press In downloading the firmware, the format of a download file is inaccurate. (Set) button. Contact Dell if this message appears repeatedly. See "Contacting Dell." Press Protection Error 016-391 Data Violation Press A firmware download was performed while it was prohibited. (Set) button. Contact Dell if this message appears repeatedly. See "Contacting Dell." Press Erase Flash Err.
If this does not solve the problem, contact Dell. Contact Administer Press Job Fail 016-531 Sign On Error An authentication error of the LDAP server or of the Kerberos server has occurred. See "Contacting Dell." Press Job Fail Wrong Attribute Ask your system administrator to confirm whether the Kerberos server and the LDAP server are set correctly on the printer. If this does not solve the problem, contact Dell. Press 016-532 The user information of the LDAP server is invalid.
016-543 Restart Printer Certificate Fail A certificate destruction error has occurred while using the Wireless WPA Enterprise or WPA2-Enterprise. Contact Administer Ask your system administrator to connect the printer with a wired network, initialize the Wireless settings, import the Wireless certificate, and set WPA-Enterprise or WPA2-Enterprise again. (Set) button, then the Cancel button to Press cancel the current print job. Delete unnecessary stored jobs.
printer. Press Wireless Error 016-920 Timeout Error WPS failed to connect. A timeout occurred during connection with the wireless LAN access point (Registrar). Press (Set) button. Execute the operation again according to the operation procedure. Press Download Error 016-921 Timeout Error WPS failed to connect. A download error has occurred during connection with the wireless LAN access point (Registrar). Press (Set) button. Execute the operation again according to the operation procedure.
Paper Size Mismatch 024-91X Load Tray N XXXXXXXX YYYYYYYY Error NNN-NNN relates to printer problems. Change the paper size settings according to the size of the paper you load. N indicates the number of the tray. See "Tray Settings" on "Dell Printer Configuration Web Tool." XXXXXXXX indicates a paper size. YYYYYYYY indicates a paper type. See "Tray Settings" on "Understanding the Printer Menus." Load paper of the specified size. See "Loading Print Media in Standard and Optional Trays.
Cartridge. expander needs to be replaced now. (www.dell.com/supplies). See "Replacing the Stapler Cartridge." Continue without Staple? Are you Sure? Empty Staple 024-979 Replace Now Stapler Cartridge. Replace the stapler cartridge. The stapler cartridge of the output expander is empty. Order a new consumable at the website (www.dell.com/supplies). See "Replacing the Stapler Cartridge.
See "Replacing the Waste Toner Box." Ready to Print Is close to life Ready to Print 091-4XX A drum cartridge needs to be replaced soon. Replace the drum cartridge of the indicated color soon. N Drum Crtrdg Order a new consumable at the website (www.dell.com/supplies). N indicates the color of the drum cartridge. See "Replacing the Drum Cartridges." 091-41X A drum cartridge needs to be replaced soon. Prepare a new drum cartridge of the indicated color.
094-911 Replace Belt The belt unit needs to be replaced now. See "Replacing the Belt Unit." Contact Support Trans. Error 094-913 The transfer roller is either missing or not fully installed in the printer. Follow the instructions in the operator panel and make sure that the transfer roller has been fully installed. See "Replacing the Transfer Roller." Insert Transfer Roller Ready to Print 142-700 Order a new belt unit at the website (www.dell.com/supplies).
Back to Contents Page Printing With Web Services on Devices (WSD) Adding Roles of Print Services Printer Setup This section provides information for network printing with WSD, the new Windows Vista ®, Windows Server® 2008, Windows Server 2008 R2, and Windows ® 7 protocol of Microsoft ®. Adding Roles of Print Services When you use Windows Server 2008 or Windows Server 2008 R2, you need to add the roles of print services to the Windows Server 2008 or Windows Server 2008 R2 client.
4. In the list of available printers, select the one you want to use, and then click Next. NOTE: In the list of available printers, the WSD printer is displayed in the form of http://IP address/ws/. NOTE: If no WSD printer is displayed in the list, enter the printer's IP address manually to create a WSD printer. To enter the printer's IP address manually, follow the instructions below. For Windows Server 2008 R2, to create a WSD printer, you must be a member of Administrators group. 1.
Back to Contents Page Printing With UX Filter (UNIX) Overview Installing the UX Filter Uninstalling the UX Filter Printing and Using the Utilities Precautions and Limitations Overview The UX Filter This section describes the features of the UX filter and its operating environment. Features The UX filter is an utility software which converts files created by the UNIX workstation into a format which conforms to the PostScript language loaded in the printer.
Before Using the UX Filter Check the following items before using the UX filter. Before setting up the workstation, set up the printer as follows. 1. Make sure the lpd port is working or not when using the network environment. If the lpd port is not working, set LPD to On on the operator panel. (Mandatory) See "Protocol" for more information. When a parallel or USB port is to be used, make sure these are working. (Mandatory) 2.
dellpsif Input filter dellposttxt5130cdn Symbolic link file to call txt2ps2 /usr/lib/lp/postscript dellpostps5130cdn Symbolic link file to call dellpsif dellbinpath5130 Directory description file for the UX filter print tool /usr/lib/lp/model Model interface program Source file of the model interface program (stored as the printer name during registration) /etc/lp/interfaces Model interface program Interface program for PRINTER (stored as the printer name during registration) posttxt5130cdn.
HP-UX 1. Setup the printer and network. 2. Insert the Drivers and Utilities CD into the local workstation. 3. Run the installer and begin the installation. 4. Print for testing the printer. Operation on Solaris Installation/Printer Setting 1. Insert the Drivers and Utilities CD in the CD-ROM drive of the local workstation. If CD-ROM drive is not mounted on your workstation, extract files by using another workstation that has a CD-ROM drive to transfer those files to your workstation. 2.
Enter server-hostname? : server server-hostname is 'server' (y/n)[y] : y NOTICE: The host name of the server must be pre-registered with DNS, NIS, NIS+ or /etc/hosts. 8. When Set Remote Printer is selected, type the remote printer name. Enter server-printer-name? : ps server-printer-name is 'ps' (y/n)[y] : y NOTICE: Type ps when the printer is a network connection printer. 9. Type the printer name to be registered with the system.
3. Type ./install.sh and run the installer. # ./install.sh 4. Select the printer model to install. Printer Model ? 1. Dell 5130cdn Color Laser Printer 2. Exit Enter Process No (1/2)? : 1 5. Specify the directory to install the utility. Enter install directory name [/usr/local/dellbin5130] : directory is '/usr/local/dellbin5130' (y/n)[n] : y 6. Type the name of the output printer. Type delllp5130cdn. Type the printer name to be registered with the system.
3. Delete the symbolic files required to call up the filter. Delete the following files from /usr/lib/lp/postscript. dellposttxt5130cdn dellpostps5130cdn dellbinpath5130 4. Delete the interface program files of Selected printer type name from /usr/lib/lp/model. Please also delete the interface program files of Selected printer name from /etc/lp/interfaces. 5. Delete all the directories that contain the UX filters and the files in these directories created during the installation.
To print to other printers: To print to a printer named dell5130cdn, type as follows. % lp -d dell5130cdn filename NOTE: The name of the printer can be confirmed by executing lpstat -v. To change the default printer temporarily for printing: To change the default printer, set the printer name in the environment variable LPDEST. To set a printer named dell5130cdn as the default printer for printing, type as follows.
The input file will be processed as the PostScript file. If the file does not begin with "%!", "%!" will be output to the beginning line. Whether the file contains "%!" will be ignored. To print text/PostScript files: -y DuplexBook Enables the long-edge binding feature. When it is specified, the printing direction or position will be adjusted and both sides of the paper printed so that the longer edge of the pages can be bound. -y DuplexList Enables the short-edge binding feature.
Feed paper from the tray loaded with MxNmm defined by users. Possible range specified: Width: 76.2 to 215.9 mm Length: 127.0 to 355.6 mm MxNin Feed paper from the tray loaded with MxNinches defined by users. Possible range specified: Width: 3.00 to 8.5 inches Length: 5.00 to 14.0 inches If this option is not specified or the tray specified tray is not available, feed paper from the default tray. -y toner_save Turns on the save toner mode for printing.
L LabelPaper/Labels C2 Coated/Coated 2/Coated Paper 2 C2B Coated Back/Coated 2/Coated Paper 2 - Side 2 C3 Coated Thick/Coated 3/Coated Paper 3 C3B Coated Thick Back/Coated 3/Coated Paper 3 - Side 2 LH LetterHead E Envelope If this option is not specified, multipurpose feeder Paper Type for the printer can be used. -y mfo=mode Specifies orientation for multipurpose feeder.
-y st=mode Specifies feed separators from. Available feed separators from the following. auto AutoTray/Auto 1 1stTray/Tray 1 (Standard 550-sheet tray) 2 2ndTray/Tray 2 (Optional 550-sheet feeder) 3 3rdTray/Tray 3(Optional 550-sheet feeder) 4 4thTray/Tray 4 (Optional 1100-sheet feeder) 5 5thTray/Tray 5 (Optional 1100-sheet feeder) msi Multipurpose Feeder off Off -y sp Specifies printed separators. -y sb Specifies Skip Blank Pages. -y cm=mode Specifies output color.
Off 1 Photo 2 Screen Display 3 Standard/ Normal 4 Business Graphics This option is available only for color printing and when entry data is RGB data. -y gc=mode Specifies RGB gamma correction. Available RGB gamma corrections are as follows: 1.0 1.0 1.4 1.4 1.8 1.8 2.2 2.2 2.6 2.6 off Off This option is available only for color printing and when entry data is RGB data. -y sc=mode Specifies screen. Available screens are as follows: 0 Fineness 1 Standard 2 Auto 3 Gradation -y gg=mode Specifies gray guaranteed.
This option is available only for color printing. -y br=mode Specifies brightness adjustment. Available brightness adjustment option values are as follows: +5 Bright 5 +4 Bright 4 +3 Bright 3 +2 Bright 2 +1 Bright 1 +0 Normal -1 Dark 1 -2 Dark 2 -3 Dark 3 -4 Dark 4 -5 Dark 5 -y rgbc=mode Specifies RGB color correction. Available RGB color corrections are as follows: 10 Perceptual 11 Saturation 12 RelativeC 13 AbsoluteC This option is available only for color printing and when entry data is RGB data.
6000K 9300 9300K This option is available only for color printing and when entry data is RGB data. -y cb=cyan-low:cyan-middle:cyan-high:magenta-low:magenta-middle:magenta-high:yellow-low:yellowmiddle:yellow high:black-low:black-middle:black-high Specifies adjustment value for color balance of each color/density.
Specifies letterhead duplex mode settings. When letterhead duplex mode is enabled, a print sheet is always fed through duplex feeding path in a printer. As the result, a user can set sheets without caring about sheet orientation in an input slot. Available Letterhead duplex mode values are as follows: 0 Off 1 On 2 Auto -y tr=mode Specifies trapping settings. Available trapping option values are as follows: 0 Off 1 On -y -hld=PrintType:UserID:Password:DocumentName Specifies the print type.
:: For jobownername, enter a job owner name up to 32 characters. For password, enter an alphanumeric password between 4 and 12 characters. For jobgroupname, specify a job group name up to 32 characters. NOTE: Alphanumeric characters, including spaces and colons, and symbols can be entered to specify a job owner name. NOTE: When no job owner name is specified, login user name is used as job owner name. NOTE: When a job owner name exceeds allowable character length, the extra characters are ignored.
To print XWD files: % lp -d dell5130cdn -o XWD filename To print TIFF format files: % lp -d dell5130cdn -o TIF filename To print PostScript files: % lp -d dell5130cdn filename To print PostScript files as text files: % lp -d dell5130cdn -o TX filename However, for PostScript files with options set up, such as paper selection, etc., when the same option is specified, it will be ignored.
To Specify the Password for Authentication Printing: If you need to specify the password in authentication printing, you can specify the password in the environment variable as follows. % setenv JOWN5130P "password" If you do not specify the password inexplicitly, type as follows. % setenv JOWN5130P "" NOTE: Acceptable password length is between 4 and 12 characters.
BS Backspace 1 character Option -d Enables the short-edge binding feature. When it is specified, the printing direction or position will be adjusted and both sides of the paper printed so that the shorter edge of the pages can be bound. -D Enables the long-edge binding feature. When it is specified, the printing direction or position will be adjusted and both sides of the paper printed so that the longer edge of the pages can be bound.
Feed paper from the tray loaded with Legal (8.5 x 14 inches). EX Feed paper from the tray loaded with Executive (7.25 x 10.5 inches). MO Feed paper from the tray loaded with Monarch (3.875 x 7.5 inches). COM10 Feed paper from the tray loaded with Envelope #10 (4.125 x 9.5 inches). DL Feed paper from the tray loaded with DL (110 x 220 mm). C5 Feed paper from the tray loaded with C5 (162 x 229 mm). MxNmm Feed paper from the tray loaded with MxNmm defined by users. Possible range specified: Width: 76.2 to 215.
-ffont Sets the font. NOTE: The available fonts are limited to the font in the printer. For more information, see "Understanding Fonts." -Nc=copies Specifies the number of output copies (the value of copies must be a positive integer). -Cl Specifies that printing be collated. If the copies option is not specified, this option will be ignored. -ps The input file will be processed as the PostScript file. If the file does not begin with %!, %! will be output to the beginning line.
a Output all pages. (default in case of Text files conversion) Specify these options as follows. In the case that convert text file, output the host name following the user name on the upper right corner of the paper, output all pages.
OHP Transparency L LabelPaper/Labels C2 Coated/Coated 2/Coated Paper 2 C2B Coated Back/Coated 2/Coated Paper 2- Side 2 C3 Coated Thick/Coated 3/Coated Paper 3 C3B Coated Thick Back/Coated 3/Coated Paper 3- Side 2 LH Letterhead E Envelope If this option is not specified, multipurpose feeder Paper Type of the printer can be used. -Mfo=mode Specifies orientation for multipurpose feeder.
Use larger size (No zoom) -St=mode Specifies feed separators from. Available feed separators froms are as follows: auto AutoTray/Auto 1 1stTray/Tray 1 (Standard 550-sheet feeder) 2 2ndTray/Tray 2 (Optional 550-sheet feeder) 3 3rdTray/Tray 3 (Optional 550-sheet feeder) 4 4thTray/Tray 4 (Optional 1100-sheet feeder) 5 5thTray/Tray 5 (Optional 1100-sheet feeder) msi Multipurpose Feeder off Off -Sp Specifies printed separators. Available only when the paper tray for separators is specified.
Off 1 Photo 2 Screen Display 3 Standard/Normal 4 Business Graphics This option is available only for color printing and when entry data is RGB data. -Gc=mode Specifies RGB gamma correction. Available RGB gamma corrections are as follows: 1.0 1.0 1.4 1.4 1.8 1.8 2.2 2.2 2.6 2.6 off Off This option is available only for color printing and when entry data is RGB data. -Sc=mode Specifies screen. Available screens are as follows: 0 Fineness 1 Standard 2 Auto 3 Gradation -Gg=mode Specifies gray guaranteed.
This option is available only for color printing. -Ct Specifies color transformation. This option is available only for color printing. -Br=mode Specifies brightness adjustment. Available brightness adjustment option values are as follows: +5 Bright 5 +4 Bright 4 +3 Bright 3 +2 Bright 2 +1 Bright 1 +0 Normal -1 Dark 1 -2 Dark 2 -3 Dark 3 -4 Dark 4 -5 Dark 5 -RGBc=mode Specifies RGB color correction.
Available RGB input profile option value are as follows: 0 sRGB 1 AdobeRGB This option is available only for color printing and when entry data is RGB data. -RGBTp=mode Specifies RGB color temperature. Available RGB color temperature option value are as follows: 5000 5000K 6000 6000K 9300 9300K This option is available only for color printing and when entry data is RGB data.
-Sl=mode Specifies staple settings. Available staple option values are as follows: 0 Off 1 On This option is available only when the optional output expander is installed. -Os=mode Specifies offset settings. Available offset option values are as follows: 0 Auto 1 Offset per Set (Offsets each copy before printing the next copy.) 2 Offset per Job (Offsets each copy per paper job you specify.) This option is available only when the optional output expander is installed.
Up to eight single-byte characters from 0x20 to 0x7E, except 0x20 " " (blank) and 0x3A":" (colon). Password Up to 12 single-byte characters from 0x30 to 0x39 (numeric characters). DocumentName Up to 12 single-byte characters from 0x20 to 0x7E, except 0x20 " " (blank) and 0x3A ":" (colon).
Incomplete form of -Jown option is treated as no authentication setting being made. In such case, if authentication setting is made with the environmental variable, it is used as setting information. Example To convert the program list of the file.txt file into the PostScript language program that sets the paper to the landscape orientation and prints in the 2-up mode, type as follows: % txt2ps2 -r -2 file.txt | lp To convert file.txt to the PostScript language program and output it to the file.
Use the -ps option only when a PostScript file that contains no %! at the beginning of the file is used as the PostScript file. If a normal text file is input, it will not function correctly. In HP-UX, txt2ps2 considers files written by PostScript that contain %! at the beginning of the file as the PostScript files. To print PostScript files as text files, specify the TX option. With this option, PostScript files will be processed as text files.
2 Feed paper from tray 2 (the second tray from the top). 3 Feed paper from tray 3 (the third tray from the top). 4 Feed paper from tray 4 (the fourth tray from the top). 5 Feed paper from tray 5 (the fifth tray from the top). A4 Feed paper from the tray loaded with A4 (210 x 297 mm). A5 Feed paper from the tray loaded with A5 (148 x 210 mm). B5 Feed paper from the tray loaded with B5 (182 x 257 mm). LT Feed paper from the tray loaded with Letter (8.5 x 11 inches).
Rotates the image by 90° and uses the paper in the landscape orientation. -n Disables the addition of the showpage. It is used when files converted to the PostScript language program are merged with files created with other applications. -l=left,bottom Specifies the print position. Printing will be executed from the left and bottom of the page. The default is 0.25 inches for both left and bottom. -s=width,height Specifies the output size. Printing will be executed with the width and height in inches.
Specify the font to print the header and footer. European fonts the same as half size alphanumeric fonts can be specified. Helvetica is specified as default. If the wrong font is specified, default European font of the printer can be used. If header/footer output option is specified, the font specification of header/footer is ignored. -MSI Specifies multipurpose feeder. -M=type Specifies multipurpose feeder Paper Type.
E Envelope If this option is not specified, multipurpose feeder Paper Type of the printer can be used. -Mfo=mode Specifies orientation for multipurpose feeder. Available orientations for multipurpose feeder are as follows: le Landscape ler Landscape (Rotated) se Portrait ser Portrait (Rotated) -Pon Specifies alternate tray.
5thTray/Tray 5 (Optional 1100-sheet feeder) msi Multipurpose Feeder off Off -Sp Specifies printed separators. Available only when the paper tray for separators is specified. -Sb Specifies Skip Blank Pages. -Cm=mode Specifies output color. Available output colors are as follows: c Color (CMYK) k Black -Pr=mode Specifies print mode. Available print modes are as follows: hs High Speed hq High Quality hr High Resolution -Cc=mode Specifies image types.
1.4 1.4 1.8 1.8 2.2 2.2 2.6 2.6 off Off This option is available only for color printing and when entry data is RGB data. -Sc=mode Specifies screen. Available screens are as follows: 0 Fineness 1 Standard 2 Auto 3 Gradation -Gg=mode Specifies gray guaranteed. Available gray guaranteed options are as follows: on On off Off This option is available only for color printing. -Ct Specifies color transformation. This option is available only for color printing. -Br=mode Specifies brightness adjustment.
+1 Bright 1 +0 Normal -1 Dark 1 -2 Dark 2 -3 Dark 3 -4 Dark 4 -5 Dark 5 -RGBc=mode Specifies RGB color correction. Available RGB color corrections are as follows: 10 Perceptual 11 Saturation 12 RelativeC 13 AbsoluteC This option is available only for color printing and when entry data is RGB data. -RGBPr=mode Specifies RGB input profile. Available RGB input profile option value are as follows: 0 sRGB 1 AdobeRGB This option is available only for color printing and when entry data is RGB data.
This option is available only for color printing and when entry data is RGB data. -Cb=cyan-low:cyan-middle:cyan-high:magenta-low:magenta-middle:magenta-high:yellow-low:yellowmiddle:yellow high:black-low:black-middle:black-high Specifies adjustment value for color balance of each color/density.
This option is available only when the optional output expander is installed. -Lh=mode Specifies letterhead duplex mode settings. When letterhead duplex mode is enabled, a print sheet is always fed through duplex feeding path in a printer. As the result, a user can set sheets without caring about sheet orientation in an input slot. Available Letterhead duplex mode values are as follows: 0 Off 1 On 2 Auto -Tr=mode Specifies trapping settings.
-Hld=proof:UserID::DocumentName -Hld=proof:UserID:: NOTICE: Make sure you specify Secure Print only when you directly print data to a printer. Secure Print may not be available if you specify it when data need to be printed through another server or data need to be handled by another program such as PostScript files. Collate is automatically specified when you specify Proof Print.
If the output size option (-s, -S) is not specified, scaling will be executed taking one pixel of the raster data as one pixel of the printer. If the print position option specifies a point beyond the printable area of the printer, data beyond the printable area will not be printed.
A paper tray can be selected by directly specifying a tray or by specifying a paper size. When a paper size is specified, the tray loaded with paper of the specified size will be found and selected automatically. The parameters for selecting a paper tray are as follows: 1 Feed paper from tray 1 (top tray). 2 Feed paper from tray 2 (the second tray from the top). 3 Feed paper from tray 3 (the third tray from the top). 4 Feed paper from tray 4 (the fourth tray from the top).
If this option is not specified or the tray specified is not available, feed paper from the default tray. -t Turns on the save toner mode for printing. The print result will be fainter than that of normal printing. In some cases, this option will be ignored. -r Rotates the image by 90° and uses the paper in the landscape orientation. -n Disables the addition of the showpage. It is used when files converted to the PostScript language program are merged with files created with other applications.
-Hd=ur -Hd=ur:uh -Hffont Specify the font to print header and footer. European fonts the same as half size alphanumeric fonts can be specified. Helvetica is specified as default. If the wrong font is specified, default European font of the printer can be used. If header/footer output option is specified, the font specification of header/footer is ignored. -MSI Specifies multipurpose feeder. -M=type Specifies multipurpose feeder Paper Type.
E Envelope If this option is not specified, multipurpose feeder Paper Type of the printer can be used. -Mfo=mode Specifies orientation for multipurpose feeder. Available orientations for multipurpose feeder are as follows: le Landscape ler Landscape (Rotated) se Portrait ser Portrait (Rotated) -Pon Specifies alternate tray. Available alternate trays are follows.
5 5thTray/Tray 5 (Optional 1100-sheet feeder) msi Multipurpose Feeder off Off -Sp Specifies printed separators. Available only when the paper tray for separators is specified. -Sb Specifies Skip Blank Pages. -Cm=mode Specifies output color. Available output colors are as follows: c Color (CMYK) k Black -Pr=mode Specifies print mode. Available print modes are as follows: hs High Speed hq High Quality hr High Resolution -Cc=mode Specifies image types.
1.0 1.4 1.4 1.8 1.8 2.2 2.2 2.6 2.6 off Off This option is available only for color printing and when entry data is RGB data. -Sc=mode Specifies screen. Available screens are as follows: 0 Fineness 1 Standard 2 Auto 3 Gradation -Gg=mode Specifies gray guaranteed. Available gray guaranteed options are as follows: on On off Off This option is available only for color printing. -Ct Specifies color transformation. This option is available only for color printing. -Br=mode Specifies brightness adjustment.
Bright 2 +1 Bright 1 +0 Normal -1 Dark 1 -2 Dark 2 -3 Dark 3 -4 Dark 4 -5 Dark 5 -RGBc=mode Specifies RGB color correction. Available RGB color corrections are as follows: 10 Perceptual 11 Saturation 12 RelativeC 13 AbsoluteC This option is available only for color printing and when entry data is RGB data. -RGBPr=mode Specifies RGB input profile. Available RGB input profile option value are as follows: 0 sRGB 1 AdobeRGB This option is available only for color printing and when entry data is RGB data.
9300K This option is available only for color printing and when entry data is RGB data. -Cb=cyan-low:cyan-middle:cyan-high:magenta-low:magenta-middle:magenta-high:yellow-low:yellowmiddle:yellow high:black-low:black-middle:black-high Specifies adjustment value for color balance of each color/density.
This option is available only when the optional output expander is installed. -Lh=mode Specifies letterhead duplex mode settings. When letterhead duplex mode is enabled, a print sheet is always fed through duplex feeding path in a printer. As the result, a user can set sheets without caring about sheet orientation in an input slot. Available Letterhead duplex mode values are as follows: 0 Off 1 On 2 Auto -Tr=mode Specifies trapping settings.
-Hld=proof:UserID::DocumentName -Hld=proof:UserID:: NOTICE: Make sure you specify Secure Print only when you directly print data to a printer. Secure Print may not be available if you specify it when data need to be printed through another server or data need to be handled by another program such as PostScript files. Collate is automatically specified when you specify Proof Print.
If the print position option (-lleft bottom) specifies a point beyond the printable area of the printer, data beyond the printable area will not be printed.
Feed paper from tray 2 (the second tray from the top). 3 Feed paper from tray 3 (the third tray from the top). 4 Feed paper from tray 4 (the fourth tray from the top). 5 Feed paper from tray 5 (the fifth tray from the top). A4 Feed paper from the tray loaded with A4 (210 x 297 mm). A5 Feed paper from the tray loaded with A5 (148 x 210 mm). B5 Feed paper from the tray loaded with B5 (182 x 257 mm). LT Feed paper from the tray loaded with Letter (8.5 x 11 inches).
Disables the addition of the showpage. It is used when files converted to the PostScript language program are merged with files created with other applications. -l=left,bottom Specifies the print position. Printing will be executed from the left and bottom of the page. The default is 0.25 inches for both left and bottom. -s=width,height Specifies the output size. Printing will be executed with the width and height in inches. -S=width Sets the width of the output size in inches.
FinePaper/Bond/Plain Paper 2 BB FinePaperBack/Bond/Plain Paper 2 - Side 2 P Stationery/Plain/Plain Paper 1 PB StationeryBack/Plain/Plain Paper 1 - Side 2 R Recycled Paper RB RecycledPaperBack/ Recycled Paper - Side 2 H1 ThickPaper/Heavyweight 1/Covers 1 H1B ThickPaperBack/Heavyweight 1/Covers 1 - Side 2 H2 ThickPaper2/Heavyweight 2/Covers 2 H2B ThickPaper2Back/Heavyweight 2/Covers 2 - Side 2 OHP Transparency L LabelPaper/Labels C2 Coated/Coated 2/Coated Paper 2 C2B Coated Back/Coated 2/Coated Paper 2- Side
Portrait ser Portrait (Rotated) -Pon Specifies alternate tray. Available alternate trays are as follows: 0 Use printer settings 1 Display message 2 Feed from multipurpose feeder 3 Use nearest size (Adjust to fit) 4 Use larger size (Adjust to fit) 5 Use nearest size (No zoom) 6 Use larger size (No zoom) -St=mode Specifies feed separators from. Available feed separators from the following.
-Cm=mode Specifies output color. Available output colors are as follows: c Color (CMYK) k Black -Pr=mode Specifies print mode. Available print modes are as follows: hs High Speed hq High Quality hr High Resolution -Cc=mode Specifies image types. Available image types are as follows: 0 Off 1 Photo 2 Screen Display 3 Standard/ Normal 4 Business Graphics This option is available only for color printing and when entry data is RGB data. -Gc=mode Specifies RGB gamma correction.
This option is available only for color printing and when entry data is RGB data. -Sc=mode Specifies screen. Available screens are as follows: 0 Fineness 1 Standard 2 Auto 3 Gradation -Gg=mode Specifies gray guaranteed. Available gray guaranteed options are as follows: on On off Off This option is available only for color printing. -Ct Specifies color transformation. This option is available only for color printing. -Br=mode Specifies brightness adjustment.
-4 Dark 4 -5 Dark 5 -RGBc=mode Specifies RGB color correction. Available RGB color corrections are as follows: 10 Perceptual 11 Saturation 12 RelativeC 13 AbsoluteC This option is available only for color printing and when entry data is RGB data. -RGBPr=mode Specifies RGB input profile. Available RGB input profile option value are as follows: 0 sRGB 1 AdobeRGB This option is available only for color printing and when entry data is RGB data. -RGBTp=mode Specifies RGB color temperature.
Dark 1 0 Normal -1 Light 1 -2 Light 2 -3 Light 3 -Cb Option value must be specified in the following order: Cyan low density, Cyan medium density, Cyan high density, Magenta low density, Magenta medium density, Magenta high density, Yellow low density, Yellow medium density, Yellow high density, Black low density, Black medium density, Black high density If no value is specified, it is treated as "0"(Normal).
-Tr=mode Specifies trapping settings. Available trapping option values are as follows: 0 Off 1 On -Hld=PrintType:UserID:Password:DocumentName Secure Print PrintType secure Secure Print private Private MailBox Print public Public MailBox Print proof Proof Print UserID Up to eight single-byte characters from 0x20 to 0x7E, except 0x20 " " (blank) and 0x3A":" (colon). Password Up to 12 single-byte characters from 0x30 to 0x39 (numeric characters).
When neither of job owner name nor password is specified (-Jown=:), login user name is used as job owner name, and authentication password is treated as not specified. When a job owner name exceeds allowable character length, the extra characters are ignored. When an unacceptable character is entered to specify a job owner name, "UnknownUser" becomes the job owner name. NOTE: Characters acceptable for job owner name are alphanumeric characters and symbols, except for space and colon.
Solaris Use lpadmin command to register the default printer. # lpadmin -d PrinterName To inhibit the banner sheets output, change the value of nobanner=no to nobanner=yes that includes in the file corresponding to the printer name in /etc/lp/interfaces/. The printer registered by UX filter must not be changed by admintool. When Content types: postscript is displayed by typing lpstat -p printername -l, it's necessary to delete the printer and reinstall.
description by inserting the line command (-Ilines). If a BS code is found at the beginning of a line, the print position of the next character will be on the left of the beginning of a line. When there are multiple tab codes in one line, the positions of tab may be off due to automatic line feed. If this happens, specify the -l or -w option. The number of columns specified by the -w option does not reflect the number of characters actually printed.
To print image files from Solaris the user cannot specify the image file directly with the lp command for printing. Make use of sunras2ps2, tiff2ps2, xwd2ps2 and convert the file to a PostScript file. Output it using the lp command after the conversion. % xwd2ps2 file.xwd | lp Header/footer Option (-Hd=position:format:page, -Hfheaderfont) (txt2ps2,sunras2ps2,tiff2ps2,xwd2ps2) If the paper size is not specified when using options, it outputs the header/footer at the position of A4-size paper.
Back to Contents Page Printing With CUPS (Linux) Operation on Turbolinux FUJI or RedHat Enterprise Linux ES 4.0/RedHat Enterprise Linux 5.0 Desktop Operation on SUSE Linux Enterprise Desktop 10 This section provides information for printing or setting up the printer driver with CUPS (Common UNIX Printing System) on Turbolinux FUJI, RedHat Enterprise Linux ES 4.0/RedHat Enterprise Linux 5.0 Desktop or SUSE Linux Enterprise Desktop 10. Operation on Turbolinux FUJI or RedHat Enterprise Linux ES 4.
Format: lpd://xxx.xxx.xxx.xxx (printer's IP address) 8. Select Dell from the Make menu, and then click Continue. 9. Select Dell 5130cdn Color Laser... from the Model menu, and then click Continue. The message Printer xxx has been added successfully. appears. The set up is complete. When you have finished setting up the queue you can print jobs from the software program. Start the print job from the software program, and then specify the queue in the print dialog box.
Installing the Printer Driver 1. Double-click Dell-5130cdn-Color-Laser-x.x-x.noarch.rpm in the Drivers and Utilities CD. 2. Type the administrator's password and click Install. Installation starts. When the installation is complete, the window is automatically closed. Setting Up the Queue To execute printing, you must set up the print queue on your workstation. 1. Select Computer® More Applications... and select YaST on the Application Browser. 2. Type the administrator's password.
f. Select the Do Local Filtering check box, and then click Next. g. Select DELL as Select manufacturer. Select 5130cdn Color Laser as Select Model, and then click Next. h. Confirm the settings in Edit configuration, and then click OK. 5. Click Finish. Printing From the Application Program When you have finished setting up the queue you can print jobs from the application program. Start the print job from the application program, and then specify the queue in the print dialog box.
Setting the Password for Authority as the Printer Administrator You must set the password for authority as the printer administrator to do operations as the printer administrator. 1. Select Computer® More Applications... and select Konsole on the Application Browser. 2. Type the following command on the terminal window. su (Type the administrator's password.) lppasswd -g sys -a root (Type the password for authority as the printer administrator after the Enter password prompt.
Back to Contents Page Printer Specifications OS Compatibility Power Supply Dimensions Memory Page Description Language (PDL)/Emulation, Operating System, and Interface Environment Cables OS Compatibility Your Dell™ 5130cdn Color Laser Printer is compatible with Windows ® (2000, XP, XP x64, Vista, Vista x64, 7, 7 x64, Server 2003, Server 2003 x64, Server 2008, Server 2008 x64, Server 2008 R2 x64); Mac OS X (10.2.8/10.3.9/10.4.x/10.5.x); Novell ® (3.12, 3.2, 4.1, 4.11, 4.2, 5, 5.1, 6, 6.
DIMM Size 1024 MB DIMM Speed EP2-2100 Page Description Language (PDL)/Emulation, Operating System, and Interface PDL/Emulations PostScript 3, PCL 6, PCL5e, XPS Microsoft ® Windows 7/7 x64/Server 2008 R2 x64/Vista/Vista x64/Server 2008/Server 2008 x64/XP/XP x64/Server 2003/Server 2003 x64/2000 (SP3 or later), Mac OS X (10.2.8, 10.3.9, 10.4.x, 10.5.x) OSes Interfaces Standard local: USB2.0, IEEE 1284 Standard network: 10Base-T/100Base-TX/1000Base-T Ethernet Optional network: IEEE802.11b/802.
Cables Your interconnection cable must meet the following requirements: Connection type Connection specifications and symbols 1 Ethernet 10 Base-T/100 Base-TX/1000 Base-T 2 Wireless IEEE802.11b/802.11g/802.11n 3 USB USB2.
Back to Contents Page Maintaining Your Printer Determining the Status of Supplies Conserving Supplies Storing Print Media Storing Consumables Replacing the Toner Cartridges Replacing the Drum Cartridges Replacing the Fuser Replacing the Separator Rollers Replacing the Belt Unit Replacing the Transfer Roller Replacing the Stapler Cartridge Replacing the Waste Toner Box Cleaning Inside the Printer Cleaning the Conductivity Temperature Depth (CTD) Sensor Adjusting Color Registrat
Storing Print Media To avoid potential paper feeding problems and uneven print quality, there are several things you can do. To achieve the best possible print quality, store print media in an environment where the temperature is approximately 21°C (70°F) and the relative humidity is 40%. Store cartons of print media on a pallet or shelf, rather than directly on the floor.
2. Open the front cover. 3. Pull out the toner cartridge you want to replace. CAUTION: Always pull out the cartridge slowly so you do not spill any toner. NOTICE: Do not touch the parts shown in the illustration. Toner can dirty and stain your hands. NOTE: Be careful not to spill toner when handling the toner cartridge. Installing a Toner Cartridge 1. Unpack a new toner cartridge of the desired color. 2. Shake the toner cartridge 5 to 6 times to distribute the toner evenly.
4. Close the front cover. Replacing the Drum Cartridges CAUTION: Before performing any of the following procedures, read and follow the safety instructions in your Product Information Guide provided with your product. CAUTION: To prevent electric shock, always turn off the printer and disconnect the power cable from the grounded outlet before performing maintenance. NOTICE: To protect the drum cartridges against bright light, close the inner cover within five minutes.
3. Rotate the lock levers of the inner cover to open it. 4. Grasp the handles on the drum cartridge you want to replace and pull out the cartridge halfway. 5. Grasp one side of the drum cartridge with the other hand and pull out the cartridge from the printer. NOTICE: Do not touch the parts shown in the illustration. Toner can dirty and stain your hands. NOTE: Be careful not to spill toner when handling the drum cartridge.
Installing a Drum Cartridge 1. Unpack a new drum cartridge. NOTICE: To protect the drum from overexposure to bright light, do not remove the orange protective covering until you have inserted the cartridge in the printer. NOTE: Be careful not to spill toner when handling the drum cartridge. 2. Pull out the two ribbons. 3. Slide the cartridge into the correct slot. 4. Remove the orange protective covering of the installed drum cartridge and discard.
5. Close the inner cover. 6. Rotate the lock levers to secure the inner cover while pressing the cover with the other hand. 7. Remove the cleaning rod from the backside of the front cover. 8. Remove the cleaning pad by pressing the white tabs between your thumb and index finger. 9. Unpack a new cleaning pad. 10. Attach the new cleaning pad to the cleaning rod.
11. Insert the cleaning rod fully into one of the four holes until it clicks into the interior of the printer as illustrated below, and then pull it out. 12. Repeat Step 11 also on the other three holes. One time insertion is enough for each hole. 13. Return the cleaning rod to its original location. 14. Close the front cover. NOTE: Whenever you replace the drum cartridges, also clean inside the printer to maintain high image quality.
"Cleaning Inside the Printer." Replacing the Fuser CAUTION: A CAUTION indicates a potential for property damage, personal injury, or death. CAUTION: Before performing any of the following procedures, read and follow the safety instructions in your Product Information Guide provided with your product. CAUTION: To prevent electric shock, always turn off the printer and disconnect the power cable from the grounded outlet before performing maintenance.
NOTE: Stand straight in front of the right hand cover and not in front of the front cover, whenever you replace the fuser. 3. Grasp both handles of the installed fuser with your hands and pull it out. Installing a Fuser 1. Unpack a new fuser. 2. Grasp both handles of the fuser with your hands and install the fuser in the printer. 3. Close the right hand cover.
CAUTION: To prevent electric shock, always turn off the printer and disconnect the power cable from the grounded outlet before performing maintenance. CAUTION: Before performing any of the following procedures, read and follow the safety instructions in your Product Information Guide provided with your product. NOTE: Video instructions are also available in the Maintenance Guide. The Maintenance Guide is included in the Drivers and Utilities CD provided with your printer.
Installing a Separator Roller in a Tray 1. Turn the separator roller cover to the left to open it, and then hold the cover. 2. Slide the front axle, then the rear axle of the separator roller cartridge in the holes of the tray. 3. Turn the separator roller cartridge to the left to fix it in place. 4. Turn the separator roller cover to the right to close it.
5. Load paper in the tray and replace the tray in the printer. Removing the Separator Rollers Inside the Printer 1. Remove the tray from the printer. 2. Turn the separator roller until the roller hook is visible. NOTE: The roller is located approximately 165 mm (6.5 inches) inside the printer when measured from the face of the paper tray opening.
3. Pull the separator roller hook out of the groove on the axle, and then slide the separator roller to the front. 4. Repeat Step 2 and Step 3 to remove other separator rollers from inside the printer. Installing Separator Rollers Inside the Printer 1. Align the hole of the new separator roller with the axle. 2. Slide the separator roller along the axle so the protrusions fit completely into the slots and the roller hook reseats into the groove on the axle. 3. Replace the tray into the printer.
Replacing the Belt Unit CAUTION: To prevent electric shock, always turn off the printer and disconnect the power cable from the grounded outlet before performing maintenance. CAUTION: Before performing any of the following procedures, read and follow the safety instructions in your Product Information Guide provided with your product. NOTE: Video instructions are also available in the Maintenance Guide. The Maintenance Guide is included in the Drivers and Utilities CD provided with your printer.
3. Open the front cover. 4. Rotate the lock levers of the inner cover to open it. 5. Grasp the handle on the front of the belt unit. 6. Pull out the belt unit until the line on the unit becomes completely visible. 7. Grasp the handles on the top of the belt unit. Pull out the unit to remove it from the printer.
NOTICE: Do not hold the parts shown in the illustration. 8. Slide the blue tab back-and-forth five times to clean the conductivity temperature depth sensor. CAUTION: Be careful not to touch the fuser. It can burn your fingers. Installing a Belt Unit 1. Unpack a new belt unit and place the unit on a level surface.
2. Remove the protective parts shown in the illustration. 3. Grasp the handles on top of the belt unit. NOTICE: Do not hold the sides of the belt unit. It may degrade print quality. 4. Align the arrows on the belt unit with the arrows on the printer.
5. Slide the unit into the printer and stop when the visible line reaches the printer. 6. Lower the handles. 7. Push the front of the belt unit to reinstall it in the printer until it stops. 8. Close the inner cover.
9. Rotate the lock levers to secure the inner cover while pressing the cover with the other hand. 10. Close the front cover. 11. Close the right hand cover. NOTE: When closing the right hand cover, apply your hand in the vicinity of the handle as shown in the illustration, and then press the cover firmly toward the printer. NOTE: Stand straight in front of the right hand cover and not in front of the front cover, whenever you close the right hand cover.
Removing the Transfer Roller 1. Turn off the printer. 2. Raise the latch of the right hand cover and open the cover. NOTE: Stand straight in front of the right hand cover and not in front of the front cover, whenever you open the right hand cover. 3. Unlock the two levers on the transfer roller and lift up the roller to remove it. Installing a Transfer Roller 1. Grasp the levers on both sides of the new transfer roller and align the arrows on the transfer roller with the arrows inside the printer. 2.
3. Close the right hand cover. NOTE: When closing the right hand cover, apply your hand in the vicinity of the handle as shown in the illustration, and then press the cover firmly toward the printer. NOTE: Stand straight in front of the right hand cover and not in front of the front cover, whenever you close the right hand cover.
2. Press the orange lever of the staple cartridge holder and pull out the cartridge. 3. Squeeze the sides of the empty staple case and remove it from the cartridge. Installing a Stapler Cartridge 1. Slide the tip of the new staple case into the cartridge and press the end into place. 2. Holding the orange lever, push the staple cartridge back into the holder until it clicks into place.
3. Close the front door of the output expander. Replacing the Waste Toner Box CAUTION: Before performing any of the following procedures, read and follow the safety instructions in your Product Information Guide provided with your product. CAUTION: To prevent electric shock, always turn off the printer and disconnect the power cable from the grounded outlet before performing maintenance. NOTE: Video instructions are also available in the Maintenance Guide.
3. Grasp the waste toner box with your other hand as shown in the illustration, and pull it out of the printer. NOTICE: Take care to avoid dropping the waste toner box while you are removing it. NOTICE: After removing the waste toner box, do not touch the parts shown in the illustration. Toner can dirty or stain your hands. NOTE: Be careful not to spill toner when handling the waste toner box. 4. Insert the used waste toner box into the plastic bag that came with the new waste toner box and seal the bag.
2. Close the front cover. Cleaning Inside the Printer To prevent deterioration of printing quality due to stains inside the printer, clean inside the printer regularly by using the cleaning rod whenever you replace drum cartridges. CAUTION: To prevent electric shock, always turn off the printer and disconnect the power cable from the grounded outlet before performing maintenance. 1. Confirm that the printer is not in operation, and open the front cover. 2.
4. Repeat Step 3 also on the other three holes. 5. Return the cleaning rod to its original location. 6. Close the front cover. Cleaning the Conductivity Temperature Depth (CTD) Sensor CAUTION: To prevent electric shock, always turn off the printer and disconnect the power cable from the grounded outlet before performing maintenance. NOTICE: Ensure nothing touches or scratches the surface (black-colored film) of the belt unit.
NOTE: Belt unit can be replaced only when the right hand cover is open. NOTE: Stand straight in front of the right hand cover and not in front of the front cover, whenever you open the right hand cover. 3. Open the front cover. 4. Rotate the lock levers of the inner cover to open it. 5. Grasp the handle on the front of the belt unit.
6. Pull out the belt unit until the line on the unit becomes completely visible. 7. Grasp the handles on the top of the belt unit. Pull out the unit to remove it from the printer. NOTICE: Do not hold the parts shown in the illustration. 8. Slide the blue tab back and forth five times. 9. Grasp the handles on top of the belt unit.
10. Align the arrows on the belt unit with the arrows on the printer. 11. Slide the unit into the printer and stop when the visible line reaches the printer. 12. Lower the handles. 13. Push the front of the belt unit to reinstall it in the printer and until it stops.
14. Close the inner cover. 15. Rotate the lock levers to secure the inner cover while pressing the cover with the other hand. 16. Close the front cover. 17. Close the right hand cover.
NOTE: When closing the right hand cover, apply your hand in the vicinity of the handle as shown in the illustration, and then press the cover firmly toward the printer. NOTE: Stand straight in front of the right hand cover and not in front of the front cover, whenever you close the right hand cover. Adjusting Color Registration To adjust the color registration when you first install the printer or after moving it to a new location, follow the procedure below.
6. Adjust all straight lines to a value of 0. Preview image of before and after adjustment will help. CAUTION: After printing the color registration chart, do not turn off the printer until the printer motor has stopped running. NOTE: If the straightest line does not line up perfectly with 0, then determine a value and adjust the color again. Determining Values From the lines to the right of the Y (Yellow), M (Magenta), and C (Cyan) pattern, find the values of the straightest lines.
10. Color registration adjustment is complete when the straightest Y (Yellow), M (Magenta), and C (Cyan) lines are next to the 0 line. When Using the Dell™ Printer Configuration Web Tool 1. Enter the IP address of your printer into the web browser. If you do not know how to launch the Dell Printer Configuration Web Tool, see "Dell Printer Configuration Web Tool." The Dell Printer Configuration Tool opens. 2. Select Printer Settings. 3. Click the Printer Maintenance tab. 4.
Back to Contents Page Removing Options Removing the 550-Sheet Feeder Removing the 1100-Sheet Feeder Removing an Output Expander Removing a Memory Removing a Hard Disk Removing the Wireless Adapter If the printer location needs to change or the printer and print media handling options need to be shipped to a new location, all print media handling options must be removed from the printer. For shipping, pack the printer and print media handling options securely to avoid damage.
4. Remove the two screws joining the printer and the sheet feeders by unscrewing them with a coin or similar object. 5. Gently lift the printer off the tray module, and place it on a level surface. CAUTION: To lift the printer safely, lift it with three people. 6. Insert the tray into the printer, and push it until it stops.
7. Reconnect all cables including the power cable into the back of the printer and turn on the printer. Removing the 1100-Sheet Feeder CAUTION: If you are removing the 1100-sheet feeder, be sure to turn off the printer, unplug the power cable, and disconnect all cables from the back of the printer before completing these tasks. 1. Turn off the printer and unplug the power cable. Then, disconnect all cables from the back of the printer. 2.
4. Remove the plastic part and the longer screw provided with the feeder by unscrewing them with a coin or similar object. 5. Remove the two screws joining the printer and the sheet feeders by unscrewing them with a coin or similar object. 6. Gently lift the printer off the tray module, and place it on a level surface. CAUTION: To lift the printer safely, lift it with three people.
7. Insert the tray into the printer, and push it until it stops. 8. Reconnect all cables including the power cable into the back of the printer and turn on the printer. Removing an Output Expander 1. Turn off the printer. 2. Remove tray 1. 3. Open the front cover.
4. Unplug the cables and the connector from the socket. 5. Remove connector cover 1. 6. Remove connector cover 2. 7. Unplug the cables and connector from the socket.
8. Unplug power cable as shown in the illustration. 9. Remove the stacker tray. 10. Gently lift up the output expander from the printer. 11. Unplug the cables.
12. Remove the two screws. 13. Remove the bracket. 14. Remove the H transport unit from the printer. 15. Insert the center output tray.
16. Attach the two parts to the printer. 17. Close the front cover. 18. Return the tray 1 to its original position.
Removing a Memory 1. Ensure that the printer is turned off. 2. Rotate the screw counterclockwise on the metal casing to open the cover. 3. Remove the control board cover. 4. Push the latches on both edges of the socket at the same time to raise the memory up.
5. Hold the memory and pull it out. 6. Replace the control board cover. 7. Close the control board cover and turn the screw clockwise.
Removing a Hard Disk 1. Ensure that the printer is turned off. 2. Rotate the screw counterclockwise on the metal casing to open the cover. 3. Remove the control board cover. 4. Remove the hard disk cables from the connectors of the control board.
5. Remove the left side connector to the control board. 6. Remove the hard disk from the printer by releasing the hard disk's hook. 7. Replace the control board cover. 8. Close the control board cover and turn the screw clockwise.
Removing the Wireless Adapter 1. Turn off the printer and unplug the power cable. Then, disconnect all cables from the back of the printer. 2. Rotate the screw counterclockwise on the metal casing to open the cover. 3. Remove the control board cover.
4. Remove the wireless adapter from the printer by releasing the adapter's hook from underside of the wireless adapter socket. 5. Insert the cap into the wireless adapter socket. 6. Replace the control board cover. 7. Close the control board cover and turn the screw clockwise.
Back to Contents Page
Back to Contents Page Clearing Jams Avoiding Jams Identifying the Location of Paper Jams Clearing Paper Jams From the MPF Clearing Paper Jams From the Standard Tray Clearing Paper Jams From the Fuser Clearing Paper Jams From the Duplexer Clearing Paper Jams From the Optional Feeder Clearing Paper Jams From the Output Expander Careful selection of appropriate print media and proper loading allow you to avoid most jams. See "Print Media Guidelines" for more information.
CAUTION: Do not attempt to clear any jams using tools or instruments. This may permanently damage the printer. 1 Fuser 2 Duplexer 3 Front Cover 4 MPF 5 550-Sheet Feeder (optional) 6 Tray 1 Clearing Paper Jams From the MPF NOTE: To resolve the error displayed on the operator panel, you must clear all print media from the print media path. 1. Remove any paper loaded on or jammed in the MPF. 2. Close the MPF.
3. Raise the latch on the handle of the right hand cover to open the cover. 4. Remove any remaining pieces of paper jammed in the MPF. 5. Use the handle to lift the duplexer. 6. Remove any remaining pieces of paper.
7. Close the right hand cover. NOTE: When closing the right hand cover, apply your hand in the vicinity of the handle as shown in the illustration, and then press the cover firmly toward the printer. NOTE: Stand straight in front of the right hand cover and not in front of the front cover, whenever you close the right hand cover. Clearing Paper Jams From the Standard Tray NOTE: To resolve the error displayed on the operator panel, you must clear all print media from the print media path. 1.
3. Use the handle to lift the duplexer. 4. Remove any remaining pieces of paper. 5. Close the right hand cover. NOTE: When closing the right hand cover, apply your hand in the vicinity of the handle as shown in the illustration, and then press the cover firmly toward the printer. NOTE: Stand straight in front of the right hand cover and not in front of the front cover, whenever you close the right hand cover. 6. Remove tray 1 from the printer.
7. Remove any paper jammed, creased or both from tray 1. 8. Replace tray 1 in the printer. Clearing Paper Jams From the Fuser CAUTION: Before performing any of the following procedures, read and follow the safety instructions in your Product Information Guide. CAUTION: To prevent electric shock, always turn off the printer and disconnect the power cable from the grounded outlet before performing maintenance. NOTE: Video instructions are also available in the Maintenance Guide.
2. Hold and lower the tab to open the inner part. CAUTION: Be careful not to touch the fuser. It can burn your fingers. 3. Remove the jammed paper. 4. Replace the inner part. 5. Close the right hand cover.
NOTE: When closing the right hand cover, apply your hand in the vicinity of the handle as shown in the illustration, and then press the cover firmly toward the printer. NOTE: Stand straight in front of the right hand cover and not in front of the front cover, whenever you close the right hand cover. Clearing Paper Jams From the Duplexer NOTE: To resolve the error displayed on the operator panel, you must clear all print media from the print media path. 1. Open the right hand cover. 2.
4. Close the right hand cover. NOTE: When closing the right hand cover, apply your hand in the vicinity of the handle as shown in the illustration, and then press the cover firmly toward the printer. NOTE: Stand straight in front of the right hand cover and not in front of the front cover, whenever you close the right hand cover. Clearing Paper Jams From the Optional Feeder NOTE: To resolve the error displayed on the operator panel, you must clear all print media from the print media path. 1.
3. Close the right hand cover of the optional feeder. 4. Remove the tray from the same feeder. 5. Remove any paper jammed, creased or both from the feeder. 6. Replace the feeder in the printer.
Clearing Paper Jams From the Output Expander Clearing Paper Jams From Inside the Output Expander NOTE: To resolve the error displayed on the operator panel, you must clear all print media from the print media path. 1. Ensure that the printer is not in operation, and open the front door of the output expander. 2. Rotate the knob clockwise and remove the jammed paper from the paper exit of the output expander. NOTICE: If the paper jam message remains, repeat the same procedure. 3.
4. If the paper jam message remains, repeat Step 1 and Step 2. 5. Close the front door of the output expander. Clearing Paper Jams From H Transport Unit NOTE: To resolve the error displayed on the operator panel, you must clear all print media from the print media path. 1. Grasp the top cover handle of the output expander and open the cover. 2. Remove the jammed paper. 3. Close the top cover of the output expander.
Clearing Staple Jams From the Output Expander 1. Ensure that the printer is not in operation, and open the front door of the output expander. 2. Grasp the orange lever on the stapler cartridge and pull out the cartridge. 3. Visually check inside the output expander for any remaining staples. 4. Lift the metal part of the stapler cartridge. 5. Remove any staples jammed in the stapler cartridge. 6. Close the metal part.
7. Grasp the orange lever on the stapler cartridge and push the cartridge in the printer until it clicks into place. 8. Close the front door of the output expander.
Back to Contents Page Troubleshooting Basic Printer Problems Display Problems Printing Problems Print Quality Problems Jam/Alignment Problems Noise Digital Certificate Problem Problems with Installed Optional Accessories Other Problems Contacting Service Basic Printer Problems Some printer problems can be easy to resolve. If a problem occurs with your printer, check each of the following: The power cable is plugged into the printer and a properly grounded electrical outlet.
Ensure Ready to Print appears on the operator panel before you send a job to print. Press Menu button to return to Ready to Print. Ensure print media is loaded in the printer. Press Menu button to return to Ready to Print. Verify the printer is using the correct page description language (PDL). Verify that you are using the correct printer driver. Job did not print or incorrect characters printed.
Print Quality Problems NOTE: For information on how to use the operator panel and Dell Configuration Web Tool, see "Understanding the Printer Menus" and "Dell Printer Configuration Web Tool." The output is too light. Action Yes No 1 Check if the whole page is printed light. Go to action 2. Go to action 8. The toner cartridges may be low or need to be replaced. Confirm the amount of toner in each toner cartridge. 2 1. Check the toner level in the Status tab in the Status Monitor. 2.
3. Click the Pitch Configuration Chart button. The Pitch Configuration Chart is printed. Does this solve your problem? Replace the drum cartridge if you have a spare. See "Replacing the Drum Cartridges." 9 1. After you replace the drum cartridge, start Tool Box. For how to start Tool Box, see "Understanding Your Printer Software." The Tool Box opens. 2. Select Chart Print from the left list. 3. Click the Pitch Configuration Chart button. The Pitch Configuration Chart is printed. The task Contact is Dell.
Colors Configuration Chart is printed. Does this solve your problem? Replace the fuser if you have a spare. 5 1. Replace the fuser. See "Replacing the Fuser." 2. After you replace the fuser, start Tool Box. For how to start Tool Box, see "Understanding Your Printer Software." The Tool Box opens. 3. Select Chart Print from the left list. 4. Click the Pitch Configuration Chart button. The Pitch Configuration Chart is printed. The task is complete. (The fuser you are using has been damaged.
Action Yes No The task is complete. Go to action 2. The task is complete. Go to action 3. The task is complete. Go to action 4. The task is complete. Go to action 5. The task is complete. Go to action 6. The task is complete. Go to action 7. The toner cartridges may be low or need to be replaced. Confirm the amount of toner in each toner cartridge. 1 1. Check the toner level in the Status tab in the Status Monitor. 2. Replace the toner cartridges as necessary.
Action Yes No The task is complete. Go to action 2. The task is complete. Go to action 3. The toner cartridges may be low or need to be replaced. Confirm the amount of toner in each toner cartridge. 1 1. Check the toner level in the Status tab in the Status Monitor. 2. Replace the toner cartridges as necessary. Does this solve your problem? If you are using non-Dell brand toner cartridges, enable the Non-Dell Toner option. 2 1.
3. Select Chart Print from the left list. 4. Click the 4 Colors Configuration Chart button. The 4 Colors Configuration Chart is printed. Does this solve your problem? Pitched color dots Action Yes No Locate the cause of the problem using the Pitch Configuration Chart. 1 1. Start Tool Box. For how to start Tool Box, see "Understanding Your Printer Software." The Tool Box opens. 2. Select Chart Print from the left list. 3. Click the Pitch Configuration Chart button.
3. Select Chart Print from the left list. 4. Click the Pitch Configuration Chart button. new one.) Dell. The Pitch Configuration Chart is printed. Does this solve your problem? Vertical blanks Action Yes No The task is complete. Go to action 8. The task is complete. Go to action 3. Clean inside the printer by using the cleaning rod. 1 1. After the cleaning is completed, start Tool Box. For how to start Tool Box, see "Understanding Your Printer Software." The Tool Box opens. 2.
Action Yes No Locate the cause of the problem using the Ghost Configuration Chart. 1. Start Tool Box. For how to start Tool Box, see "Understanding Your Printer Software." The Tool Box opens. 2. Select Chart Print from the left list. 3. Click the Ghost Configuration Chart button. 1 Proceed to the action corresponding to the type of ghosting. Positive ghost - 2a Contact Dell. Negative ghost - 2b The Ghost Configuration Chart is printed.
Does this solve your problem? Fog Action Yes No The task is complete. (The drum cartridge you are using has been damaged. Replace it with a new one.) Contact Dell. Replace the drum cartridge if you have a spare. 1 1. Replace the drum cartridge. See "Replacing the Drum Cartridges." 2. After you replace the drum cartridge, start Tool Box. For how to start Tool Box, see "Understanding Your Printer Software." The Tool Box opens. 3. Select Chart Print from the left list. 4.
been damaged. Replace it with a new one.) 3. Select Chart Print from the left list. 4. Click the 4 Color Configuration Chart button. The 4 Color Configuration Chart is printed. Dell. Does this solve your problem? Jagged characters Action Yes No The task is complete. Go to action 2. The task is complete. Go to action 3. The task is complete. Contact Dell. Set Print Mode to High Quality in the printer driver. 1 1. On the Graphics tab, select High Quality from Print Mode.
2 2. After you replace the drum cartridge, start Tool Box. For how to start Tool Box, see "Understanding Your The task is complete. (The drum cartridge you Printer Software." are using has been damaged. Replace it with a The Tool Box opens. new one.) 3. Select Chart Print from the left list. 4. Click the MQ Chart button. Contact Dell. The MQ Chart is printed. Does this solve your problem? Replace the fuser if you have a spare. 3 1. Replace the fuser. See "Replacing the Fuser." 2.
Does this solve your problem? Replace the drum cartridge if you have a spare. 3 1. Replace the drum cartridge. See "Replacing the Drum Cartridges." 2. After you replace the drum cartridge, start Tool Box. For how to start Tool Box, see "Understanding Your The task is complete. (The drum cartridge you Printer Software." are using has been damaged. Replace it with a The Tool Box opens. new one.) 3. Select Chart Print from the left list. 4. Click the Pitch Configuration Chart button.
Does this solve your problem? 6 7 recommended one. The wrinkle had appeared Check if the wrinkle appeared within the square within the allowable range. whose each edge is 30 mm inside the four sides of You can use the envelope the envelope. you are using. Change the envelope with another one and try again. The task is complete. Go to action 7. Contact Dell.
Action 1 2 Yes Ensure that the margin is installed correctly on the application being used. Does this solve your problem? In Customer mode, correct the S-S direction KtoP parameter. No The task is complete. Go to action 2. The task is complete. Contact Dell. Does this solve your problem? The side margin is incorrect Action 1 2a 2b Yes Ensure that the margin is installed correctly on the application The task is being used. complete.
Action 1 Yes No The task Go to is action complete. 2. Adjust the settings of the paper type on the printer driver to those of the tray. Does this solve your problem? Execute auto color registration adjustment. 1. Launch the Dell Printer Configuration Web Tool by entering your printer's IP address in your web browser. (If you do not know how to launch the Dell Printer Configuration Web Tool, see "Dell Printer Configuration Web Tool".) 2.
Tray 1 Misfeed jam Action Yes No Proceed to the action corresponding to the type of the print media being used: 1 2a 2b 2c Ensure that the tray 1 is properly inserted. Does this solve your problem? Use thick paper that is 216 gsm or less. The task is complete. Go to action 3a. The task is complete. Go to action 3a. The task is complete. Go to action 3b. The task is complete. Go to action 3c. The task is complete. Go to action 2g. The task is complete. Go to action 3a.
Does this solve your problem? 4c Change the envelope with another one and then try again. Is the problem reduced or recovered? complete. The task is complete. Go to action 3b. MPF Misfeed jam Action Yes No - - The task is complete. Go to action 3a. The task is complete. Go to action 3a. The task is complete. Go to action 3b. The task is complete. Go to action 3c. The task is complete. Go to action 3a. The task is complete. Go to action 4a. The task is complete. Go to action 3b.
Option Tray Misfeed jam Action 1 Ensure that the tray is properly inserted. Does this solve your problem? Yes No The task is complete. Go to action 2. Proceed to the action corresponding to the type of the print media being used: 2 3a 3b 3c Ensure the right hand cover is closed. Does this solve your problem? Use thick paper that is 216 gsm or less. Does this solve your problem? Use thin paper that is 60 gsm or more. Does this solve your problem? Ensure that the print media is not curled.
Does this solve your problem? 4. Replace the transfer roller if you have a spare. 4 1. Replace the transfer roller. See "Replacing the Transfer Roller." 2. After you replace the transfer roller, start Tool Box. For how to start Tool Box, see "Understanding Your Printer Software." The Tool Box opens. 3. Select Chart Print from the left list. 4. Click the Pitch Configuration Chart button. The Pitch Configuration Chart is printed. The task is complete. (The transfer roller you are using has been damaged.
3 4 Use print media that is not damp. Does this solve your problem? Fan the print media. Does this solve your problem? Wipe the separator rollers in the tray where the multi-feed occurred 5 with a cloth moistened with water. Does this solve your problem? Replace the separator rollers in the tray where the multi-feed 6 occurred if you have a spare. Does this solve your problem? The task is complete. Go to action 4. The task is complete. Go to action 5. The task is complete. Go to action 6.
3 2. After you replace the fuser, click start Tool Box. For how to start Tool Box, see "Understanding Your Printer Software." The Tool Box opens. 3. Select Chart Print from the left list. 4. Click the Pitch Configuration Chart button. The Pitch Configuration Chart is printed. The task is complete. (The fuser you are using has been damaged. Replace it with a new one.) Go to action 7 The task is complete. (The waste box you are using has been damaged. Replace it with a new one.) Go to action 5.
016-404 is displayed when setting the encryption of the HDD to OFF. 016-404 is displayed when formatting the HDD. Security is set to OFF when setting encryption of the HDD to OFF. Security is set to OFF when formatting the HDD. The HDD is formatted and the certificate data is deleted when setting encryption of the HDD to OFF. Since a certificate is required and the security function cannot be enabled when restarting the device afterward, 016-404 is displayed and the security setting must be initialized.
Problems with Installed Optional Accessories If an option does not operate correctly following installation or stops working: Turn off the printer, wait for 10 seconds, and then turn on the printer. If this does not fix the problem, unplug the printer, and check the connection between the option and the printer. Print the printer settings page to see if the option is listed in the Installed Options list. If the option is not listed, reinstall it. See "Printing a Printer Settings Page.
Compile Exit SNR OFF Jam Action 1 Yes Remove the print media left in the H Transport Unit. Does this solve your problem? No The task is complete. Contact Dell. Set Eject Jam Action If using non-recommended print media, use the print media recommended for 1 the printer. Does this solve your problem? Yes No The task is complete. Go to action 2. The task is complete. Go to action 3. The task is complete. Go to action 4. The task is complete. Contact Dell.
Back to Contents Page Appendix Dell Technical Support Policy Warranty and Return Policy Contacting Dell Dell Technical Support Policy Technician-assisted technical support requires the cooperation and participation of the customer in the troubleshooting process and provides for restoration of the operating system, software program and hardware drivers to the original default configuration as shipped from Dell, as well as the verification of appropriate functionality of the printer and all Dellinstal
Warranty and Return Policy Dell Computer Corporation ("Dell") manufactures its hardware products from parts and components that are new or equivalent to new in accordance with industry-standard practices. For information about the Dell warranty for your printer, see support.dell.com. Recycling Information It is recommended that customers dispose of their used computer hardware, monitors, printers, and other peripherals in an environmentally sound manner.