Dell OptiPlex 3070 Small Form Factor Setup and Specifications Regulatory Model: D11S Regulatory Type: D11S004
Notes, cautions, and warnings NOTE: A NOTE indicates important information that helps you make better use of your product. CAUTION: A CAUTION indicates either potential damage to hardware or loss of data and tells you how to avoid the problem. WARNING: A WARNING indicates a potential for property damage, personal injury, or death. © 2018 - 2019 Dell Inc. or its subsidiaries. All rights reserved. Dell, EMC, and other trademarks are trademarks of Dell Inc. or its subsidiaries.
Contents 1 Set up your computer................................................................................................................... 5 2 Chassis........................................................................................................................................7 Front view...............................................................................................................................................................................
Updating your system BIOS using a USB flash drive................................................................................................28 Updating the Dell BIOS in Linux and Ubuntu environments.....................................................................................29 Flashing the BIOS from the F12 One-Time boot menu............................................................................................ 29 System and setup password...................................................
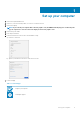
1 Set up your computer 1. Connect the keyboard and mouse. 2. Connect to your network using a cable, or connect to a wireless network. 3. Connect the display. NOTE: If you ordered your computer with a discrete graphics card, the HDMI and the display ports on the back panel of your computer are covered. Connect the display to the discrete graphics card. 4. Connect the power cable. 5. Press the power button. 6. Follow the instructions on the screen to finish Windows setup: a) Connect to a network.
SupportAssist — Check and update your computer 6 Set up your computer
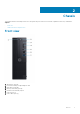
2 Chassis This chapter illustrates the multiple chassis views along with the ports and connectors and also explains the FN hot key combinations. Topics: • • Front view Small Form Factor Computer Views Front view 1. 2. 3. 4. 5. 6. 7. Optical drive (optional) Power button and power light/diagnostic LED Hard-drive activity light Memory card reader (optional) Headset/Universal audio jack port USB 2.0 ports (2) USB 3.
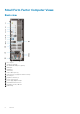
Small Form Factor Computer Views Back view 1. 2. 3. 4. 5. 6. 7. 8. 9. 10. 11. 12. 13. 14. 15. 8 Line-out port Serial Port (optional) DP/HDMI2.0b/VGA port (optional) HDMI port DisplayPort Service tag USB 3.1 Gen 1 ports (2) USB 2.
3 System specifications NOTE: Offerings may vary by region. The following specifications are only those required by law to ship with your computer. For more information about the configuration of your computer, go to Help and Support in your Windows operating system and select the option to view information about your computer.
Device Guard is a combination of enterprise-related hardware and software security features that, when configured together, will lock a device down so that it can only run trusted applications. If it is not a trusted application, it cannot run. Credential Guard uses virtualization-based security to isolate secrets (credentials) so that only privileged system software can access them. Unauthorized access to these secrets can lead to credential theft attacks.
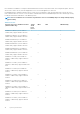
Intel Core Processors 9th Gen Core CPUs (Offered offline only) Tower/ Small Form Factor Intel® Core™ i7-9700 (8 Cores/12MB/8T/ 3.0GHz to 4.7GHz/65W); supports Windows 10/Linux x Intel® Core™ i7-9700T (8 Cores/12MB/8T/ 2.0GHz to 4.3GHz/35W); supports Windows 10/Linux Micro GSP DG/CG Ready x x x Table 4. Processor Intel Core Processors 8th Gen Core CPUs (Offered offline only) Tower Small Form Micro Factor GSP DG/CG Ready Intel Core i7-8700 (6 Cores/12 MB/12T/up to 4.
Memory NOTE: Memory modules should be installed in pairs of matched memory size, speed, and technology. If the memory modules are not installed in matched pairs, the computer will continue to operate, but with a slight reduction in performance. The entire memory range is available to 64-bit operating systems. Table 5.
Tower/Small form factor/Micro Temperature Range -10°C to 70°C Relative Humidity Range 5 to 95% Storage Table 7. Storage Tower Small form factor Micro Optical Drives Supported 1 Slim 1 Slim 0 Hard Drive Bay Supported (Internal) 1x3.5”/2x2.5” 1x3.5" or 1x2.5" 1x2.5" Hard Drives Supported 3.5”/2.5” (maximum) 1/2 1/1 0/1 SATA 2.0 1 1 0 SATA 3.0 2 1 1 M.2 Socket 3 (for SATA / NVMe SSD) 1 1 1 M.2 Socket 1 (for WiFi/BT card) 1 1 1 3.5 inch 500 GB 7200 RPM HDD Y Y N 3.
Audio and speakers Table 8. Audio and speakers Tower/Small Form Factor/Micro Realtek ALC3234 High Definition Audio Codec (supports multiple streaming) Integrated Audio enhancement software Wave MaxxAudioPro (Standard) Internal speaker (mono) Integrated Speaker Performance, Speech Grade & Electrical Grade Grade D Dell 2.0 Speaker System - AE215 Optional Dell 2.
Communications – Wireless Table 11. Communications – Wireless Tower/Small form factor/Micro Qualcomm QCA9377 Dual-band 1x1 802.11ac Wireless + Bluetooth 4.1 Yes Qualcomm QCA61x4A Dual-band 2x2 802.11ac Wireless + Yes Bluetooth 4.2 Intel Wireless-AC 9560, Dualband 2x2 802.11ac Wi-Fi with MU-MIMO + Bluetooth 5 Yes Internal Wireless Antennas Yes External Wireless Connectors and Antenna Yes Support for 802.11n and 802.11ac Yes via M.
Tower Small Form Factor Micro Line out for headphones or speakers 1 Rear 1 Rear 1 Front Universal Audio Jack 1 Front 1 Front 1 Front Audio: System board connectors NOTE: See Detailed Engineering Specifications for maximum card dimensions. Table 13. System board connectors Tower Small Form Factor Micro 1 1 0 3 1 0 3 2 1 M.2 Socket 3 3 (for SSD) 1 - 2230/2280 1 - 2230/2280 1 - 2230/2280 M.
Operating system Tower/Small form factor/Micro Platforms Qualified on specific versions of Windows 10 This website also includes a matrix of other platforms qualified on specific versions of Windows 10. Power supply Table 15. Power supply Input Voltage 100-240 Vac Input current (maximum) Wattage Physical specifications Table 16. Physical system dimensions Chassis volume (liters) Chassis weight (pounds / kilograms) Table 17.
Table 19. Regulatory/Environmental Certifications Tower/ Small form factor/ Micro Energy Star 7.0/7.1 Compliant (Windows & Ubuntu) Yes Br/CL Reduction: Yes Plastic parts above 25 grams shall not contain greater than 1000 ppm chlorine or greater than 1000 ppm bromine at the homogenous level.
4 System setup System setup enables you to manage your hardware and specify BIOS level options.
System setup options NOTE: Depending on the and its installed devices, the items listed in this section may or may not appear. General options Table 20. General Option Description System Information Displays the following information: • • • • • Boot Sequence Allows you to specify the order in which the computer attempts to find an operating system from the devices specified in this list.
Option Description NOTE: Depending on the computer and its installed devices, the items listed in this section may or may not appear. SATA Operation Allows you to configure the operating mode of the integrated hard drive controller. • • • Drives Disabled = The SATA controllers are hidden AHCI = SATA is configured for AHCI mode RAID ON = SATA is configured to support RAID mode (selected by default) Allows you to enable or disable the various drives on-board: • • • SATA-0 SATA-4 M.
Option Description NOTE: If you do not select Auto, the on-board graphics device will be present and enabled. Security Table 23. Security Option Description Strong Password This option lets you enable or disable strong passwords for the system. The option is disabled by default. Password Configuration Allows you to control the minimum and maximum number of characters allowed for a administrative password and the system password. The range of characters is between 4 and 32.
Option Description • • Enabled On-Silent OROM Keyboard Access • • • Disabled Enabled (default) One Time Enable Admin Setup Lockout Allows you to prevent users from entering Setup when Admin password is set. This option is not set by default. SMM Security Mitigation Allows you to enable or disable additional UEFI SMM Security Mitigation protections. This option is not set by default. Secure boot options Table 24.
Option Description Click one of the following options: • • • Enclave Memory Size Disabled Enabled Software controlled—Default This option sets SGX Enclave Reserve Memory Size Click one of the following options: • • • 32 MB 64 MB 128 MB—Default Performance Table 26. Performance Option Description Multi Core Support This field specifies whether the process has one or all cores enabled. The performance of some applications improves with the additional cores.
Power management Table 27. Power Management Option Description AC Recovery Determines how the system responds when AC power is re-applied after a power loss. You can set the AC Recovery to: • • • Power Off Power On Last Power State This option is set to Power Off by default. Enable Intel Speed Shift Technology Allows you to enable or disable Intel Speed Shift Technology support. The option Enable Intel Speed Shift Technology is set by default.
Option Description • • Thorough — The system does not skip any steps in the boot process. Auto — This allows the operating system to control this setting (this works only when the operating system supports Simple Boot Flag). This option is set to Thorough by default. Extend BIOS POST Time This option creates an additional pre-boot delay. • • • 0 seconds (default) 5 seconds 10 seconds Full Screen Logo This option will display full screen logo if your image match screen resolution.
Option Description • Bluetooth All the options are enabled by default. Maintenance Table 32. Maintenance Option Description Service Tag Displays the service tag of your computer. Asset Tag Allows you to create a system asset tag if an asset tag is not already set. This option is not set by default. SERR Messages Controls the SERR message mechanism. This option is set by default. Some graphics cards require that the SERR message mechanism be disabled.
2. Go to Dell.com/support. • • Enter the Service Tag or Express Service Code and click Submit. Click Detect Product and follow the instructions on screen. 3. If you are unable to detect or find the Service Tag, click Choose from all products. 4. Choose the Products category from the list. NOTE: Choose the appropriate category to reach the product page 5. Select your computer model and the Product Support page of your computer appears. 6. Click Get drivers and click Drivers and Downloads.
Figure 1. DOS BIOS Update Screen Updating the Dell BIOS in Linux and Ubuntu environments If you want to update the system BIOS in a Linux environment such as Ubuntu, see https://www.dell.com/support/article/us/en/19/ sln171755/. Flashing the BIOS from the F12 One-Time boot menu Updating your system BIOS using a BIOS update .exe file copied to a FAT32 USB key and booting from the F12 one time boot menu.
3. The Bios flash menu will open then click the Flash from file. 4.
5. Once the file is selected, Double click the flash target file, then press submit . 6. Click the Update BIOS then system will reboot to flash the BIOS.
7. Once complete, the system will reboot and the BIOS update process is completed. System and setup password Table 35. System and setup password Password type Description System password Password that you must enter to log on to your system. Setup password Password that you must enter to access and make changes to the BIOS settings of your computer. You can create a system password and a setup password to secure your computer.
The computer reboots. Deleting or changing an existing system setup password Ensure that the Password Status is Unlocked (in the System Setup) before attempting to delete or change the existing System and/or Setup password. You cannot delete or change an existing System or Setup password, if the Password Status is Locked. To enter the System Setup, press F2 immediately after a power-on or reboot. 1. In the System BIOS or System Setup screen, select System Security and press Enter.
5 Software This chapter details the supported operating systems along with instructions on how to install the drivers. Topics: • Downloading drivers Downloading drivers 1. Turn on the . 2. Go to Dell.com/support. 3. Click Product Support, enter the Service Tag of your , and then click Submit. NOTE: If you do not have the Service Tag, use the auto detect feature or manually browse for your model. 4. Click Drivers and Downloads. 5. Select the operating system installed on your . 6.
Network adapter drivers Verify if the Network adapter drivers are already installed in the system. Realtek Audio Verify if audio drivers are already installed in the computer. Storage controller Verify if the storage control drivers are already installed in the system.
6 Getting help Topics: • Contacting Dell Contacting Dell NOTE: If you do not have an active Internet connection, you can find contact information on your purchase invoice, packing slip, bill, or Dell product catalog. Dell provides several online and telephone-based support and service options. Availability varies by country and product, and some services may not be available in your area. To contact Dell for sales, technical support, or customer service issues: 1. Go to Dell.com/support. 2.