Dell™ All-In-One Printer 810 User's Guide Click the links to the left for information on the features and operation of your printer. For information on other documentation included with your printer, see Finding Information. To order ink or supplies from Dell: 1. Double-click the icon on your desktop. 2. Visit Dell's website: www.dell.com/supplies 3. Order Dell printer supplies by phone. Refer to the Owner's Manual for the correct phone number for your country.
About Your Printer Understanding the Printer Parts Setting Up Your Printer Using the Operator Panel Loading Paper You can use the Dell™ All-In-One Printer 810 to do a variety of things. A few important things to note: l If your printer is connected to a computer, you can use either the printer operator panel or the printer software to create your projects. l You do need to connect your printer to a computer to scan, print, and fax. l You do not need to connect your printer to a computer to copy.
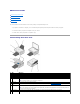
NOTE: Insert the power cable into the printer before connecting the power cable into the wall outlet. 10 Operator panel Panel on the printer you use to control copying and scanning. For more information, see Using the Operator Panel. 11 Scanner glass Surface on which you place your document or photo face down to copy, fax, or scan it. Setting Up Your Printer NOTE: The Dell AIO Printer 810 supports Microsoft® Windows® 2000, Windows XP, and Windows XP Professional x64 Edition.
Appendix Dell Technical Support Policy Contacting Dell Warranty and Return Policy Dell Technical Support Policy Technician-assisted technical support requires the cooperation and participation of the customer in the troubleshooting process and provides for restoration of the Operating System, application software and hardware drivers to the original default configuration as shipped from Dell, as well as the verification of appropriate functionality of the printer and all Dell-installed hardware.
BSD License and Warranty Statements Copyright (c) 1991 The Regents of the University of California. All rights reserved. Redistribution and use in source and binary forms, with or without modification, are permitted provided that the following conditions are met: 1. Redistributions of source code must retain the above copyright notice, this list of conditions and the following disclaimer. 2.
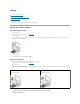
Copying Copying Documents or Photos Copying 4x6 Photos Using the Operator Panel Changing Copy Settings To make copies, you can use the printer operator panel or your computer. Copying Documents or Photos Using the Operator Panel 1. Turn on your printer. 2. Load the paper. For more information, see Loading Paper. 3. Open the top cover. 4. Place the document or photo you want to copy face down on the scanner glass.
7. Select the number of copies (1–99) and color setting from the drop-down menu. 8. Click See More Copy Settings to: 9. ¡ Choose a copy quality. ¡ Select the blank paper size. ¡ Select the original document size. ¡ Lighten or darken your document. ¡ Reduce or enlarge your document. ¡ Click the Advanced button to change options such as paper size and quality. When you are finished customizing your settings, click Copy Now.
Image Enhancements l Select the area to be scanned. l Straighten images after scan (deskew). Sharpen your blurry images. Adjust the brightness of your image. Adjust the color correction curve (gamma) of your image. l l l Image Patterns l l l 6. Smooth the conversion of a gray image to a black and white dot pattern (dither). Remove image patterns from magazines or newspapers (descreen). Reduce the background noise on your color document.
Faxing Installing Microsoft Fax Console in Windows XP Configuring Microsoft Fax Console (Windows XP) or Fax Service Management (Windows 2000) Faxing a Paper Document Faxing Electronic Documents Receiving a Fax Using Fax Console or Fax Service Management Viewing Sent and Received Faxes Using Fax Console or Fax Service Management Viewing the Status of a Fax Using Fax Console or Fax Service Management Changing the Fax Configuration To send a fax using this printer, you need to have the printer attached to a c
5. If you want to disable the sending of faxes, click to clear the Enable Send check box. 6. Click to select the Enable Receive check box if you want to receive faxes. NOTE: Selecting the Enable Receive check box allows you to receive faxes but may cause the computer modem to answer all phone calls, in which case you may not receive voice mail. 7. Click the Manual answer button or Automatically answer after (user-defined number of rings) button. 8. Click Next. 9.
l In the Productivity Tools section, click Fax using PC modem, and follow the instructions on the screen. NOTE: One of the questions on the screen asks if you want to scan another page. If you do, place the next page on the scanner glass and click Yes. Faxing Electronic Documents 1. With the file open, click File® Print. 2. In the printer list, select Fax. 3. Click OK or Print, and then follow the instructions on the screen. Receiving a Fax Using Fax Console or Fax Service Management 1.
Finding Information What are you looking for? l l Drivers for my printer My User's Guide Find it here Drivers and Utilities CD If you purchased your Dell computer and printer at the same time, documentation and drivers for your printer are already installed on your computer. You can use the CD to uninstall/reinstall drivers or access your documentation.
GNU License GENERAL PUBLIC LICENSE Version 2, June 1991 Copyright (C) 1989, 1991 Free Software Foundation, Inc. 59 Temple Place, Suite 330, Boston, MA 02111-1307 USA Everyone is permitted to copy and distribute verbatim copies of this license document, but changing it is not allowed. Preamble The licenses for most software are designed to take away your freedom to share and change it.
2. You may copy and distribute verbatim copies of the Program's source code as you receive it, in any medium, provided that you conspicuously and appropriately publish on each copy an appropriate copyright notice and disclaimer of warranty; keep intact all the notices that refer to this License and to the absence of any warranty; and give any other recipients of the Program a copy of this License along with the Program.
Foundation. If the Program does not specify a version number of this License, you may choose any version ever published by the Free Software Foundation. 11. If you wish to incorporate parts of the Program into other free programs whose distribution conditions are different, write to the author to ask for permission. For software which is copyrighted by the Free Software Foundation, write to the Free Software Foundation; we sometimes make exceptions for this.
This license, the Lesser General Public License, applies to some specially designated software packages--typically libraries--of the Free Software Foundation and other authors who decide to use it. You can use it too, but we suggest you first think carefully about whether this license or the ordinary General Public License is the better strategy to use in any particular case, based on the explanations below. When we speak of free software, we are referring to freedom of use, not price.
A "library" means a collection of software functions and/or data prepared so as to be conveniently linked with application programs (which use some of those functions and data) to form executables. The "Library", below, refers to any such software library or work which has been distributed under these terms.
portions of the Library, and distribute that work under terms of your choice, provided that the terms permit modification of the work for the customer's own use and reverse engineering for debugging such modifications. You must give prominent notice with each copy of the work that the Library is used in it and that the Library and its use are covered by this License. You must supply a copy of this License.
YOU ASSUME THE COST OF ALL NECESSARY SERVICING, REPAIR OR CORRECTION. 16.
Licensing Notice The printer resident software contains: l Software developed and copyrighted by Dell and/or third parties l Dell modified software licensed under the provisions of the GNU General Public License version 2 and the GNU Lesser General Public License version 2.1 l Software licensed under the BSD license and warranty statements l Software based in part on the work of the Independent JPEG Group.
Ink Cartridge Maintenance Replacing an Ink Cartridge Aligning an Ink Cartridge Cleaning the Ink Cartridge Nozzles CAUTION: Before performing any of the procedures listed in this section, read and follow the safety information in your Owner's Manual. Dell ink cartridges are only available through Dell. You can order more ink online at www.dell.com/supplies or by phone. To order by phone, see "Ordering Supplies" in your Owner's Manual. Dell recommends Dell ink cartridges for your printer.
7. Insert the new ink cartridge. 8. Snap the lid closed. 9. Lift the printer unit, and hold the scanner support up while lowering the printer unit until it is completely closed. Aligning an Ink Cartridge You may need to align the ink cartridge when characters are not properly formed or are not aligned at the left margin, or when vertical or straight lines appear wavy. To align the ink cartridge: 1. 2. Load plain paper. For more information, see Loading Paper.
3. 4. Right-click the Dell AIO 810 icon. Click Printing Preferences. The Printing Preferences dialog box opens. 5. Click the Maintenance tab. 6. Click Align Print Cartridge. 7. Click Print. A blue and black alignment page prints. 8. After the alignment page has finished printing, place the page face-down on the scanner glass. Make sure the upper left corner of the front of the page aligns with the arrow on the printer. 9. Press the Scan button . The page is scanned.
Printing Printing a Document Printing Photos Print Borderless Photos Printing a Document 1. Turn on your computer and printer, and make sure they are connected. 2. Load paper with the print side facing up. For more information, see Loading Paper. 3. With your document open, click File® Print. 4. To customize your print settings: a. Click Preferences, Properties, Options, or Setup (depending on the program or operating system). The Printing Preferences dialog box opens. 5. b.
1. For best results, load photo/glossy paper, and make sure the print side is facing up. For more information, see Print Media Guidelines. 2. With your document open, click File® Print. 3. To customize your print settings, click Preferences, Properties, Options, or Setup (depending on the program or operating system). The Printing Preferences dialog box opens. 4. On the Print Setup tab, select Photo, and then select the dpi settings for the photo from the drop-down menu. 5.
Regulatory Notices FCC Notices (U.S.
FCC, Class B This equipment generates, uses, and can radiate radio frequency energy and, if not installed and used in accordance with the manufacturer's instruction manual, may cause interference with radio and television reception. This equipment has been tested and found to comply with the limits for a Class B digital device pursuant to Part 15 of the FCC Rules. This device complies with Part 15 of the FCC Rules.
A "Declaration of Conformity" in accordance with the preceding directives and standards has been made and is on file at Dell Inc. Products Europe BV, Limerick, Ireland. VCCI Notice (Japan Only) VCCI, Class B MIC Notice (Republic of Korea Only) MIC, Class B Class B Equipment (Household purpose info/telecommunications equipment) As this equipment has undergone EMC registration for household purpose, this product can be used in any area including residential area.
Ship to: Dell Computer de México, S.A. de C.V. al Cuidado de Kuehne & Nagel de México S. de R.L. Avenida Soles No. 55 Col. Peñon de los Baños 15520 México, D.F. Model number: 810 Supply voltage: 100-240 VAC Frequency: 50-60 Hz Current consumption: 1.0 A Output voltage: 30 VDC Output current: 0.
Diretiva WEEE (Waste from Electrical and Electronic Equipment) Na União Européia, essa etiqueta indica que o produto não deve ser descartado junto com o lixo normal. Ele deve ser depositado em uma instalação apropriada para coleta e reciclagem. Para obter informações sobre como reciclar este produto de forma responsável em seu país, visite: www.euro.dell.com/recycling.
WEEE-direktiivi käytöstä poistettujen laitteiden hävittämisestä Euroopan unionissa tämä merkintä kertoo, että tuote tulee hävittää kotitalousjätteen mukana. Se tulee hävittää niin, että se voidaan noutaa ja siirtää kierrätykseen. Lisätietoja maakohtaisesta jätteenkäsittelyohjeista on sivustossa www.euro.dell.com/recycling.
Waste Electrical and Electronic Equipment (WEEE) Directive ???? ??? ,??? ?????? ????? ?????? ?? ?????.?????? ????? ??? ????? ????? ??? ??????? ?? .????? ????? ??? ????? ?? ?????? ???? ?????? ?? ????? ,??????? ?????? .www.euro.dell.com/recycling Direttiva WEEE (Waste from Electrical and Electronic Equipment) Nell'Unione Europea, questa etichetta indica che il prodotto non deve essere smaltito insieme ai rifiuti solidi urbani.
?????????? ?? ????????? ? ???????? ?????????????? ? ???????????? ???????????? (WEEE) ? ???????? ???????????? ????? ??? ??????? ???????? ?????? ?? ?????????? ??????? ?????????? ????????? ? ??????? ???????.??? ?????????? ?????? ????????????? ????? ???????? ? ?????? Directiva sobre el desecho de material eléctrico y electrónico (WEEE) En la Unión Europea, esta etiqueta indica que la eliminación de este producto no se puede hacer junto con el desecho doméstico.
Scanning Scanning Photos Scanning Multiple Pages or Images Editing Scanned Text Using Optical Character Recognition (OCR) Saving an Image on Your Computer E-mailing a Scanned Image or Document Enlarging or Reducing Images or Documents You can scan with your printer using the printer operator panel or your computer. 1. Turn on your computer and printer, and make sure they are connected. 2. Open the top cover. 3. Place the document you want to scan face down on the scanner glass.
4. 5. Close the top cover. Open the Dell All-In-One Center by clicking Start® Programs or All Programs® Dell Printers® Dell AIO 810® Dell All-In-One Center. The Dell All-In-One Center opens. NOTE: You can also open the Dell All-In-One Center from the operator panel on your printer by pressing the Scan button Center opens on your computer. 6. Click Preview Now to see your scanned image. 7. Adjust the dotted lines to fit around the portion of the image you want to scan. 8.
7. In the Scan section, click See More Scan Settings, and then click the Advanced button. 8. On the Scan tab, select the Scan multiple items before output box. 9. Click OK. 10. When you finish customizing your settings, click Scan Now. After you scan the first page, a prompt appears requesting the next page. 11. Place the next sheet on the scanner glass, and click Yes. Repeat until you finish scanning all pages. 12. When finished, click No. The program opens with the multiple pages scanned.
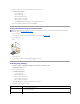
E-mailing a Scanned Image or Document To send scanned images or documents through e-mail: 1. Open the top cover. 2. Place the document or photo face down on the scanner glass. Make sure the upper left corner of the front of the item aligns with the arrow on the printer. For portrait orientation: For landscape orientation: 3. Close the top cover. 4. Click Start® Programs or All Programs® Dell Printers® Dell AIO 810® Dell All-In-One Center. The Dell All-In-One Center opens.
4. 5. Close the top cover. Click Start® Programs or All Programs® Dell Printers® Dell AIO 810® Dell All-In-One Center. The Dell All-In-One Center opens. NOTE: You can also open the Dell All-In-One Center from the operator panel on your printer by pressing the Scan button Center opens on your computer. 6. Click Preview Now. 7. In the Productivity Tools section, select Enlarge or reduce an image. 8. Follow the instructions on the screen to select the size of your new image. 9.
Understanding the Software Using the Dell All-In-One Center Using Printing Preferences Using Dell Picture Studio Dell Ink Management System Removing and Reinstalling the Software The printer software includes: l Dell All-In-One Center — Allows you to perform various scan, copy, fax, and print operations with newly scanned and previously saved documents and images. l Printing Preferences — Allows you to adjust printer settings.
In this section: You can: Preview Now l l Scan and Fax l l l l l Select a portion of the preview image to scan. View an image of what will be printed or copied. Select Select Select Select Select the program where you want to send the scanned image. the type of image being scanned. the quality of the scan. Scan Now. Fax Now. NOTE: Click See More Scan Settings to view all settings. Copy l l l l l l Select the quantity and color of your copies. Select a quality setting for your copies.
NOTE: Changes made to the printer settings from the Printers folder become the default settings for most programs. Printing Preferences Tabs Printing Preferences includes three main tabs. Tab Options Print Setup Quality/Speed — Select Automatic, Draft, Normal, or Photo depending on your desired output quality. Media Type — Allows you to set the paper type. Paper Size — Select the size and type of paper. Borderless — Select the check box if you want to print borderless photos.
Removing and Reinstalling the Software If your printer does not function properly, or communication error messages appear when using your printer, you can remove and reinstall the printer software. 1. Click Start® Programs or All Programs® Dell Printers® Dell AIO 810® Uninstall Dell AIO 810. 2. Follow the instructions on the screen. 3. Restart your computer. 4. Insert the Drivers and Utilities CD, and then follow the instructions on the screen. If the installation screen does not appear: a.
Printer Specifications Overview Environmental Specifications Power Consumption and Requirements Fax Mode Capabilities Print Quality Specifications Copy/Scan Mode Capabilities Operating System Support System Specifications and Requirements Print Media Guidelines Cables Overview Memory 8MB SDRAM Connectivity USB 2.
The printer must be connected to a computer with a USB cable. l NOTE: You cannot fax with a DSL (digital subscribe line), ISDN (integrated services digital network), or cable modem.
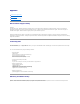
Operating system Processor RAM (MB) Hard disk (MB) Windows 2000 Pentium 233 128 500 Windows XP Pentium 300 128 500 Windows XP Professional x64 Edition Windows XP Professional x64 Edition-compatible PC 256 500 Print Media Guidelines Load up to: 100 sheets of plain paper Make sure: l l The paper is loaded vertically against the right side of the paper support. The paper guide rests against the left edge of the paper.
Troubleshooting Setup Problems General Problems Improving Print Quality Setup Problems Computer Problems Verify that your printer is compatible with your computer. The Dell All-In-One Printer 810 supports Windows 2000, Windows XP, and Windows XP Professional x64 Edition. Make sure you turned on both your printer and your computer. Check the USB cable. l l Ensure the USB cable is firmly connected to your printer and your computer.
General Problems Faxing Problems Make sure you turned on both your printer and your computer, and the USB cable is properly connected. Ensure the computer is connected to an active analog phone line. Using the fax function requires a phone connection to the fax/modem in your computer. When using an external modem, make sure it is turned on, and it is correctly connected to your computer. Paper Problems Make sure you loaded the paper correctly. For more information, see Loading Paper.
4. Print your document again. 5. If the print quality does not improve, try aligning or cleaning the ink cartridge. For more information on aligning, see Aligning an Ink Cartridge. For more information on cleaning ink cartridges, see Cleaning the Ink Cartridge Nozzles. For additional solutions, go to support.dell.com.