Embedded Web Server — Security Administrator's Guide October 2013 www.dell.com | dell.
Contents 2 Contents Security devices covered in this guide..........................................................4 Simple security devices.............................................................................................................................4 Advanced security devices........................................................................................................................4 Using security features in the Embedded Web Server..................................
Contents 3 Configuring the TCP/IP port access setting.......................................................................................................32 Configuring IPsec settings.................................................................................................................................32 Enabling the security reset jumper...................................................................................................................
Security devices covered in this guide 4 Security devices covered in this guide There are two levels of security supported based on the product definition. For a complete list of available functionality, see “Authentication and Authorization” on page 5.
Using security features in the Embedded Web Server 5 Using security features in the Embedded Web Server Embedded Web Server represents an evolution in keeping document outputs safe and confidential in today's busy environments. With traditional components such as authentication and group permissions, administrators can use Embedded Web Server Security Templates to control access to the devices that produce, store, and transmit sensitive documents.
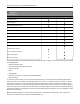
Using security features in the Embedded Web Server 6 = Supported X = Not supported Function Simple security devices Panel PIN Protect PIN Protection Advanced security devices X X Web Page Password Protect X Password Protection X Internal Accounts (Username and Username/Password) X Groups (internal) X LDAP X LDAP+GSSAPI X Kerberos 5 X Active Directory X Limited access controls X Access controls (complete) X Security Templates X Basic Security Setup X The Embedded Web Server han
Using security features in the Embedded Web Server 7 Groups Administrators can designate up to 32 groups to be used in association with either the Internal accounts or LDAP/LDAP +GSSAPI building blocks. For the purposes of Embedded Web Server security, groups are used to identify sets of users needing access to similar functions. For example, in Company A, employees in the warehouse do not need to print in color, but those in sales and marketing use color every day.
Using security features in the Embedded Web Server 8 Limiting access with Basic Security Setup Use Basic Security Setup to limit access to the Embedded Web Server security settings and the configuration menus on the printer control panel. This selection allows the definition of simple internal device security authentication methods. Notes: • This feature is available only in select printer models.
Using security features in the Embedded Web Server 9 3 Under Manage Passwords, select Add a Password. 4 Type a name for the password in the Setup Name box. Note: Each password must have a unique name containing up to 128 UTF‑8 characters (example: “Copy Lockout Password”). 5 Type a password in the appropriate box, and then retype the password to confirm it. 6 If the password will be used as the Administrator password, then select Admin Password.
Using security features in the Embedded Web Server 10 3 Type the name of the PIN configuration in the Setup Name box. Note: Each PIN must have a unique name containing up to 128 UTF‑8 characters (example: “Copy Lockout PIN”). 4 Enter a PIN in the appropriate box, and then reenter the PIN to confirm it. To change the default PIN length: a Click Settings > Security > Miscellaneous Security Settings. b Enter a number in the Minimum PIN Length field, and then click Submit.
Using security features in the Embedded Web Server 11 3 Type the group name. Note: Group names can contain up to 128 UTF‑8 characters. 4 Click Add. 5 Repeat steps 3 through 4 to add more user groups. Note: When creating groups, make a list of all users first, and then determine which device functions are needed by all users and which functions are needed only by certain users.
Using security features in the Embedded Web Server 12 • If you do not select HTTPS, then you will not be able to set up Active Directory. 1 Open a Web browser, and then type the IP address or host name of the printer. Note: A warning with a message associated to your printer IP address or host name will appear. Click Continue to this website (not recommended) to continue.
Using security features in the Embedded Web Server 13 f Change some of the building block settings depending on your environment, including the following: • Server Port‑‑The standard port for LDAP is 389. Another common port is 3268, but this is used only for Global Catalog servers in Active Directory. When applicable, change the port to 3268 to speed up the querying process. • Search Base‑‑This tells the device where, in the directory “tree”, to start searching.
Using security features in the Embedded Web Server 14 3 Click Add an LDAP Setup. The LDAP Server Setup dialog is divided into four parts: General Information • Setup Name—This name is used to identify each particular LDAP Server Setup when creating security templates. • Server Address—Type the IP address or the host name of the LDAP server where the authentication will be performed. • Server Port—The Embedded Web Server communicates with the LDAP server using this port. The default LDAP port is 389.
Using security features in the Embedded Web Server 15 To edit an existing LDAP setup 1 From the Embedded Web Server, click Settings > Security > Security Setup. 2 Under Advanced Security Setup, click LDAP. 3 Click a setup from the list. 4 Make any needed changes in the LDAP Configuration dialog. 5 Click Modify to save the changes, or click Cancel to return to previous values. To delete an existing LDAP setup 1 From the Embedded Web Server, click Settings > Security > Security Setup.
Using security features in the Embedded Web Server 16 To add a new LDAP+GSSAPI setup 1 From the Embedded Web Server, click Settings > Security > Security Setup. 2 Under Advanced Security Setup, click LDAP+GSSAPI. 3 Click Add an LDAP+GSSAPI Setup. The setup dialog is divided into four parts: General Information • Setup Name—This name will be used to identify each particular LDAP+GSSAPI Server Setup when creating security templates.
Using security features in the Embedded Web Server 17 To edit an existing LDAP+GSSAPI setup 1 From the Embedded Web Server, click Settings > Security > Security Setup. 2 Under Advanced Security Setup, click LDAP+GSSAPI. 3 Select a setup from the list. 4 Make any needed changes in the LDAP Configuration dialog. 5 Click Modify to save the changes, or Cancel to return to previous values. To delete an existing LDAP+GSSAPI setup 1 From the Embedded Web Server, click Settings > Security > Security Setup.
Using security features in the Embedded Web Server 18 5 Type the realm (or domain) used by the Kerberos server in the Realm field. 6 Click Submit to save the information as a krb5.conf file on the selected device, or Reset Form to reset the fields and start again. Uploading a Kerberos configuration file 1 From the Embedded Web Server, click Settings > Security > Security Setup. 2 Under Advanced Security Setup, click Kerberos 5. 3 Click Browse, and then select the krb5.conf file.
Using security features in the Embedded Web Server 19 Setting up a CA certificate monitor Note: This is available only in select printer models. When joined to an Active Directory environment, automatic updates of CA (Certificate Authority) certificates is necessary. The certificate monitor, when enabled, performs this function. 1 From the Embedded Web Server, click Settings > Security > Certificate Management > CA Cert Monitor Setup. 2 Click the “Enable CA Monitor” check box.
Using security features in the Embedded Web Server 20 3 Select the Use Backup Password check box, and then type and retype the password. 4 Click Submit. Setting login restrictions Note: This is available only in select printer models. Many organizations establish login restrictions for information assets such as workstations and servers. Embedded Web Server administrators should verify that printer login restrictions also comply with organizational security policies.
Using security features in the Embedded Web Server 21 5 From the Authentication Setup list, select a method for authenticating users. Note: The Authentication Setup list is populated with the authentication building blocks that have been configured on the device. 6 To use authorization, click Add authorization, and then select a building block from the Authorization Setup list. Note: The Authorization Setup list is populated with the authorization building blocks available on the device.
Using security features in the Embedded Web Server 22 • You can delete a security template only if it is not in use; however, security templates currently in use can be edited. Managing certificates and other settings Note: This is available only in select printer models. The Certificate Management menu allows users to configure printers to use certificates for establishing SSL, PSec, and 802.1X connections. Additionally, MFPs use certificates for LDA over SSL authentication and address book look‑ups.
Using security features in the Embedded Web Server 23 Configuring the device for certificate information Note: This is available only in select printer models. The printer has a self‑generated certificate. For some operations (e.g. 802.1x, IPSec, etc.), the printer certificate needs to be upgraded to a certificate that has been signed by a certificate authority.
Using security features in the Embedded Web Server 24 10 Click Browse, and then select the CA Signed Device Certificate file that was created in step 8. 11 Click Submit. Note: This completes the process of creating and installing a signed printer certificate. The printer can now present a valid certificate to systems to which it attempts to negotiate an SSL or IPSec connection. Creating a new certificate 1 From the Embedded Web Server, click Settings > Security > Certificate Management.
Using security features in the Embedded Web Server 25 Setting certificate defaults Administrators can set default values for certificates generated for a supported device. The values entered here will be present in all new certificates generated in the Certificate Management task, even though those fields will remain blank on the screen. 1 From the Embedded Web Server, click Settings > Security > Certificate Management > Set Certificate Defaults.
Using security features in the Embedded Web Server Use 26 To Confidential Job Expiration Set a limit on how long the printer stores confidential print jobs. Off Notes: 1 hour • If the “Confidential Job Expiration” setting is changed while confidential print jobs 4 hours reside in the printer memory or printer hard disk, then the expiration time for those 24 hours print jobs does not change to the new default value.
Using security features in the Embedded Web Server 27 c From the Day(s) menu, select which day or days the schedule should run (example: “Weekdays (Mon‑Fri)”). d Click Add to save the action to the schedule. Notes: • Use of USB devices is enabled by default. • For each “Disable” schedule entry, you must also create an “Enable” schedule entry to reactivate use of the USB devices.
Using security features in the Embedded Web Server 28 5 From the Remote Syslog Method menu, select one of the following: • Normal UDP—To send log messages and events using a lower‑priority transmission protocol. • Stunnel—If implemented on the destination server. 6 From the Remote Syslog Facility menu, select a facility code for events to be logged to on the destination server.
Using security features in the Embedded Web Server 29 7 From the Use SSL/TLS list, select Disabled, Negotiate, or Required to specify whether e-mail will be sent using an encrypted link. 8 If your SMTP server requires user credentials, then select an authentication method from the SMTP Server Authentication list. The default setting is “No authentication required.” 9 From the Device‑Initiated E‑mail list, select None for no authentication, or Use Device SMTP Credentials if authentication is required.
Using security features in the Embedded Web Server 30 Though normally associated with wireless devices and connectivity, 802.1X authentication supports both wired and wireless environments. 802.1X is located within the wireless menu when wireless is enabled on the device. The following network authentication mechanisms can be included in the 802.
Using security features in the Embedded Web Server 31 4 From the TTLS Authentication Method list, select the authentication method to accept through the secure tunnel created between the authentication server and the printer. 5 Click Submit to save the changes, or Reset Form to restore the default settings. Note: Changes made to settings marked with an asterisk (*) cause the print server to reset.
Using security features in the Embedded Web Server 32 4 Under Trap Destination, enter the IP address of the network management server or monitoring station, and then click the check box next to each condition that should generate an alert. 5 Click Submit to save the changes, or click Reset Form to clear all fields. Configuring the TCP/IP port access setting Note: This is available only in select printer models. This feature allows you to set access settings on the different TCP/IP ports of the device.
Using security features in the Embedded Web Server 33 Setting Description Settings DH Group Encryption Authentication Certificate Validation Validate Peer Certificate To specify the encryption and authentication methods of your printer, select an option for each setting. On* Off Select Device Certificate * This is the factory default setting. 3 Click Submit to save the changes, or click Reset Form to restore the default values.
Using security features in the Embedded Web Server 34 • Hard disk memory—Some devices have a hard disk drive installed. The printer hard disk is designed for device‑specific functionality and cannot be used for long term storage for data that is not print‑related. The hard disk does not provide the capability for users to extract information, create folders, create disk or network file shares, or FTP information directly from a client device.
Using security features in the Embedded Web Server 35 • Fax data—If your printer does not contain a hard disk, or if you have chosen NAND for fax storage, then you can erase fax settings and data by resetting the NVRAM using the printer Config menu. Note: If your printer has a hard disk that has been partitioned for fax storage, then you must reformat that partition to erase fax data and settings.
Using security features in the Embedded Web Server 36 Completely erasing printer hard disk memory Notes: • Some printer models may not have a printer hard disk installed. • Access to the configuration menu might be restricted or disabled by the Configuration Menu function access control. For more information, see “Appendix D: Access controls” on page 43.
Using security features in the Embedded Web Server 37 Notes: • View the printer IP address on the printer home screen. The IP address appears as four sets of numbers separated by periods, such as 123.123.123.123. • If you are using a proxy server, then temporarily disable it to load the Web page correctly. 2 Click Settings > Security > Disk Encryption. Note: Disk Encryption appears in the Security Menu only when a formatted, non‑defective printer hard disk is installed.
Using security features in the Embedded Web Server 38 Scenarios Scenario: Printer in a public place If your printer is located in a public space such as a lobby, and you want to prevent the general public from using it, then a password or PIN can provide simple protection right at the device. Administrators can assign a single password or PIN for all authorized users of the device, or separate codes to protect individual functions.
Using security features in the Embedded Web Server 39 Scenario: Standalone or small office Note: This is available only in select printer models. If your printer is not connected to a network, or you do not use an authentication server to grant users access to devices, then internal accounts can be created and stored within the Embedded Web Server for authentication, authorization, or both. Step 1: Set up individual user accounts 1 From the Embedded Web Server, click Settings > Security > Security Setup.
Using security features in the Embedded Web Server 40 On networks running Active Directory, administrators can use the LDAP+GSSAPI capabilities of the Embedded Web Server to take advantage of authentication and authorization services already deployed on the network. User credentials and group designations can be pulled from the existing network, making access to the printer as seamless as other network services.
Appendix 41 Appendix Appendix A: CA file creation Note: This example of generation of a CA file for the Certificate Authority assumes usage of a Windows Certificate Authority server. 1 Point the browser window to the CA. Make sure to use the URL, http///CertSrv, where CA’s address is the IP address or host name of the CA server. Note: Before the CA Web page opens, a Windows login window may pop up and request user credentials to verify that you have access to the CA Web page.
Appendix 42 For this application to function, the device must be joined to an Active Directory environment and a Certificate Enrollment Web Services (Server Role) application needs to be installed on the customer’s network. Note: The example usage instructions given below assume the Certificate Enrollment Web Services is installed on a Windows 2008 R2 server. 1 Open a Web browser, and then type the IP address or host name of the printer in the address field.
Appendix 43 To specify that certificates that are about to expire are automatically renewed, in the Configure tab on the “Settings > Apps > App Management” Web page for the Automatic Enrollment application, select the check box for Automatically Update Certificates, specify the number of days before expiration for the Auto Renewal Threshold setting, and then click Apply.
Appendix 44 Management Function access control What it does Firmware Updates This controls the ability to update firmware from any source other than a flash drive. Firmware files that are received through FTP, the Embedded Web Server, etc., will be ignored (flushed) when this function is protected. Operator Panel Lock This protects access to the locking function of the printer control panel. If this is enabled, then users with appropriate credentials can lock and unlock the printer touch screen.
Appendix 45 Function access control What it does Allow Flash Drive Access This controls the ability to access the flash drive. Flash Drive Print This controls the ability to print from a flash drive. Flash Drive Scan This controls the ability to scan documents to a flash drive. FTP Function This controls access to the Scan to FTP function. Held Jobs Access This protects access to the Held Jobs function.
Notices 46 Notices Edition notice October 2013 The following paragraph does not apply to any country where such provisions are inconsistent with local law: THIS PUBLICATION IS PROVIDED “AS IS” WITHOUT WARRANTY OF ANY KIND, EITHER EXPRESS OR IMPLIED, INCLUDING, BUT NOT LIMITED TO, THE IMPLIED WARRANTIES OF MERCHANTABILITY OR FITNESS FOR A PARTICULAR PURPOSE. Some states do not allow disclaimer of express or implied warranties in certain transactions; therefore, this statement may not apply to you.
Notices 47 Agustín Delgado (Servinform S.A.), Aitor Almeida (University of Deusto), Alasdair Mackintosh (Google), Alexander Martin (Haase & Martin GmbH), Andreas Pillath, Andrew Walbran (Google), Andrey Sitnik, Androida.hu / http://www.androida.hu/, Antonio Manuel Benjumea (Servinform S.A.), Brian Brown (Google), Chang Hyun Park, Christian Brunschen (Google), crowdin.
Notices 48 "Contributor" shall mean Licensor and any individual or Legal Entity on behalf of whom a Contribution has been received by Licensor and subsequently incorporated within the Work. 2 Grant of Copyright License.
Notices 49 8 Limitation of Liability.
Glossary of Security Terms 50 Glossary of Security Terms Access Controls Settings that control whether individual device menus, functions, and settings are available, and to whom. Also referred to as Function Access Controls on some devices. Authentication A method for securely identifying a user. Authorization A method for specifying which functions are available to a user. Building Block Authentication and Authorization tools used in the Embedded Web Server.
Index 51 Index Numerics 802.
Index I installing Certificate Authority certificate 22 Installing a Certificate Authority certificate on the device 22 internal accounts creating 10 using 10 IP security settings configuring 32 IPSec IP security settings 32 K Kerberos configuring 17 LDAP+GSSAPI and 17 setting date and time for 17 L LDAP using 13 LDAP+GSSAPI Kerberos and 17 using 15 lockout 20 login failure 20 restrictions 20 M memory types installed on printer 33 menu, security Erase Temporary Data Files 27 N non‑volatile memory 33 er