
Users Guide
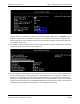
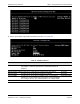
Table Of Contents
- Revision History
- Table of Contents
- Regulatory and Safety Approvals
- Functional Description
- Network Link and Activity Indication
- Features
- Software and Hardware Features
- Virtualization Features
- VXLAN
- NVGRE/GRE/IP-in-IP/Geneve
- Stateless Offloads
- UDP Fragmentation Offload
- Stateless Transport Tunnel Offload
- Multiqueue Support for OS
- SR-IOV Configuration Support Matrix
- SR-IOV
- Network Partitioning (NPAR)
- RDMA over Converged Ethernet – RoCE
- Supported Combinations
- Installing the Hardware
- Software Packages and Installation
- Windows Driver Advanced Properties and Event Log Messages
- Teaming
- System-level Configuration
- ISCSI Boot
- VXLAN: Configuration and Use Case Examples
- SR-IOV: Configuration and Use Case Examples
- NPAR – Configuration and Use Case Example
- RoCE – Configuration and Use Case Examples
- DCBX – Data Center Bridging

SR-IOV: Configuration and Use Case ExamplesNetXtreme-E User’s Manual
September 4, 2019 • NetXtreme-E-UG103 Page 63
SR-IOV: Configuration and Use Case Examples
SR-IOV can be configured, enabled, and used on 10Gb and 25Gb Broadcom NetExtreme-E NICs.
Linux Use Case
1. Enable SR-IOV in the NIC cards:
a. SR-IOV in the NIC card can be enabled using the HII menu. During system boot, access the system
BIOS -> Device Settings -> NetXtreme-E NIC -> Device Level Configuration.
b. Set the Virtualization mode to SR-IOV.
c. Set the number of virtual functions per physical function.
d. Set the number of MSI-X vectors per the VF and Max number of physical function MSI-X vectors. If the
VF is running out of resources, balance the number of MSI-X vectors per VM using CCM.
2. Enable virtualization in the BIOS:
a. During system boot, enter the system BIOS -> Processor settings -> Virtualization Technologies and
set it to Enabled.
b. During system boot, enter the system BIOS -> Integrated Devices -> SR-IOV Global and set it to
Enabled.
3. Install the desired Linux version with Virtualization enabled (libvirt and Qemu).
4. Enable the iommu kernel parameter.
a. The IOMMU kernel parameter is enabled by editing
/etc/default/grub.cfg and running grub2-mkconfig
-o /boot/grub2/grub.cfg
for legacy mode. For UEFI mode, edit /etc/default/grub.cfg and run grub2-
mkconfig -o /etc/grub2-efi.cfg
. Refer to the following example:
Linuxefi /vmlinuz-3.10.0-229.el7.x86_64 root=/dev/mapper/rhel-root ro rd.lvm.lv=rhel/swap
crashkernel=auto rd.lvm.lv=rhel/root rhgb intel_iommu=on quiet LANG=en_US.UTF.8
5. Install bnxt_en driver:
a. Copy the
bnxt_en driver on to the OS and run make; make install; modprobe bnxt_en.
Table 40: VXLAN Command and Configuration Examples
System 1 System 2
PxPy: ifconfig PxPy 1.1.1.4/24 PxPy: ifconfig PxPy 1.1.1.2/24
ip link add vxlan10 type vxlan id 10 group 239.0.0.10
dev PxPy dstport 4789
ip link add vxlan10 type vxlan id 10 group 239.0.0.10
dev PxPy dstport 4789
ip addr add 192.168.1.5/24 broadcast 192.168.1.255
dev vxlan10
ip addr add 192.168.1.10/24 broadcast 192.168.1.255
dev vxlan10
ip link set vxlan10 up ip link set vxlan10 up
ip –d link show vxlan10
Ping 192.168.1.10 ifconfig vxlan10 (MTU 1450) (SUSE and RHEL)
Note: x represents the PCI-E bus number of the physical adapter found in the system. y represents the port
number on the physical adapter.