Dell™ Crystal Flat Panel Monitor User's Guide About Your Monitor Product Features Identifying Parts and Controls Monitor Specifications Universal Serial Bus (USB) Interface Plug and Play Capability Integrated Speakers Specifications Webcam-MIC Specifications Maintenance Guidelines Setting Up the Monitor Connecting the Monitor Solving Problems Troubleshooting The Monitor Common Problems Camera Problems Product Specific Problems Troubleshooting the Speakers Appendix Safety Instructions FCC Notice (U.S.
Back to Contents Page About Your Monitor Dell™ Crystal Flat Panel Monitor User's Guide Product Features Identifying Parts and Controls Monitor Specifications Universal Serial Bus (USB) Interface Plug and Play Capability Integrated Speakers Specifications Webcam-MIC Specifications Maintenance Guidelines Product Features The Crystal flat panel display has an active matrix, thin-film transistor (TFT), liquid crystal display (LCD). The monitor features include: ■ 22-inch (558.8 mm) viewable area display.
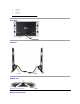
Down button 4 OK button 5 Power button 6 Webcam 7 Speakers Back View Back view Side View Left side Right side Bottom View Bottom view with the monitor stand Monitor Specifications
The following sections give you information about the various power management modes and pin assignments for various connectors for your monitor. Power Management Modes If you have VESA's DPM™ compliance display card or software installed in your PC, the monitor can automatically reduce its power consumption when not in use. This is referred to as Power Save Mode*. If the computer detects an input from any keyboard, mouse, or the other input devices, the monitor automatically resumes.
1 T.M.D.S. Data 2- 2 T.M.D.S. Data 2 Shield 3 T.M.D.S. Data 2+ 4 T.M.D.S. Data 1+ 5 T.M.D.S. Data 1 Shield 6 T.M.D.S. Data 1- 7 T.M.D.S. Data 0+ 8 T.M.D.S. Data 0 Shield 9 T.M.D.S. Data 0- 10 T.M.D.S. Clock + 11 T.M.D.S. Clock Shield 12 T.M.D.S. Clock - 13 CEC 14 Reserved(N.C.
Pin Number 4-pin Side of the connector 1 VCC 2 DMD 3 DPD 4 GND NOTE: The USB connector is only available for webcam. NOTE: USB 2.0 capability requires 2.0-capable computer. NOTE: The USB interface of the monitor works ONLY when monitor is powered ON (or in Power Save Mode). Switching your monitor OFF and then ON would re enumerate its USB interface; attached peripherals may take a few seconds to resume normal functionality.
Dynamic contrast ratio 2000 to 1 (typ) Faceplate coating ARC-Glare (2H) Backlight CCFL (4) edgelight system Response Time 2ms typical (Grey to Grey) Color Gamut (Typical) 98%* * Crystal color gamut (typical) is based on CIE1976 (98.3%) and CIE1931 (92%) test standards. Integrated Speakers Specifications System Frequency Response 95 Hz to 20 kHz @ 10 dB below avg.
Audio Specification Microphone type Mono Microphone Interface USB 2.0 high Speed Power Supply 3.3 volts+- 5% System Requirements The following are the minimum system requirements for Camera - MIC feature: l l l l l l Intel® Pentium® 4 or AMD® equivalent processor running at 1.8 GHz or higher (Recommended: Intel Pentium 4, 2.
Resolution Specifications Horizontal scan range 30 kHz to 83 kHz (automatic) Vertical scan range 56 Hz to 76 Hz (automatic) Optimal preset resolution 1680 x 1050 at 60 Hz Highest preset resolution 1680 x 1050 at 60 Hz Video Supported Modes Video input capabilities (HDMI playback) 480i/480p/576i/576p/720p/1080i/1080p (Supports HDCP)
Back to Contents Page Appendix Dell™ Crystal Flat Panel Monitor User's Guide Safety Instructions FCC Notice (U.S. Only) and Other Regulatory Information Contacting Dell CAUTION: Safety Instructions CAUTION: Use of controls, adjustments, or procedures other than those specified in this documentation may result in exposure to shock, electrical hazards, and/or mechanical hazards. For information on safety instructions, see the Product Information Guide. FCC Notices (U.S.
Back to Contents Page Setting Up Your Monitor Dell™ Crystal Flat Panel Monitor User's Guide If you have a Dell™ desktop or a Dell™ portable computer with internet access 1. Go to http://support.dell.com, enter your service tag, and download the latest driver for your graphics card. 2. After installing the drivers for your Graphics Adapter, attempt to set the resolution to 1680x1050 again.
Back to Contents Page Setting Up Your Monitor Dell™ Crystal Flat Panel Monitor User's Guide If you have a non Dell™ desktop, portable computer, or a graphic card 1. Right-click on the desktop and click Properties. 2. Select the Settings tab. 3. Select Advanced. 4. Identify your graphics controller supplier from the description at the top of the window (e.g. NVIDIA, ATI, Intel etc.). 5. Please refer to the graphic card provider website for updated driver (for example, http://www.ATI.com OR http://www.
Back to Contents Page Operating the Monitor Dell™ Crystal Flat Panel Monitor User's Guide Using the Front Panel Controls Using the On-Screen Display (OSD) Menu Setting the Optimal Resolution Using the Speakers Tilting your monitor Using the Camera Using the Front Panel Use the buttons on the front of the monitor to adjust the image settings. Front panel Button Description A Use the Menu button to open and exit the on-screen display (OSD), and exit from menus and sub-menus.
1. Press the Main Menu 2. 3. 4. 5. Press the button to open the OSD menu and display the main menu. and buttons to toggle between options in the Menu. As you move from one icon to another, the option name is highlighted. To select the highlighted item on the menu press the Press the Press the and again. buttons to select the desired parameter. button to enter the slide bar and then use the or button, according to the indicators on the menu, to make your changes. 6.
l Graphics: Select this mode if your monitor is connected to your computer. l Video: Select this mode if you monitor is connected to a DVD player. NOTE: Depending upon the Display Mode you select the Preset Modes available for your monitor change. Preset Mode Allows you to choose from a list of preset color modes. In the Graphics mode, you can set the color to the following preset values: l Standard: Loads the monitor's default color settings. This is the default preset mode.
again. You can set the response time to: l Normal l Overdrive (default). Display Reset Resets the monitor's display settings to the factory defaults. AUDIO SETTINGS Use the Audio Settings to adjust the audio settings of your built-in speakers. Audio Setting mode submenu Back Speaker Volume Speaker Mute Audio Preset Press Allows you to increase the speaker volume. Use and Audio Input buttons to adjust the speaker volume from '0' to '100'.
Language Allows you to set the OSD display to one of five languages: English, Espanol, Francais, Deutsch, or Japanese. Menu Transparency Allows you to adjust the OSD background from opaque to transparent. Menu Timer Allows you to set the time for which the OSD remains active after you press a button on the monitor. Use the Menu Lock and buttons to adjust the slider in 1 second increments, from 5 to 60 seconds. Controls user access to adjustments.
If you press any button other than the power button one of the following messages will appear depending on the selected input: When monitor enters Power Save mode, the following message appears : See Solving Problems for more information. Setting the Optimal Resolution To set the optimal resolution for the monitor: 1. 2. 3. 4. Right-click on the desktop and select Properties. Select the Settings tab. Set the screen resolution to 1680 x 1050. Click OK.
Using the Camera Installing the Webcam Software (Microsoft® Windows® Operating Systems) The Dell Crystal webcam application media that ships with your monitor, allows you to the install the software and drivers for the integrated webcam. To install the Webcam Software: 1. Insert the Webcam Software into the drive. NOTE: Ensure that the USB cable is connected between the monitor and the computer. 2. The Install Shield Wizard automatically launches the setup application.
Setting the Resolution To set the camera resolution using the Dell Webcam Center: 1. Right-click the Dell Webcam Manager icon in the system tray located in the lower right corner of the screen. Click Launch Webcam Center. The Dell Webcam Center window appears. 2. Click the Video Recording tab. 3. Select the resolution from the Video drop-down list at the lower left hand corner. The video resolution is updated immediately. The current resolution is indicated by a check mark. 4.
Back to Contents Page Setting Up Your Monitor Dell™ Crystal Flat Panel Monitor User's Guide Important instructions to set the display resolution to 1680X1050 (Optimal) For optimal display performance while using the Microsoft Windows® operating systems, set the display resolution to 1680 x 1050 pixels by performing the following steps: 1. Right-click on the desktop and click Properties. 2. Select the Settings tab. 3.
Dell™ Crystal Flat Panel Monitor User Guide Important instructions to set the display resolution to 1680x1050(Optimal) Information in this document is subject to change without notice. © 2007-2008 Dell Inc. All rights reserved Reproduction in any manner whatsoever without the written permission of Dell Inc. is strictly forbidden.
Back to Contents Page Setting Up the Monitor Dell™ Crystal Flat Panel Monitor User's Guide Connecting the Monitor Connecting The Monitor CAUTION: Before you begin any of the procedures in this section, follow the Safety Instructions. Connecting Your Monitor Using an HDMI Cable To connect your monitor using an HDMI cable: 1. Turn off your computer/DVD player. 2. Connect the HDMI cable to the HDMI port on your system. 3. Connect the USB cable (if applicable) to the USB port on your system.
3. Connect the other end of the HDMI to DVI adapter to your computer. 4. Connect the USB cable (optional) to the USB port on your system. NOTE: You must connect the USB cable to your system to use your monitors built-in webcam. 5. Connect the DC power adapter to your monitor's power cable. 6. Connect the other end of the DC power adapter to the electrical outlet. 7. Turn on your system. 8. Press the monitor power button to turn your monitor on. If nothing appears, see Troubleshooting the Monitor.
Back to Contents Page Solving Problems Dell™ Crystal Flat Panel Monitor User's Guide Troubleshooting the Monitor Common Problems Camera Problems Product Specific Problems Troubleshooting the Speakers CAUTION: Before you begin any of the procedures in this section, follow the Safety Instructions. Troubleshooting the Monitor Self-Test Feature Check Your monitor provides a self-test feature that allows you to check whether your monitor is functioning properly.
Sync Problems Screen is scrambled or appears torn. l l l l LCD Scratched Screen has scratches or smudges. l l Safety Related Issues Visible signs of smoke or sparks. l l Intermittent Problems Monitor malfunctions on and off. l l l l Image Retention (from a static image) Faint Shadow from the static image displayed appears on the screen. l l Perform monitor reset. Perform monitor self-test feature check to determine if scrambled screen appears in self-test mode.
Check if the volume is muted. To enable sound: 1. Click Start®Control Panel®Sound and Audio Devices. 2. Click to uncheck the box next to Mute. Set the correct audio source in Dell Webcam Center. To select the correct audio source: 1. In the Dell Webcam Center, click Tools®Audio Source Control. 2. Select Monitor Webcam (C22W) in the Audio Source drop down list. 3. Adjust the Volume slider to obtain the desired audio level. Test the microphone.