Dell™ E1910H Flat Panel Monitor User's Guide About Your Monitor Setting Up the Monitor Operating the Monitor Troubleshooting Appendix Notes, Notices, and Cautions NOTE: A NOTE indicates important information that helps you make better use of your computer. NOTICE: A NOTICE indicates either potential damage to hardware or loss of data and tells you how to avoid the problem. CAUTION: A CAUTION indicates a potential for property damage, personal injury, or death.
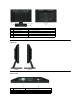
Back to Contents Page About Your Monitor Dell™ E1910H Flat Panel Monitor User's Guide Package Contents Product Features Identifying Parts and Controls Monitor Specifications Plug and Play Capability LCD Monitor Quality & Pixel Policy Maintenance Guidelines Package Contents Your monitor ships with all the components shown below. Ensure that you have received all the components and Contact Dell™ if anything is missing. NOTE: Some items may be optional and may not ship with your monitor.
Product Features The Dell™ E1910H flat panel display has an active matrix, Thin-film Transistor, Liquid Crystal Display. The monitors features include: ■ Dell E1910H has a 18.5-inch (470.0 mm) viewable area display. ■ 1366 x 768 resolution, plus full-screen support for lower resolutions. ■ Wide viewing angle to allow viewing from a sitting or standing position, or while moving from side-to-side. ■ Tilt adjustment capability.
Label Description Use 1 Barcode serial number label Refer to this label if you need to contact Dell for technical support. 2 Regulatory rating label List the regulatory approvals. 3 VESA mounting holes (100mm) To mount the monitor. 4 Security lock slot Use a security lock with the slot to help secure your monitor. 5 Dell soundbar mounting brackets To attach the optional Dell Soundbar.
Monitor Specifications The following sections give you information about the various power management modes and pin assignments for the various connectors of your monitor. Power Management Modes If you have VESA's DPM compliance display card or software installed in your PC, the monitor automatically reduces its power consumption when not in use. This is referred to as Power Save Mode. If the computer detects input from keyboard, mouse, or other input devices, the monitor automatically resumes functioning.
Plug and Play Capability You can install the monitor in any Plug and Play-compatible system. The monitor automatically provides the computer with its Extended Display Identification Data (EDID) using Display Data Channel (DDC) protocols so that the system can configure itself and optimize the monitor settings. Most monitor installations are automatic. You can select different settings if required.
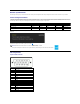
Preset Display Modes The following table lists the preset modes for which Dell guarantees image size and centering: Display Mode Horizontal Frequency (kHz) Vertical Frequency (Hz) Pixel Clock (MHz) Sync Polarity (Horizontal/Vertical) VESA, 720 x 400 31.5 70.0 28.3 -/+ VESA, 640 x 480 31.5 60.0 25.2 -/- VESA, 640 x 480 37.5 75.0 31.5 -/- VESA, 800 x 600 37.9 60.0 40.0 +/+ VESA, 800 x 600 46.9 75.0 49.5 +/+ VESA, 1024 x 768 48.4 60.0 65.0 -/- VESA, 1024 x 768 60.0 75.
l Non-operating Storage: -20° to 60°C (-4° to 140°F) Shipping: -20° to 60°C(-4° to 140°F) Humidity l Operating 10% to 80% (non-condensing) l Non-operating Storage: 5% to 90% (non-condensing) Shipping: 5% to 90%(non-condensing) Altitude l Operating 3,657.6m (12,000 ft) max l Non-operating 12,192m (40,000 ft) max Thermal dissipation 71.82 BTU/hour (maximum) 64.
Back to Contents Page Appendix Dell™ E1910H Flat Panel Monitor User's Guide Safety Instructions FCC Notice (U.S. Only) and Other Regulatory Information Contacting Dell CAUTION: Safety Instructions CAUTION: Use of controls, adjustments, or procedures other than those specified in this documentation may result in exposure to shock, electrical hazards, and/or mechanical hazards. For information on safety instructions, see the Product Information Guide. FCC Notices (U.S.
Back to Contents Page Setting Up Your Monitor Dell™ E1910H Flat Panel Monitor If you have a Dell™ desktop or a Dell™ portable computer with internet access 1. Go to http://support.dell.com, enter your service tag, and download the latest driver for your graphics card. 2. After installing the drivers for your Graphics Adapter, attempt to set the resolution to 1366x768 again.
Back to Contents Page Setting Up Your Monitor Dell™ E1910H Flat Panel Monitor If you have a non Dell™ desktop, portable computer, or graphics card 1. Right-click on the desktop and click Properties. 2. Select the Settings tab. 3. Select Advanced. 4. Identify your graphics controller supplier from the description at the top of the window (e.g. NVIDIA, ATI, Intel etc.). 5. Refer to the graphic card provider website for updated driver (for example, http://www.ATI.com OR http://www.NVIDIA.com ). 6.
Back to Contents Page Operating the Monitor Dell™ E1910H Flat Panel Monitor User's Guide Using the Front Panel Controls Using the On-Screen Display (OSD) Menu Setting the Maximum Resolution Using the Dell Soundbar (Optional) Using the Tilt Power On the Monitor Press the button to turn on the monitor Using the Front Panel Controls Use the keys on the front of the monitor to adjust the image settings. Front panel Key Description A Use the Preset modes key to choose from a list of preset color modes.
Use the Exit key to exit on-screen display(OSD) from menu and sub-menus. Exit Front panel Key Use the keys on the front of the monitor to adjust the image settings. Front panel Key Description A Use the Up key to adjust (increase ranges) items in the OSD menu. Up B Use the Down key to adjust (decrease ranges) items in the OSD menu. Down C Use the OK key to confirm your selection. OK D Use the back key to back previous menu.
2. 3. 4. 5. 6. Press the and buttons to toggle between options in the Menu. As you move from one icon to another, the option name is highlighted. To select the highlighted item on the menu press the button again. Press the and buttons to select the desired parameter. Press the button to enter the slide bar and then use the Select the to return to previous menu without accepting current settings or or buttons, according to the indicators on the menu, to make your changes.
Auto Adjustment allows the monitor to self-adjust to the incoming video signal. After using Auto Adjustment, you can further tune your monitor b Pixel Clock (Coarse) and Phase (Fine) controls under Image Settings. NOTE: Auto Adjust does not occur if you press the button while there are no active video input signals or attached cables.. COLOR SETTINGS Back Input Color Format Mode Selection Use the Color Setting menu to adjust the monitor's color settings. Press to go back to the main menu.
l Standard: Loads the monitor's default color settings. This is the default preset mode. l Multimedia: Loads color settings ideal for multimedia applications. l Game: Loads color settings ideal for most gaming applications. l Warm: Increase the color temperature. The screen appears warmer with a red/yellow tint. l Cool: Decreases the color temperature. The screen appears cooler with a blue tint. l Custom (RGB): Allows you to manually adjust the color settings.
Back Press to go back to the main menu. Horizontal Position Use the or buttons to adjust image left and right. Minimum is '0' (-). Maximum is '100' (+). Vertical Position Use the or buttons to adjust image up and down. Minimum is '0' (-). Maximum is '100' (+) Sharpness This feature can make the image look sharper or softer. Use Pixel Clock The Phase and Pixel Clock adjustments allow you to adjust your monitor to your preference.
Menu Transparency Allows you to adjust the OSD background from opaque to transparent. Menu Timer Allows you to set the time for which the OSD remains active after you press a key on the monitor. Use the Menu Lock and keys to adjust the slider in 1 second increments, from 5 to 60 seconds. Controls user access to adjustments. When Lock is selected, no user adjustments are allowed.
Back Press to go back to the main menu. OSD Warning Messages When the monitor does not support a particular resolution mode you will see the following message: This means that the monitor cannot synchronize with the signal that it is receiving from the computer. See Monitor Specifications for the Horizontal and Vertical frequency ranges addressable by this monitor. Recommended mode is 1366 x 768. You will see the following message before the DDC/CI function is disabled.
If VGA cable is not connected, a floating dialog box as shown below appears. See Solving Problems for more information. Setting the Maximum Resolution To set the Maximum resolution for the monitor: 1. 2. 3. 4. Right-click on the desktop and select Properties. Select the Settings tab. Set the screen resolution to 1366 x 768. Click OK. If you do not see 1366 x 768 as an option, you may need to update your graphics driver.
NOTE: The stand is detached when the monitor is shipped from the factory.
Back to Contents Page Setting Up Your Monitor Dell™ E1910H Flat Panel Monitor Setting the display resolution to 1366X768 (Maximum) For optimal display performance while using the Microsoft Windows operating systems, set the display resolution to 1366 x 768 pixels by performing the following steps: 1. Right-click on the desktop and click Properties. 2. Select the Settings tab. 3. Move the slider-bar to the right by pressing and holding left-mouse button and adjust the screen resolution to 1366 X 768. 4.
Dell™ E1910H Flat Panel Monitor User Guide Setting the display resolution to 1366x768(Maximum) Information in this document is subject to change without notice. © 2009 Dell Inc. All rights reserved Reproduction of these materials in any manner whatsoever without the written permission of Dell Inc. is strictly forbidden. Trademarks used in this text: Dell and the DELL logo are trademarks of Dell Inc.
Back to Contents Page Setting Up the Monitor Dell™ E1910H Flat Panel Monitor User's Guide Attaching the Stand Connecting Your Monitor Removing the Stand Base Attaching the Dell Soundbar (Optional) Removing the Stand for VESA wall mount Attaching the Stand NOTE: The stand is detached when the monitor is shipped from the factory. To attach the base of the stand to the monitor stand: 1. Place the monitor stand base on a stable table top. 2.
CAUTION: The Graphics are used for the purpose of illustration only. Appearance of the computer may vary. Removing the Stand Base To remove the base of the stand from the monitor: 1. Place the monitor panel on soft cloth or cushion on a stable flat table. 2. Press and hold the release latch, while pulling the base of the stand away from the monitor.
NOTICE: Do not use with any device other than the Dell Soundbar. To attach the soundbar: 1. Working from the back of the monitor, attach Soundbar by aligning the two slots with the two tabs along the bottom of the monitor. 2. Slide the Soundbar to the left until it snaps into place. 3. Connect the Soundbar with the DC power connector from the Soundbar Power Adaptor. 4. Insert the mini stereo plug from the back of the Soundbar into the computer's audio output jack.
Back to Contents Page Troubleshooting Dell™ E1910H Flat Panel Monitor Self-Test Common Problems Product Specific Problems CAUTION: Before you begin any of the procedures in this section, follow the Safety Instructions. Self-Test Your monitor provides a self-test feature that allows you to check whether your monitor is functioning properly. If your monitor and computer are properly connected but the monitor screen remains dark, run the monitor self-test by performing the following steps: 1. 2. 3.
To run the built-in diagnostics: 1. 2. 3. 4. 5. 6. 7. Ensure that the screen is clean (no dust particles on the surface of the screen). Unplug the video cable from the back of the computer or monitor. The monitor then goes into the self-test mode. Press and hold the 1st and 4th buttons on the front panel, simultaneously for 2 seconds. A gray screen appears. Carefully inspect the screen for abnormalities. Press the 4th button on the front panel again. The color of the screen changes to red.
Wrong Color Picture color not good l l l l Image retention from a static Faint shadow from the static image left on the monitor for a image displayed appears on long period of time the screen Change the Color Setting Mode in the Color Settings OSD to Graphics or Video depending on the application. Try different Color Preset Settings in Color Settings OSD. Adjust R/G/B value in Color Settings OSD if the Color Management is turned off.