
Install Guide


• File system size — Capacity of the file system. You can increase or decrease the size of the file system
with no disruption to users.
• Snapshot reserve (optional) — Percentage of the file system size that can be used to store snapshots.
Snapshot reserve is consumed from the NAS reserve space allocated to the file system. Therefore, user data
and snapshots compete for the same file system space. Note that data takes precedence over snapshots. If
the file system begins to run out of space, it will take space from the snapshot reserve. the oldest snapshots
will be deleted first.
Unless you specify a different value, the file system will use the service-wide default value for the snapshot
reserve (50%).
• In-use warning limit— Percentage of the file system size that—when consumed by user data or
snapshots—results in an event message.
Unless you specify a different value, the file system will use the service-wide default value for the in-use
warning limit (80%).
• Security mode and permissions — By default, a file system supports mixed (NTFS and UNIX) security
mode, and 744 and 755, respectively, for the UNIX directory and file permissions. You can modify the file
system to change the security mode and permissions. See Security and Permissions on page 53 for more
information.
Creating a NAS File System
As part of creating a file system, you can select the option to create a CIFS share or an NFS export and specify
the share or export name and the directory. However, you can skip creating a share or export at this time, and
create shares and exports after creating the file system.
NAS Services support Unicode for the following:
• CIFS share name
• CIFS directory name
• NFS export name
• NFS directory name
More specifically, this means all the characters in any language's alphabet, Arabic numerals, dots (also called
periods), and the dash or hyphen character (-).
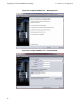
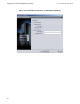
To create a NAS file system:
1. Click NAS in the lower-left GUI window and then click Create NAS File System in the Activities panel.
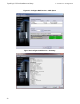
2. In the Create NAS File System wizard dialog boxes, enter the information you obtained in Gathering the
NAS Service Configuration Information on page 49.
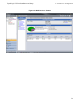
3. The final dialog box shows a summary of the file system configuration and any share or export you created.
Click Finish to complete the configuration. Click Back to make changes.
62
EqualLogic FS7500 Installation and Setup
6 NAS Storage Allocation