Dell PowerVault MD3000i Configuration Guide for VMware ESX Server Software January 2008 Dell Virtualization Solutions Engineering www.dell.
Table of Contents 1. 2. 3. 4. 5. 6. 7. Introduction ................................................................................................................. 3 Architectural Setup ..................................................................................................... 3 iSCSI Connectivity Support ........................................................................................ 4 PowerVault MD3000i Storage Setup and Configuration ...........................................
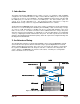
1. Introduction The Dell™ PowerVault™ MD3000i storage solution consists of a standard or high availability configuration. The standard model has a single controller with two 1GbE ports. It can be deployed to support up to 16 hosts non-redundantly. The high availability model has dual controllers with two 1GbE ports per controller for a total of four 1GbE ports. The dual controller option can connect up to 16 fully redundant hosts.
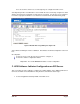
3. iSCSI Connectivity Support Operating System VMware ESX Server 3.5 Host Bus Adapter iSCSI software initiator with ESX Server 4. PowerVault MD3000i Storage Setup and Configuration Create virtual disks on MD3000i using steps described in: http://support.dell.com/support/edocs/systems/md3000i/en/IG/PDF/IGbk0HR.pdf. After opening the Modular Disk Storage Manager and selecting the MD3000i storage array to be configured, select the Configure tab.
these are shown as Linux hosts even though they are configured as ESX servers. Selecting Next provides a Confirmation screen in which the new server being configured is shown and the other previously configured associated hosts are named. For the first server configured in a new host group there will be no associated hosts listed under the Associated host group. Figure 3: Modular Disk Storage Manager Configure Tab Select Finish confirming the new host definition.
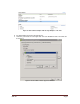
Figure 4: Security Profile Configuration Tab 2. Click on Properties. The Firewall Properties box appears. Figure 5: Firewall Properties Window 3. Check Software iSCSI Client. 4. Select Configuration->Storage Adapters on the ESX server. 5. Select iSCSI software adapter and click on Properties.
Figure 6: iSCSI software adapter under Storage Adapters on VI client 6. The iSCSI initiator Properties window appears. 7. Under the general tab select Configure tab. Select the Enabled checkbox and click OK. Select Close.
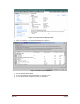
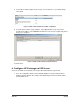
. Select iSCSI software adapter under storage. You should now see your iSCSI Target name listed. Figure 8: iSCSI software adapter after initial configuration 9. Select Properties under storage adapters. Select Dynamic Discovery. Select Add. Provide the IP address of the MD3000i and click OK. There may be a slight delay before the process completes. Figure 9: iSCSI software initiator properties window 10. Click Close. 6.
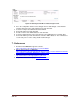
Figure 10: iSCSI target and LUNs as visible through VI client 2. Go to the configuration tab and select Storage. Click on Add Storage, select Disk/Lun and click Next. Select the newly added storage and click Next. 3. Select the newly created iSCSI LUN and click Next. 4. Review the disk layout and click Next. 5. Provide a name for the VMFS datastore and click Next. 6. Select the appropriate block size and capacity for the VMFS datastore and click Next. 7.
THIS DOCUMENT IS FOR INFORMATIONAL PURPOSES ONLY, AND MAY CONTAIN TYPOGRAPHICAL ERRORS AND TECHNICAL INACCURACIES. THE CONTENT IS PROVIDED AS IS, WITHOUT EXPRESS OR IMPLIED WARRANTIES OF ANY KIND. Microsoft and Windows are registered trademarks of Microsoft Corporation. VMware is a registered trademark and VMotion, Virtual SMP, and ESX Server are trademarks of VMware, Inc. Intel and Xeon are registered trademarks of Intel Corp.