
White Papers


10 DELL EMC HPC Solution for Life Sciences v1.1: Deployment Best Practices | Document ID | version (optional)
4 Cluster installation
4.1 Installing the head node
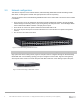
It is recommended that all the nodes are connected beforehand so that how things are connected is known.
1. The BIOS of the head node should have the local time set.
2. The head node should be booted from a Bright Cluster Manager (BCM) DVD or a flash. We created a
bootable USB drive with a BCM ISO image containing BCM version 7.2 and Red Hat Enterprise Linux
(RHEL) version 7.2.
3. Install Bright Cluster Manager should be selected in the text boot menu. This brings up the GUI
installation Welcome screen.
4. At the Welcome screen, Continue should be clicked. By default, this continues with a Normal
(recommended) installation mode.
5. At the License screens: At the Bright Computing Software License screen, the acceptance checkbox
should be ticked. Continue should then be ticked.
6. At the Linux base distribution screen, the acceptance checkbox should be ticked. Continue should then
be clicked.
7. Continue at the Kernel Module screen.
8. At the Hardware Information screen, all the relevant hardware is detected. Continue should be clicked.
9. At the Nodes screen:
• The number of racks and compute nodes are specified
• The base name for the compute nodes is set. Accepting the default of node means nodes names are
prefixed with node.
• The number of digits to append to the base name is set. For example, accepting the default of 3
means nodes from node001 to node999 are possible names.
Figure 4 Welcome screen