
White Papers


11 DELL EMC HPC Solution for Life Sciences v1.1: Deployment Best Practices | Document ID | version (optional)
• The correct hardware manufacturer is selected
Continue is then clicked.
10. At the Network Topology screen, the default network layout is chosen. Click continue
11. At the Additional Network Configuration screen, add the Intel® OPA network and 1GbE network and
configure the use of IPMI/iLO BMCs on the nodes. Adding an IPMI/iLO network is needed to configure
IPMI/iLO interfaces in a different IP subnet, and is recommended. When done, Continue should be
clicked.
12. At the Networks screen, the network parameters for the head node should be entered for the interface
facing the network named externalnet. Uncheked DHCP checkbox, and add static values. Then OK
button should be clicked.
13. At the Nameservers screen, add proper DNS search domains and external DNA name servers.
14. At the Network Interface screen, review IP addresses assigned to the network interfaces. Continue
should be clicked.
15. If Intel® OPA network is properly enabled, the Subnet Managers screen is displayed. At this screen,
nodes that are to run the subnet manager for the Intel® OPA network should be selected. Continue
should then be clicked.
16. At the Installation source screen, the USB drive containing the BCM/RHEL should be selected, click
Continue. Clicking on the Continue button starts the media integrity check.
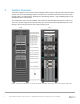
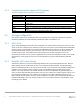
17. At the Workload Management setup screen, select Torque/Maui from the dropdown menu. The
recommended scheduler is Torque/Maui. The master node should be configured to run jobs. Slurm has
known issues with next generation sequencing data analysis pipeline especially when some sub-
processes are concatenated through piping.
18. At the Disk Partitioning and Layouts screen, two 500GB RAID 1 volume on the head node should be
selected. The installation will be done onto this volume, overwriting all its previous content. Use master-
standard.xml as the layout template.
Figure 5 Workload Management Setup