
Users Guide


The Virtual desktop of the Citrix Receiver is displayed.
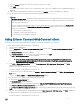
7 In the Virtual desktop window, click Add Apps (+) > All Applications.
You can select or clear the application check boxes. The selected applications are displayed on the virtual desktop.
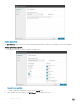
8 On the virtual desktop, click Settings to:
• Refresh
• Add or Delete Server account
• Log-o
Conguring the Remote Desktop Connection session
services
Remote Desktop Connection is a network protocol that provides a graphical interface to connect to another computer over a network
connection.
To install the software, use the instructions accompanying them. Make sessions and applications available to the thin client by sharing the
server environment.
NOTE: If you use a Windows 2003/2008 Server, a Terminal Services Client Access License (TSCAL) server must also be
accessible on the network. The server grants a temporary license, which expires after 120 days. After the temporary license
expires, you must purchase and install the TSCALs on the server. You cannot make a connection without a temporary or
permanent license.
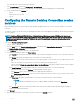
To congure a Remote Desktop Connection:
1 Log in as a user or administrator.
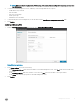
2 From the Start menu, click Remote Desktop Connection, or double-click the Remote Desktop Connection icon on the desktop.
The Remote Desktop Connection window is displayed.
3 In the Computer box, enter the computer or the domain name.
4 For advanced conguration options, click Show Options.
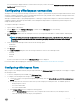
• In the General tab, you can enter the logon credentials, edit or open an existing RDP connection, or save a new RDP connection
le.
• In the Display tab, manage the display and the color quality of your remote desktop:
• Move the slider to increase or decrease the size of your remote desktop. To use full screen, move the slider all the way to the
right.
• Select the color quality of your preference for your remote desktop from the drop-down list.
• Select or clear the Display the connection bar when I use the full screen check box to display or hide the connection bar in
full screen mode.
• In the Local Resources tab congure audio, keyboard, or local devices and resources for your remote desktop.
• In the Remote audio section, click Settings for advanced audio settings options.
• In the Keyboard section, choose when and where to apply keyboard combinations.
• In the Local devices and resources section, select devices and resources that you want to use in your remote session. Click
More for more options.
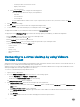
• In the Experience tab optimize the performance of your remote session based on the connection quality.
NOTE
:
If you nd that the Unied Write Filter cache is lling up, disable the Bitmap caching in the Experience
tab.
• In the Advanced tab, select the action that should be taken when the server authentication fails and congure settings for
connection through Remote Gateway.
5 Click Connect.
6 Enter the login credentials for connecting to the remote session in the Security dialog box.
12
Software