
Owner's manual

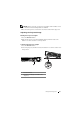
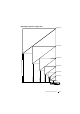
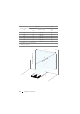
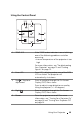
Table Of Contents
- Contents
- Your Dell Projector
- Connecting Your Projector
- Using Your Projector
- Turning Your Projector On
- Turning Your Projector Off
- Adjusting the Projected Image
- Adjusting the Projector Focus
- Adjusting Projection Image Size
- Using the Control Panel
- Using the Remote Control
- Installing the Remote Control Battery
- Operating Range with Remote Control
- Using the On-Screen Display
- Multimedia Introduction
- Photo Format
- Video Format
- Music Format
- How to set-up File Type for Multimedia with USB
- How to set-up File Type for Multimedia with SD Card
- How to set-up File Type for Multimedia with Internal Memory
- Office Viewer for the USB, SD, and Internal Memory
- Buttons Introduction
- Multimedia SETUP for USB, SD Card, and Internal Memory
- Intel® Wireless Display (WiDi) Installation
- Wi-Fi Display Installation
- Managing the Projector From Web Management
- Make Application Token
- Troubleshooting Your Projector
- Specifications
- Contacting Dell
- Appendix: Glossary

NOTE: Before you turn on the projector again, wait for 60 seconds
to allow the internal temperature to stabilize.
4
Disconnect the power cord from the electrical outlet and the projector.
Adjusting the Projected Image
Raising the Projector Height
1
Press the
Elevator
button.
2
Raise the projector to the desired display angle, and then release the
button to lock the elevator foot into position.
Lowering the Projector Height
1
Press the
Elevator
button.
2
Lower the projector, and then release the button to lock the elevator foot
into position.
1
2
1 Elevator button
2 Elevator foot (Angle of tilt: 0 to 9.6
degrees)
Using Your Projector 15