
Installation manual


3
Unpacking the Switch
The switch and its accessories are shipped in a single box. The power cords may be shipped in a separate
box. Before unpacking the switch, inspect the container and immediately report any evidence of damage.
Verify that you have received your ordered items, including the following:
WARNING: If any item is missing or damaged, contact your Dell Networking representative or
reseller for instructions.
CAUTION: Always wear an ESD-preventive wrist or heel ground strap when handling the switch
and its components. Ground yourself by using an antistatic wrist strap or other device and
connect it to the ESD grounding jack on the chassis. As with all electrical devices of this type, take
all necessary safety precautions to prevent injury when installing this system.
CAUTION: The system is packaged in one or two separate containers. Use an equipment lift or
pallet jack to lift or install the chassis. Lifting the system by its shelves will cause damage to the
chassis
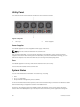
• Z9500 switch
• Static-Rail kit (#1 and #2 Phillips and flat-tipped screwdrivers required)
NOTE: One Rail Kit is required for every chassis in a rack.
• Screws for rack installation
• Console cables
• Any optional items ordered
• Getting Started Guide
• Safety and Regulatory Information
• Warranty and Support Information
• Software License Agreement
1. Place the container on a clean, flat surface and cut all straps securing the container.
2. Open the container or remove the container top.
3. Carefully remove all components from the container and place it on a secure and clean surface.
4. Remove all packing material.
5. Inspect the switch and accessories for damage.
Hardware Installation Overview
To install the Z9500, follow these steps:
1. Assemble 4-Post Rack Frame
2. Attaching the Mounting Brackets
3. Installing the Dell Static Rails System
4. Securing the Chassis Ground
5. Installing AC Power Supplies
Unpacking the Switch
7