
Getting Started Guide

8 Getting Started Guide
Installing on a Wall
1
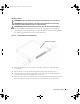
Place the supplied wall-mounting bracket on one side of the device, ensuring that the
mounting holes on the device line up to the mounting holes on the rack-mounting bracket.
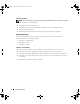
The following figure illustrates where to mount the brackets.
Figure 1-2. Bracket Installation for Wall Mounting
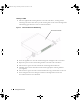
2
Insert the supplied screws into the rack-mounting holes and tighten with a screwdriver.
3
Repeat the process for the wall-mounting bracket on the other side of the device.
4
Place the device against the wall and mark the wall through the bracket holes.
5
Drill holes in the wall for the brackets and install the appropriate mounting hardware
(not supplied).
6
Place the device against the wall so that the bracket holes align with the holes in the wall.
7
Insert and tighten the screws through each of the mounting brackets. Ensure that
the ventilation holes are not obstructed.
PowerConnect Switch
T9020bk2.book Page 8 Thursday, November 16, 2006 9:11 AM