Dell™ PowerConnect™ 6024/6024F Systems Getting Started Guide 使用入门指南 Začínáme Guide de mise en route Handbuch zum Einstieg Οδηγός έναρξης はじめに Instrukcja uruchomienia Guía de introducción מדריך תחילת עבודה Models: 6024 and 6024F w w w. d e l l . c o m | s u p p o r t . d e l l .
Dell™ PowerConnect™ 6024/6024F Systems Getting Started Guide w w w. d e l l . c o m | s u p p o r t . d e l l .
Notes, Notices, and Cautions NOTE: A NOTE indicates important information that helps you make better use of your computer. NOTICE: A NOTICE indicates either potential damage to hardware or loss of data and tells you how to avoid the problem. CAUTION: A CAUTION indicates a potential for property damage, personal injury, or death. ____________________ Information in this document is subject to change without notice. © 2004-2005 Dell Inc. All rights reserved.
Installation Overview This document provides basic information to install, configure, and operate Dell™ PowerConnect™ 6024 and 6024F systems. For more information, see the User's Guide, which is available on your User Documentation CD, or check the Dell Support website at support.dell.com for the latest updates on documentation and software. Site Preparation PowerConnect 60xx devices can be mounted in a standard 48.26-cm (19-inch) rack or left free-standing (placed on a tabletop).
www.dell.com | support.dell.com Unpacking the Device NOTE: Before unpacking the device, inspect the container and immediately report any evidence of damage. 1 Place the container on a clean, flat surface and cut all straps securing the container. 2 Open the container or remove the container top. 3 Carefully remove the device from the container and place it on a secure and clean surface. 4 Remove all packing material. 5 Inspect the product and accessories for damage. Report any damage immediately.
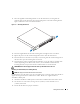
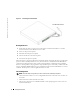
1 Place the supplied rack-mounting bracket on one side of the device, ensuring that the mounting holes on the device line up to the mounting holes on the rack-mounting bracket. Figure 1-1 illustrates where to mount the brackets. Figure 1-1. Attaching the Brackets 2 Insert the supplied bolts into the rack-mounting holes and tighten with a screwdriver. 3 Repeat the process for the rack-mounting bracket on the other side of the device. 4 Insert the device into the 48.
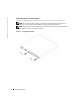
www.dell.com | support.dell.com Connecting a Device to a Power Supply Connect the supplied AC power cable to the AC power connector located on the back panel. NOTE: Do not connect the power cable to a grounded AC outlet at this time. Connect the device to a power source as described in the step detailed in “Starting and Configuring the Device." NOTE: Read the safety information in the Product information Guide as well as the safety information for other devices that connect to or support the switch.
Starting and Configuring the Device After completing all external connections, connect a terminal to the device to configure the device. Additional advanced functions are described in the User's Guide located on your User Documentation CD. NOTE: Read the release notes for this product before proceeding. You can download the release notes from the Dell Support website at support.dell.com.
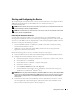
www.dell.com | support.dell.com Figure 1-3. Connecting to the Console Port to VT100 terminal device to console port Booting the Device 1 Ensure that the device console port is connected to a VT100 terminal device or VT100 terminal emulator via the RS-232 crossover cable. 2 Locate an AC power receptacle. 3 Deactivate the AC power receptacle. 4 Connect the device to the AC receptacle. 5 Activate the AC power receptacle.
The initial device configuration is performed through the console port. After the initial configuration, you can manage the device either from the already-connected console port or remotely through an interface defined during the initial configuration. NOTE: The device is not configured with a default user name and password. NOTE: All of the above settings are necessary to allow the remote management of the device through Telnet (Telnet client) or HTTP (Web browser).
www.dell.com | support.dell.com 1 If you enter [N], the Setup Wizard exits. If there is no response within 60 seconds, the Setup Wizard automatically exits and the CLI console prompt appears. If you enter [Y], the Setup Wizard provides interactive guidance throughout the initial device configuration. NOTE: If there is no response within 60 seconds, and there is a BootP server on the network, an address is retrieved from the BootP server.
Wizard Step 2 Please enter the IP address of the Management System (A.B.C.D) or wildcard (0.0.0.0) to manage from any Management Station:[0.0.0.0] 1 Enter – 2 Management System IP address for example “0.0.0.0”, or wildcard mask. Press Enter. Wizard Step 3 The following information appears: Now we need to setup your initial privilege (Level 15) user account. This account is used to login to the CLI and Web interface. You may setup other accounts and change privilege levels later.
www.dell.com | support.dell.com Wizard Step 4 The following information appears: Next, an IP address is setup. The IP address is defined on the OOB port. This is the IP address you use to access the CLI, Web interface, or SNMP interface for the switch. To setup an IP address: Please enter the IP address of the device (A.B.C.D): Please enter the IP subnet mask (A.B.C.D or /nn): 1 Enter the IP address, for example 192.168.1.100. 2 Press Enter. 3 Enter the IP subnet mask, for example 255.255.255.
Wizard Step 6 The following information appears: If the information is correct, please select (Y) to save the configuration, and copy to the start-up configuration file. If the information is incorrect, select (N) to discard configuration and restart the wizard: [Y/N] 1 Enter [Y] to complete the Setup Wizard or enter [N] to skip to restart the wizard. If you enter [Y] the following information appears: Configuring SNMP management interface. Configuring user account....... Configuring IP and subnet...... .
14 Getting Started Guide www.dell.com | support.dell.
Dell™ PowerConnect™ 6024/6024F 系统 使用入门指南 w w w. d e l l . c o m | s u p p o r t . d e l l .
注、注意和警告 注 : 注表示可以帮助您更好地使用计算机的重要信息。 注意 : 注意表示硬件的潜在损坏或数据丢失,并且告诉您如何避免此类问题。 警告 : 警告表示潜在的财产损坏、人身伤害或死亡。 ____________________ 本说明文件中的信息如有更改,恕不另行通知。 © 2004-2005 Dell Inc. 保留所有权利。 未经 Dell Inc. 书面许可,严禁以任何方式进行复制。 本文件中使用的商标 :Dell、 DELL 徽标和 PowerConnect 是 Dell Inc. 的商标; Microsoft 和 Windows 是 Microsoft Corporation 的注 册商标。 本说明文件中述及的其它商标和商品名称是指拥有相应标记和名称的公司或其制造的产品。Dell Inc.
安装 概览 本说明文件提供了安装、配置和操作 Dell™ PowerConnect™ 6024 和 6024F 系统的基本信 息。有关详情,请参阅用户说明文件 光盘中的 《用户指南》,或访问 Dell 支持 Web 站点 support.dell.com 以获取说明文件和软件的最新更新。 场所准备 PowerConnect 60xx 设备可以安装在标准的 48.
www.dell.com | support.dell.
1 将所提供的机架固定支架置于设备的一侧,确保设备上的固定孔与机架固定支架上的固 定孔对齐。图 1-1 图示说明了固定支架的位置。 图 1-1. 连接支架 2 将提供的螺栓插入机架固定孔中并用螺丝刀拧紧。 3 对设备另一侧的机架固定支架重复该步骤。 4 将设备插入 48.26 厘米 (19 英寸)机架中,确保设备上的机架固定孔与机架上的固定孔 对齐。 5 根据您所用机架的类型,使用机架螺栓或锁紧螺帽以及带有垫圈的锁紧螺帽螺栓将设备 固定到机架上。在拧紧顶部的螺栓前,先拧紧底部的螺栓。确保未阻塞通风孔。 警告 : 确保提供的机架螺栓与机架上的预制螺纹孔适配。 安装到平面上 (独立式设备) 注 : 我们强烈建议将设备固定好。 如果不将设备安装到机架上,则请将其安装到平坦表面上。该表面必须能够支持设备和设 备电缆的重量。设备附带四个自粘胶垫。 1 将自粘胶垫粘到机箱底部每个标记的位置。 2 将设备置于平面上,每侧留出 5.08 厘米 (2 英寸 ),后面留出 12.
www.dell.com | support.dell.com 连接设备至电源 将所提供的交流电源电缆连接到位于背面板上的交流电源连接器。 注 : 此时,请勿连接电源电缆至接地交流电源插座。请按照 “启动和配置设备”中详述的步骤 将设备连接至电源。 注 : 请阅读 《产品信息指南》中的安全信息,以及连接至或支持该交换机的其它设备的安全信 息。 图 1-2.
启动和配置设备 完成所有外部连接后,将终端连接到设备以配置该设备。其它高级功能在用户说明文件 光 盘上的 《用户指南》中说明。 注 : 在继续之前,请阅读本产品的发布注释。您可以从 Dell 支持 Web 站点 support.dell.com 下载 该发布注释。 注 : 我们建议您从 Dell 支持 Web 站点 support.dell.
www.dell.com | support.dell.com 图 1-3.
注 : 要想通过远程登录 (远程登录客户机)或 HTTP (Web 浏览器)来远程管理设备,则所有 以上设置都是必需的。 在设置设备的初始配置之前,必须从网络管理员处获取以下信息: • 将要分配给 “带外以太网管理端口”的 IP 地址,通过该端口管理设备。 • 该网络的 IP 子网掩码 • “带外以太网管理端口”默认网关的 IP 地址,用来配置默认路由。 注 : 有关 “带外以太网管理端口”的其它信息,请参阅 《用户指南》。 初始配置程序 您可以使用 “Dell PowerConnect 简易安装向导”,或者使用 “命令行界面” (CLI),来执 行初始配置。当设备配置文件为空时,“安装向导”自动启动。在向导过程的任何时候, 您都可以通过输入 [ctrl+z] 调用 CLI。有关 CLI 初始配置的详情,请参阅 《用户指南》。 本指南显示了如何使用 “安装向导”进行初始设备配置。“安装向导”配置了以下字段。 • SNMP 团体字符串和 SNMP 管理系统 IP 地址 (可选) • 用户名和密码 • 带外以太网管理端口 IP 地址 • 带外以太网管理端口默认网关地址 在设备完成开机自测
www.dell.com | support.dell.com 1 如果您输入 [N],“安装向导”将退出。如果 60 秒之内无响应,“安装向导”会自动退 出,并且 CLI 控制台提示符出现。 如果您输入 [Y],“安装向导”将在整个初始设备配置 过程中提供交互式的导航。 注 : 如果 60 秒之内无响应,并且网络中有 BootP 服务器,将从 BootP 服务器检索地址。 注 : 您可以在任何时候通过输入 [ctrl+Z] 来退出 “安装向导”。 向导步骤 1 如果您输入 [Y],以下信息出现: The system is not setup for SNMP management by default. To manage the switch using SNMP (required for Dell Network Manager) you can: • Setup the initial SNMP version 2 account now. • Return later and setup the SNMP version 2 account.
To add a management station: Please enter the SNMP community string to be used:[Dell_NetWork_Manager] (要设置 SNMP 管理帐号,您必须指定管理系统 IP 地址和 “团体字符串”或密码, 特定的管理系统可以用其来访问交换机。向导会自动分配最高访问级别 [ 优先权级别 15] 给此帐号。您随后可以使用 “Dell 网络管理器”或其它管理接口更改此设置,以 及添加附加的管理系统。有关添加管理系统的详情,请参阅用户文档。 要添加管理站: 请输入将要使用的 SNMP 团体字符串:[Dell_NetWork_Manager]) 2 输入以下内容:用户 SNMP 团体字符串,例如 “MYSETUPWIZARD”。 3 按 Enter 键。 向导步骤 2 Please enter the IP address of the Management System (A.B.C.D) or wildcard (0.0.0.0) to manage from any Management Station:[0.0.0.
www.dell.com | support.dell.com 要设置用户帐号: 请输入用户名: 请输入用户密码: 请重新输入用户密码:) 1 输入: – 用户名,例如 “admin” – 密码和密码确认。 注 : 如果第一次和第二次密码输入不一致,向导会提示您输入一致的密码。 2 按 Enter 键。 3 输入密码,例如 “secret”。 4 按 Enter 键。 5 通过输入相同的字符串确认密码,例如,“secret”。 6 按 Enter 键。 向导步骤 4 以下信息出现: Next, an IP address is setup. The IP address is defined on the OOB port. This is the IP address you use to access the CLI, Web interface, or SNMP interface for the switch. To setup an IP address: Please enter the IP address of the device (A.B.C.
向导步骤 5 以下信息出现: Finally, setup the default gateway. Please enter the IP address of the gateway from which this network is reachable (for example 192.168.1.1): (最后,设置默认网关。请输入使本网络可达的网关的 IP 地址 [ 例如 192.168.1.1]:) 1 输入默认网关,例如, 192.168.1.1 2 按 Enter 键。 以下信息出现 (按照所说明的实例参数): This is the configuration information that has been collected: SNMP Interface = MYSETUPWIZARD@0.0.0.0 User Account setup = admin Password = ********** Management IP address = 192.168.1.100 255.255.255.0 Default Gateway = 192.168.1.
www.dell.com | support.dell.com Configuring user account....... Configuring IP and subnet...... ............................... Thank you for using Dell Easy Setup Wizard. You will now enter CLI mode. (正在配置 SNMP 管理接口。 正在配置用户帐号 ....... 正在配置 IP 和子网 ...... ...............................
Systémy Dell™ PowerConnect™ 6024/6024F Začínáme w w w. d e l l . c o m | s u p p o r t . d e l l .
Poznámky, upozornění a varování POZNÁMKA: POZNÁMKA označuje důležité informace, které pomáhají lepšímu využití počítače. UPOZORNĚNÍ: UPOZORNĚNÍ označuje nebezpečí poškození hardwaru nebo ztráty dat a popisuje, jak se lze problému vyhnout. VAROVÁNÍ: VAROVÁNÍ upozorňuje na potenciální nebezpečí poškození majetku, úrazu nebo smrti. ____________________ Informace v tomto dokumentu se mohou bez předchozího upozornění změnit. © 2004-2005 Dell Inc. Všechna práva vyhrazena.
Instalace Přehled Tento dokument obsahuje základní informace o instalaci, konfiguraci a provozu systémů Dell™ PowerConnect™ 6024 a 6024F. Další informace najdete v Příručka uživatele, která je k dispozici na disku CD s dokumentací, nebo vyhledejte nejnovější aktualizace dokumentace a softwaru na webu odborné pomoci společnosti Dell support.dell.com. Příprava místa instalace Zařízení PowerConnect 60xx lze instalovat do standardního regálu 48,26 cm (19 palců) nebo umístit volně (na stole).
www.dell.com | support.dell.com Vybalení zařízení POZNÁMKA: Před vybalením zařízení zkontrolujte, zda není poškozen obal; případné poškození ihned nahlaste. 1 Umístěte krabici na čistou rovnou plochu a odstraňte z obalu všechny pásky. 2 Otevřete krabici nebo odstraňte její vrchní část. 3 Opatrně vyjměte zařízení z krabice a položte jej na bezpečné a čisté místo. 4 Odstraňte všechny obaly. 5 Zkontrolujte, zda výrobek nebo příslušenství nejsou poškozeny.
1 Na jednu stranu zařízení umístěte dodávanou podpěru tak, aby otvory na zařízení odpovídaly otvorům na podpěře. Na obrázku Obrázek 1-1 je uvedeno umístění montážních konzol. Obrázek 1-1. Montáž konzol 2 Do otvorů pro montáž do regálu vložte šrouby a utáhněte šroubovákem. 3 Podobně nainstalujte podpěru na druhé straně zařízení. 4 Zasuňte zařízení do regálu o velikosti 48,26 cm (19 palců) a zkontrolujte, zda otvory pro montáž na zařízení odpovídají otvorům v regálu.
www.dell.com | support.dell.com Připojení zařízení ke zdroji napájení Připojte dodaný napájecí kabel střídavého proudu ke konektoru napájení střídavým proudem na zadním panelu. POZNÁMKA: V této chvíli ještě nepřipojujte napájecí kabel do uzemněné elektrické zásuvky. Připojte zařízení ke zdroji napájení podle pokynů v části „Spuštění a konfigurace zařízení.
Spuštění a konfigurace zařízení Po ukončení instalace všech externích připojení připojte zařízení k terminálu, aby se mohlo nakonfigurovat. Další rozšířené funkce jsou popsány v Příručka uživatele, která se nachází na disku CD s uživatelskou dokumentací. POZNÁMKA: Než budete pokračovat, přečtěte si poznámky k verzi tohoto výrobku.Poznámky k verzi jsou k dispozici ke stažení z webu odborné pomoci Dell Support support.dell.com.
www.dell.com | support.dell.com 3 Připojte zásuvkový konektor křížového kabelu RS-232 přímo ke konzolovému portu zařízení a zajistěte šrouby. Konzolové porty PowerConnect 6024 a 6024F se nacházejí na předním panelu viz Obrázek 1-3. Obrázek 1-3. Připojení ke konzolovému portu K terminálovému zařízení VT100 Ke konzolovému portu Zavedení zařízení 1 Zkontrolujte, zda je konzolový port zařízení připojen k zařízení terminálu VT100 nebo terminalovému emulátoru VT100 pomocí křížového kabelu RS-232.
Původní konfigurace POZNÁMKA: Počáteční jednoduchá konfigurace vychází z následujících předpokladů: • Zařízení PowerConnect ještě nikdy nebylo nakonfigurováno a nachází se v takovém stavu, v jakém jste jej obdrželi. • Zařízení PowerConnect úspěšně zavedlo systém. • Připojení konzole bylo úspěšně navázáno a na obrazovce koncového zařízení VT100 se zobrazí zpráva konzole. Počáteční konfigurace zařízení se provádí prostřednictvím konzolového portu.
www.dell.com | support.dell.com Po dokončení automatického testu POST a spuštění zařízení se zobrazí následující informace: Welcome to Dell Easy Setup Wizard The Setup Wizard guides you through the initial switch configuration, and gets you up and running easily and quickly. You can also skip the setup wizard, and enter CLI mode to manually configure the switch if you prefer. You can exit the Setup Wizard at any time by entering [ctrl+Z].
• Setup the initial SNMP version 2 account now. • Return later and setup the SNMP version 2 account. (For more information on setting up a SNMP version 2 account, see the user documentation). Would you like to setup the SNMP management interface now? (Y/N)[Y] (Ve výchozí konfiguraci není systém nastaven pro správu SNMP. Chcete-li spravovat přepínač pomocí SNMP (vyžadováno aplikací Dell Network Manager), můžete provést následující kroky: • Nastavte počáteční účet SNMP verze 2.
www.dell.com | support.dell.com Zadejte řetězec komunity SNMP, který má být použit:[Dell_NetWork_Manager]) 2 Zadejte následující informace: Řetězec komunity SNMP uživatele, například „PRUVODCENASTAVENÍM“. 3 Stiskněte klávesu ENTER. Průvodce - krok 2 Please enter the IP address of the Management System (A.B.C.D) or wildcard (0.0.0.0) to manage from any Management Station:[0.0.0.0] (Zadejte adresu IP systému pro správu (A.B.C.
Znovu zadejte heslo uživatele:) 1 Zadejte: – Uživatelské jméno, například „admin“ – Heslo a znovu heslo pro potvrzení. POZNÁMKA: Pokud nejsou první a druhé zadání hesla totožné, budete vyzváni Průvodcem k zadání totožných hesel. 2 Stiskněte klávesu ENTER. 3 Zadejte heslo, například „secret“. 4 Stiskněte klávesu ENTER. 5 Zadáním totožného řetězce (například „secret“) potvrd’te heslo. 6 Stiskněte klávesu ENTER. Průvodce - krok 4 Zobrazí se následující informace: Next, an IP address is setup.
www.dell.com | support.dell.com Průvodce - krok 5 Zobrazí se následující informace: Finally, setup the default gateway. Please enter the IP address of the gateway from which this network is reachable (for example 192.168.1.1): (Nakonec nastavte výchozí bránu. Zadejte adresu IP brány, ze které je tato sí˙ dosažitelná (například 192.168.1.1):) 1 Zadejte výchozí bránu, například 192.168.1.1. 2 Stiskněte klávesu ENTER.
Průvodce - krok 6 Zobrazí se následující informace: If the information is correct, please select (Y) to save the configuration, and copy to the start-up configuration file. If the information is incorrect, select (N) to discard configuration and restart the wizard: [Y/N] (Pokud jsou informace správné, stisknutím klávesy (A) konfiguraci uložte a zkopírujte spouštěcí konfigurační soubor.
44 Začínáme www.dell.com | support.dell.
Systèmes Dell™ PowerConnect™ 6024/6024F Guide de mise en route w w w. d e l l . c o m | s u p p o r t . d e l l .
Remarques, avis et précautions REMARQUE : Une REMARQUE indique des informations importantes qui peuvent vous aider à mieux utiliser votre ordinateur. AVIS : Un AVIS vous avertit d’un risque de dommage matériel ou de perte de données et vous indique comment éviter le problème. PRÉCAUTION : Une PRÉCAUTION indique un risque potentiel d'endommagement du matériel, de blessure corporelle ou de mort. ____________________ Les informations contenues dans ce document sont sujettes à modification sans préavis.
Installation Présentation générale Ce guide présente des informations de base concernant l'installation, la configuration et l'exécution des systèmes Dell™ PowerConnect™ 6024 et 6024F. Pour en savoir plus, reportez-vous au Guide d'utilisation, qui se trouve sur votre CD Documentation utilisateur ou consultez le site Web de support technique de Dell à l'adresse support.dell.com pour obtenir les dernières mises à jour de la documentation et des logiciels.
www.dell.com | support.dell.com • Guide de mise en route • Le document d'Informations sur les réglementations et la sécurité Déballage de l'appareil REMARQUE : Avant de déballer l'appareil, inspectez l'emballage et signalez immédiatement tout signe de dommage. 1 Placez le conteneur sur une surface plane et propre et coupez toutes les sangles qui le maintiennent fermé. 2 Ouvrez le conteneur ou retirez la partie supérieure du conteneur.
1 Placez une des languettes métalliques de montage sur rack fournies sur un côté de l'appareil en vous assurant que les trous de montage de celui-ci s'alignent sur les trous de montage de la languette métallique de montage sur rack. La Figure 1-1 indique où monter les supports. Figure 1-1. Fixation des supports 2 Insérez les vis fournies dans les trous de montage sur rack et serrez-les avec un tournevis.
www.dell.com | support.dell.com 2 Placez le périphérique sur une surface plane, tout en laissant 5,08 cm (2 pouces) de chaque côté et 12,7 cm (5 pouces) à l'arrière. 3 Assurez-vous que l'appareil est bien aéré. Connexion d'un périphérique sur un bloc d'alimentation Raccordez le câble d'alimentation CA fourni au connecteur d'alimentation CA situé sur le panneau arrière. REMARQUE : Ne raccordez pas tout de suite le câble d'alimentation à une prise électrique CA mise à la terre.
Mise en route et configuration de l'appareil Après avoir effectué toutes les connexions externes, raccordez un terminal à l'appareil afin de configurer celui-ci. Vous trouverez la description des fonctions avancées supplémentaires dans le Guide d'utilisation qui se trouve sur le CD Documentation utilisateur. REMARQUE : Avant de continuer, lisez les notes de mise à jour pertinentes à ce produit.
www.dell.com | support.dell.com AVIS : Si vous utilisez HyperTerminal avec Microsoft Windows 2000, assurez-vous que le Service Pack 2 de Windows 2000 ou version ultérieure est installé. Lorsque le Service Pack 2 de Windows 2000 est installé, les touches de direction fonctionnent correctement avec l'émulation VT100 d'HyperTerminal. Rendez-vous à l'adresse www.microsoft.com pour obtenir des informations sur les services packs de Windows 2000.
Configuration initiale REMARQUE : Les conditions suivantes doivent être remplies préalablement à la procédure de configuration initiale : • L'appareil PowerConnect n'a jamais été configuré auparavant et se trouve dans l'état où vous l'avez reçu. • L'initialisation de l'appareil PowerConnect a réussi. • La connexion à la console est établie et l'invite de la console est affichée sur l'écran d'un dispositif terminal VT100.
www.dell.com | support.dell.com Welcome to Dell Easy Setup Wizard The Setup Wizard guides you through the initial switch configuration, and gets you up and running easily and quickly. You can also skip the setup wizard, and enter CLI mode to manually configure the switch if you prefer. You can exit the Setup Wizard at any time by entering [ctrl+Z]. The system will prompt you with a default answer; by pressing enter, you accept the default.
Assistant Étape 1 Si vous entrez [Y], les informations suivantes s'affichent : The system is not setup for SNMP management by default. To manage the switch using SNMP (required for Dell Network Manager) you can: • Setup the initial SNMP version 2 account now. • Return later and setup the SNMP version 2 account. (For more information on setting up a SNMP version 2 account, see the user documentation).
www.dell.com | support.dell.com le plus haut niveau d'accès [Niveau de privilège 15] à ce compte. Vous pouvez utiliser le gestionnaire de réseau Dell ou une autre interface de gestion pour modifier ce paramètre et ajouter un autre système de gestion dans le futur. Pour en savoir plus sur l'ajout de systèmes de gestion, reportez-vous à la documentation de l'utilisateur.
(Maintenant il faut configurer votre compte utilisateur privilège initial (Niveau 15). On utilise ce compte pour se connecter aux interfaces CLI et Web. Vous pouvez configurer d'autres comptes et modifier les niveaux de privilège plus tard. Pour en savoir plus sur la configuration des comptes utilisateur et la modification des niveaux de privilège, reportez-vous à la documentation de l'utilisateur.
www.dell.com | support.dell.com 1 Entrez l'adresse IP, par exemple 192.168.1.100. 2 Appuyez sur Entrée. 3 Entrez le masque de sous-réseau IP, par exemple 255.255.255.0 4 Appuyez sur Entrée. Assistant Étape 5 Les informations suivantes s'affichent : Finally, setup the default gateway. Please enter the IP address of the gateway from which this network is reachable (for example 192.168.1.1): (Enfin, configurez la passerelle par défaut.
Assistant Étape 6 Les informations suivantes s'affichent : If the information is correct, please select (Y) to save the configuration, and copy to the start-up configuration file. If the information is incorrect, select (N) to discard configuration and restart the wizard: [Y/N] (Si les informations sont correctes, veuillez sélectionner (Y) pour enregistrer la configuration et copier dans le fichier de configuration de démarrage.
60 Guide de mise en route www.dell.com | support.dell.
Dell™ PowerConnect™ 6024/6024F-Systeme Handbuch zum Einstieg w w w. d e l l . c o m | s u p p o r t . d e l l .
Anmerkungen, Hinweise und Vorsichtshinweise ANMERKUNG: Eine ANMERKUNG macht auf wichtige Informationen aufmerksam, mit denen Sie den Computer besser einsetzen können. HINWEIS: Ein HINWEIS weist auf mögliche Schäden an der Hardware oder auf möglichen Datenverlust hin und beschreibt Ihnen, wie Sie dieses Problem vermeiden können. VORSICHT: VORSICHT weist auf Gefahren hin, die zu Sachschäden, Personenschäden oder lebensgefährlichen Verletzungen führen können.
Installation Übersicht Dieses Dokument stellt die grundlegenden Informationen zur Installation, Konfiguration und zum Betrieb des Dell™ PowerConnect™ 6024 und 6024F Systems bereit. Weitere Informationen finden Sie im Benutzerhandbuch, das Ihnen auf der Dokumentations-CD zur Verfügung steht, oder besuchen Sie die Dell Support-Website über support.dell.com, um Informationen über die neuesten Aktualisierungen für die Dokumentation und die Software zu erhalten.
www.dell.com | support.dell.com • Handbuch zum Einstieg • Dokument mit Zulassungs- und Sicherheitsinformationen Auspacken des Geräts ANMERKUNG: Vor dem Auspacken des Geräts überprüfen Sie bitte das Paket und melden Sie uns sofort eventuelle Beschädigungen. 1 Setzen Sie den Container auf eine flache, saubere Oberfläche und entfernen Sie alle Riemen am Container. 2 Öffnen Sie den Container oder entfernen Sie die Abdeckung des Containers.
1 Bringen Sie das Rackmontage-Abdeckblech an einer Seite des Geräts an und stellen Sie sicher, dass die Montagelöcher in einer Linie mit den Montagelöchern des RackmontageAbdeckblechs stehen. Abbildung 1-1 zeigt, wo die Abdeckbleche zu befestigen sind. Abbildung 1-1. Befestigung der Halterungen 2 Fügen Sie die mitgelieferten Schrauben in die Löcher der Rackmontage ein und ziehen Sie sie mit einem Schraubendreher fest.
www.dell.com | support.dell.com 2 Stellen Sie das Gerät auf eine flache Oberfläche mit einem Abstand von 5,08 cm (2 Zoll) auf jeder Seite und 12,7 cm (5 Zoll) auf der Rückseite. 3 Stellen Sie sicher, dass das Gerät ordnungsgemäß belüftet wird. Anschließen eines Geräts an die Stromversorgung Schließen Sie das Netzkabel an den Wechselstromanschluss auf der Rückseite an. ANMERKUNG: Schließen Sie das Netzkabel jetzt nicht an eine geerdete Wechselstromsteckdose an.
Starten und Konfigurieren des Geräts Nach der Vollendung aller externen Verbindungen schließen Sie ein Terminal an das Gerät an, um das Gerät zu konfigurieren. Weitere zusätzliche Funktionen werden im Benutzerhandbuch beschrieben, dass sich auf Ihrer Benutzer- Dokumentations-CD befindet. ANMERKUNG: Bevor Sie fortfahren, lesen Sie bitte die Versionshinweise für dieses Produkt. Die Versionshinweise können von der Dell Support-Website unter support.dell.com heruntergeladen werden.
www.dell.com | support.dell.com HINWEIS: Wenn Sie HyperTerminal mit Microsoft® Windows® 2000 verwenden, stellen Sie sicher, dass Sie das Windows 2000 Service-Pack 2 oder eine neuere Version installiert haben. Beim Windows 2000 Service-Pack 2 funktionieren die Pfeiltasten korrekt bei der VT100-Emulation von HyperTerminal. Gehen Sie auf die Website www.microsoft.com, um weitere Informationen zu Windows 2000 Service Packs zu erhalten.
Ursprüngliche Konfiguration ANMERKUNG: Das Erstinstallationsverfahren beruht auf den folgenden Annahmen: • Das PowerConnect-Gerät wurde niemals zuvor konfiguriert und ist in demselben Zustand, in dem Sie es erhalten haben. • Das PowerConnect-Gerät ist erfolgreich gestartet. • Der Konsolenanschluss ist vorhanden und die Konsolen-Eingabeaufforderung wird auf dem Bildschirm eines VT100-Terminalgeräts angezeigt. Die Anfangsgerätekonfiguation wird über die Konsolenschnittstelle durchgeführt.
www.dell.com | support.dell.com • Adresse des Standard-Gateways des bandexternen Ethernet-Management-Ports Nachdem das Gerät den Einschaltselbsttest (POST) und den Bootvorgang abgeschlossen hat, werden die folgenden Informationen angezeigt: Welcome to Dell Easy Setup Wizard The Setup Wizard guides you through the initial switch configuration, and gets you up and running easily and quickly. You can also skip the setup wizard, and enter CLI mode to manually configure the switch if you prefer.
Schritt 1 Wenn Sie [J] eingeben, werden die folgenden Informationen angezeigt: The system is not setup for SNMP management by default. To manage the switch using SNMP (required for Dell Network Manager) you can: • Setup the initial SNMP version 2 account now. • Return later and setup the SNMP version 2 account. (For more information on setting up a SNMP version 2 account, see the user documentation).
www.dell.com | support.dell.com (Für das Einrichten eines SNMP-Steuerungskontos müssen Sie die Adresse des Verwaltungssystems und die „Communityzeichenfolge” oder das Kennwort festlegen, die das Verwaltungssystem verwendet, um auf den Switch zuzugreifen. Der Assistent vergibt automatisch die höchste Zugriffsklasse [Zugriffsstufe 15] für dieses Konto.
Please enter the user password: Please reenter the user password: (Richten Sie nun Ihr anfängliches Zugangsbenutzerkonto (Stufe 15) ein. Dieses Konto wird für die Anmeldung an der Befehlszeilenschnittstelle (CLI) und am Internet verwendet. Sie können später weitere Konten einrichten und Zugriffsstufen ändern. Weitere Informationen zum Einrichten von Benutzerkonten und zum Ändern von Zugriffsstufen finden Sie in der Benutzerdokumentation.
www.dell.com | support.dell.com (Als Nächstes wird eine IP-Adresse eingerichtet. Diese IPAdresse ist auf dem OOB-Port definiert. Es ist die IP-Adresse, die Sie für den Zugang zur Befehlszeilenschnittstelle (CLI), das Internet oder die SNMP-Schnittstelle für den Switch benötigen. So richten Sie eine IP-Adresse ein: Bitte geben Sie die IP-Adresse des Geräts ein (A.B.C.D): Bitte geben Sie die IP-Teilnetzmaske (A.B.C.D oder /nn) ein:) 1 Geben Sie nun die IP-Adresse ein, z. B. 192.168.1.100.
Kennwort = ********** Management-IP-Adresse = 192.168.1.100 255.255.255.0 Standard-Gateway = 192.168.1.1) Schritt 6 Es werden die folgenden Informationen angezeigt: If the information is correct, please select (Y) to save the configuration, and copy to the start-up configuration file.
www.dell.com | support.dell.com Schritt 7 Die Befehlszeilenschnittstelle (CLI) wird angezeigt. Sie können das Gerät nun über die bereits verbundene Konsolenschnittstelle steuern. Alternativ ist auch eine Fernverwaltung über die bandexterne Ethernet-Management-PortSchnittstelle möglich, die während der Erstkonfiguration definiert wurde.
Συστήµατα Dell™ PowerConnect™ 6024/6024F Οδηγός έναρξης w w w. d e l l . c o m | s u p p o r t . d e l l .
Σηµείωση, ειδοποίηση και προσοχή ΣΗΜΕΙΩΣΗ: Η ΣΗΜΕΙΩΣΗ υποδεικνύει σηµαντικές πληροφορίες που σας βοηθούν να χρησιµοποιείτε καλύτερα τον υπολογιστή σας. ΕΙ∆ΟΠΟΙΗΣΗ: Η ΕΙ∆ΟΠΟΙΗΣΗ υποδηλώνει είτε δυνητική βλάβη υλικού είτε απώλεια δεδοµένων και υποδεικνύει τον τρόπο µε τον οποίο µπορείτε να αποφύγετε το πρόβληµα. ΠΡΟΣΟΧΗ: Η ΠΡΟΣΟΧΗ υποδηλώνει δυνητική βλάβη υλικού, τραυµατισµό ή θάνατο. ____________________ Οι πληροφορίες αυτού του εγγράφου µπορεί να αλλάξουν χωρίς προειδοποίηση. © 2004-2005 Dell Inc.
Εγκατάσταση Επισκόπηση Αυτό το έγγραφο παρέχει τις βασικές πληροφορίες για να εγκαταστήσετε, να ρυθµίσετε και να λειτουργήσετε τα συστήµατα Dell™ PowerConnect™ 6024 και 6024F. Για περισσότερες πληροφορίες, ανατρέξετε στον Οδηγό χρήσης, ο οποίος είναι διαθέσιµος στο CD Τεκµηρίωση χρήστη ή επισκεφθείτε την τοποθεσία υποστήριξης της Dell στο web στη διεύθυνση support.dell.com για τις πιο πρόσφατες ενηµερώσεις σχετικά µε την τεκµηρίωση και το λογισµικό.
www.dell.com | support.dell.com • Ένα σετ από αυτοκόλλητα ελαστικά τακάκια για την ελεύθερη συσκευή (συµπεριλαµβάνονται τέσσερα τακάκια) • CD Τεκµηρίωση χρήστη • Οδηγός έναρξης • Έγγραφο πληροφοριών ασφαλείας και κανονισµών Αφαίρεση συσκευασίας της συσκευής ΣΗΜΕΙΩΣΗ: Πριν την αφαίρεση της συσκευασίας της συσκευής, ελέγξτε τη συσκευασία και αναφέρετε αµέσως οποιαδήποτε ένδειξη βλάβης. 1 Τοποθετήστε τη συσκευασία επάνω σε µια καθαρή επίπεδη επιφάνεια και κόψτε όλες τις ταινίες ασφάλισής της.
1 Τοποθετήστε το παρεχόµενο στήριγµα σε πλαίσιο στη µία πλευρά της συσκευής, ώστε οι οπές στερέωσης στη συσκευή να ευθυγραµµιστούν µε τις οπές στερέωσης στο στήριγµα σε πλαίσιο. Η Εικόνα 1-1 δείχνει που πρέπει να τοποθετηθούν τα στηρίγµατα. Εικόνα 1-1. Τοποθέτηση στηριγµάτων 2 Τοποθετήστε τις παρεχόµενες βίδες µέσα στις οπές στερέωσης σε βάση και σφίξτε µε ένα κατσαβίδι. 3 Επαναλάβετε τη διαδικασία για το στήριγµα σε πλαίσιο στην άλλη πλευρά της συσκευής.
www.dell.com | support.dell.com 2 Τοποθετήστε τη συσκευή σε µια επίπεδη επιφάνεια, αφήνοντας 5,08 cm (2 ίντσες) στην κάθε πλευρά και 12,7 cm (5 ίντσες) στο πίσω µέρος. 3 Βεβαιωθείτε ότι η συσκευή αερίζεται επαρκώς. Σύνδεση συσκευής µε τροφοδοτικό Συνδέστε το παρεχόµενο καλώδιο τροφοδοσίας AC στη θύρα τροφοδοσίας AC που βρίσκεται στην πίσω πλευρά. ΣΗΜΕΙΩΣΗ: Μην συνδέσετε το καλώδιο τροφοδοσίας σε γειωµένη AC πρίζα στο σηµείο αυτό.
Εκκίνηση και ρύθµιση παραµέτρων της συσκευής Αφού ολοκληρώσετε όλες τις εξωτερικές συνδέσεις, συνδέστε ένα τερµατικό στη συσκευή για να ρυθµίσετε τις παραµέτρους της. Επιπρόσθετες προχωρηµένες λειτουργίες περιγράφονται στον Οδηγό χρήσης, ο οποίος βρίσκεται στο CD Τεκµηρίωση χρήστη. ΣΗΜΕΙΩΣΗ: Πριν προχωρήσετε, διαβάστε τις σηµειώσεις έκδοσης για το προϊόν. Μπορείτε να προµηθευτείτε τις σηµειώσεις έκδοσης από την τοποθεσία υποστήριξης της Dell στο web στη διεύθυνση support.dell.com.
www.dell.com | support.dell.com 3 Συνδέστε το θηλυκό φις του καλωδίου crossover RS-232 απευθείας στη θύρα της κονσόλας της συσκευής και σφίξτε τις βίδες συγκράτησης. Οι θύρες της κονσόλας PowerConnect 6024 και 6024F βρίσκονται στην µπροστινή πλευρά, όπως φαίνεται στην Εικόνα 1-3. Εικόνα 1-3.
Αρχική ρύθµιση παραµέτρων ΣΗΜΕΙΩΣΗ: Η αρχική διαδικασία απλής ρύθµισης παραµέτρων εκτελείται υπό τους παρακάτω όρους: • Η συσκευή PowerConnect δεν ρυθµίστηκε ποτέ πριν και βρίσκεται στην κατάσταση που είχε όταν την παραλάβατε. • Η διαδικασία εκκίνησης της συσκευής PowerConnect ήταν επιτυχής. • Η σύνδεση της κονσόλας πραγµατοποιήθηκε και εµφανίζεται η ειδοποίηση κονσόλας στην οθόνη µιας συσκευής τερµατικού VT100. Η αρχική ρύθµιση παραµέτρων της συσκευής γίνεται από τη θύρα της κονσόλας.
www.dell.com | support.dell.com • Όνοµα χρήστη και κωδικός πρόσβασης • ∆ιεύθυνση IP θύρας διαχείρισης Out-of-Band Ethernet • Προεπιλεγµένη διεύθυνση πύλης θύρας διαχείρισης Out-of-Band Ethernet Αφού η συσκευή ολοκληρώσει τον έλεγχο POST και ξεκινήσει, εµφανίζονται τα παρακάτω: Welcome to Dell Easy Setup Wizard The Setup Wizard guides you through the initial switch configuration, and gets you up and running easily and quickly.
Βήµα οδηγού 1 Αν επιλέξετε [Y] (Ναι) εµφανίζονται τα παρακάτω: The system is not setup for SNMP management by default. To manage the switch using SNMP (required for Dell Network Manager) you can: • Setup the initial SNMP version 2 account now. • Return later and setup the SNMP version 2 account. (For more information on setting up a SNMP version 2 account, see the user documentation).
www.dell.com | support.dell.com στηµα διαχείρισης για πρόσβαση στο διακόπτη. Ο οδηγός αντιστοιχίζει αυ τόµατα το υψηλότερο επίπεδο πρόσβασης [Επίπεδο δικαιωµάτων 15] σε αυτό ντολογαριασµό.Μπορείτεναχρησιµοποιήσετετη∆ιαχείρισηδικτύουDell ήάλλαπεριβάλλονταδιαχείρισηςγιατηµετέπειτααλλαγήαυτήςτηςρύθµισ ης καιτηνπροσθήκηενόςεπιπλέονσυστήµατοςδιαχείρισης. Γιαπερισσότε ρεςπληροφορίεςσχετικάµετηνπροσθήκησυστηµάτωνδιαχείρισης,ανατρέξτ ε στην τεκµηρίωση χρήστη.
(Τώρα πρέπει να εγκατασταθεί ο αρχικός λογαριασµός χρήστη σας µε δικαιώ µατα (Επίπεδο 15). Αυτός ο λογαριασµός χρησιµοποιείται για τη σύνδεση στο CLI και στο περιβάλλον Web. Μπορείτε να εγκαταστήσετε άλλους λογαρι ασµούςκαινααλλάξετετα επίπεδαδικαιωµάτωναργότερα. Γιαπερισσότερε ς πληροφορίες σχετικά µε την εγκατάσταση λογαριασµών χρήστη και την αλ λαγή των επιπέδων δικαιωµάτων, ανατρέξτε στην τεκµηρίωση χρήστη.
www.dell.com | support.dell.com 1 Πληκτρολογήστε τη διεύθυνση IP, π.χ 192.168.1.100. 2 Πατήστε Enter. 3 Πληκτρολογήστε τη µάσκα υποδικτύου IP, π.χ. 255.255.255.0 4 Πατήστε Enter. Βήµα οδηγού 5 Εµφανίζονται τα παρακάτω: Finally, setup the default gateway. Please enter the IP address of the gateway from which this network is reachable (for example 192.168.1.1): (Τέλος, εγκαταστήστε την προεπιλεγµένη πύλη. P Πληκτρολογήστε τη διεύ θυνση ΙΡ της πύλης από την οποία είναι προσβάσιµο το δίκτυο (π.χ. 1.
Βήµα οδηγού 6 Εµφανίζονται τα παρακάτω: If the information is correct, please select (Y) to save the configuration, and copy to the start-up configuration file. If the information is incorrect, select (N) to discard configuration and restart the wizard: [Y/N] (Αν οι πληροφορίες είναι σωστές, επιλέξτε (Ναι) για να αποθηκεύσετε τι ς ρυθµίσεις παραµέτρων και να τις αντιγράψετε στο αρχείο ρύθµισης παραµ έτρων εκκίνησης.
92 Οδηγός έναρξης www.dell.com | support.dell.
Dell™ PowerConnect™ 6024/6024F システム はじめに w w w. d e l l . c o m | s u p p o r t . d e l l .
メモ、注意、警告 メモ : コンピュータを使いやすくするための重要な情報を説明しています。 注意 : ハードウェアの損傷またはデータの損失の可能性があることを示します。また、その問題を回避す るための方法も記載されています。 警告 : 物的損害、けが、または死亡の原因となる可能性があることを示します。 ____________________ この文書の情報は、事前の通知なく変更されることがあります。 © 2004-2005 すべての著作権は Dell Inc. にあります。 Dell Inc. の書面による許可のない複写は、いかなる形態においても厳重に禁止されています。 この文書に使用されている商標について:Dell、DELL のロゴ、および PowerConnect は Dell Inc. の商標です。Microsoft お よび Windows は Microsoft Corporation の登録商標です。 この文書では、上記記載以外の商標や会社名が使用されている場合があります。これらの商標や会社名は、一切 Dell Inc.
設置 概要 この文書では、Dell™ PowerConnect™ 6024 および 6024F システムの設置、設定、および操作 についての基本的な情報を説明します。詳細に関しては、『User Documentation CD』に収録され ている『ユーザーズガイド』を参照してください。マニュアルおよびソフトウェアのアップデートに ついては、デルサポートサイト(support.dell.com)をご覧ください。 設置場所の準備 PowerConnect 60xx デバイスは、標準 の 48.
www.dell.com | support.dell.
1 付属のラック取り付けブラケットを、デバイスの片方の側面に取り付けます。デバイスの取り 付け穴がラック取り付けブラケットの取り付け穴と揃っていることを確認してください。 図 1-1 は、ブラケットの取り付け位置を示します。 図 1-1. ブラケットの取り付け 2 付属のボルトをラック取り付け穴に差し込み、ドライバで締めます。 3 この手順を繰り返して、ラック取り付けブラケットをデバイスのもう片方の側面にも取り付け ます。 4 デバイスを 48.
www.dell.com | support.dell.com デバイスと電源ユニットの接続 付属の AC 電源ケーブルを、背面パネルの AC 電源コネクタに接続します。 メモ : この段階では、電源ケーブルをアースされた AC コンセントに接続しないでください。「デバイス の起動および設定」の説明に従ってデバイスを電源に接続します。 メモ : 製品情報ガイドの安全情報およびスイッチに接続したりサポートする他のデバイスに関する安全 情報を参照してください。 図 1-2.
デバイスの起動および設定 外部接続がすべて完了したら、ターミナルをデバイスに接続し、デバイスの設定を行います。追加の 詳細機能については、『User Documentation CD』に収録されている『ユーザーズガイド』を参照 してください。 メモ : 作業を続行する前にこの製品に関するリリースノートを参照してください。リリースノートは、 デルサポートサイト(support.jp.dell.com)からダウンロードできます。 メモ : デルサポートサイト(support.dell.
www.dell.com | support.dell.com 図 1-3.
メモ : Telnet(Telnet クライアント)または HTTP(ウェブブラウザ)からデバイスをリモート管理する 場合は、上記のすべての設定を行う必要があります。 デバイスの初期設定を行う前に、ネットワーク管理者から次の情報を入手してください。 • デバイス管理で使用する帯域外 Ethernet 管理ポートに割り当てられた IP アドレス • このネットワーク用の IP サブネットマスク • デフォルトルート設定に使用する帯域外 Ethernet 管理ポートのデフォルトゲートウェイの IP アドレス メモ : 帯域外 Ethernet 管理ポートの追加情報については、『ユーザーズガイド』を参照してください。 初期設定の手順 Dell PowerConnect イージーセットアップウィザードまたはコマンドラインインタフェース(CLI) を使用して初期設定を実行できます。デバイスの設定ファイルが存在しない場合は、セットアップ ウィザードが自動的に開始されます。ウィザードの起動中に [ctrl+z] を押すと、いつでも CLI が起動 します。CLI による初期設定の詳細に関しては、『ユーザーズ
www.dell.com | support.dell.com セットアップウィザードで基本的な設定を終えたら、帯域外 Ethernet 管理ポートからデ バイスを管理できます。 セットアップウィザードを開始しますか? (Y/N)[Y]) 1 [N] を入力すると、セットアップウィザードは終了します。60 秒以内に何も入力しない と、セットアップウィザードは自動的に終了して、CLI コンソールプロンプトが表示されます。 [Y] を入力すると、デバイスの初期設定が終了するまで対話型の案内が表示されます。 メモ : 60 秒以内に何も入力せず、ネットワーク上に BootP サーバーが存在する場合は、BootP サー バーからアドレスを取得します。 メモ : [ctrl+z] を押すと、いつでもセットアップウィザードを終了できます。 ウィザード手順 1 [Y] を入力すると、次の情報が表示されます。 The system is not setup for SNMP management by default.
To add a management station: Please enter the SNMP community string to be used:[Dell_NetWork_Manager] (SNMP 管理アカウントを設定するには、特定の管理システムがスイッチにアクセスするため に使用する、管理システム IP アドレスおよび「コミュニティ文字列」またはパスワードを 指定する必要があります。ウィザードはこのアカウントに、最高のアクセスレベル「特権レ ベル 15」を自動的に割り当てます。デルのネットワーク管理インタフェース、あるいはそ の他の管理インタフェースを使って、後でこの設定を変更したり、管理システムを追加した りできます。管理システムの追加についての詳細については、ユーザーマニュアルを参照し てください。 管理ステーションを追加するには: 使用される SNMP コミュニティ文字列を入力してください:[Dell_NetWork_Manager]) 2 ユーザーの SNMP コミュニティ文字列(例:MYSETUPWIZARD)を入力します。 3 Enter を押します。 ウィザード手順
www.dell.com | support.dell.com ユーザーアカウントを設定するには: ユーザー名を入力してください: ユーザーパスワードを入力してください: ユーザーパスワードを再度入力してください:) 1 次を入力します。 – ユーザー名(例:admin) – パスワードおよびパスワードの確認 メモ : 最初に入力したパスワードと 2 回目に入力したパスワードが異なる場合は、同じパスワードを入 力するようにプロンプトが表示されます。 2 3 4 5 6 Enter を押します。 パスワード(例:secret)を入力します。 Enter を押します。 同じパスワード(例:secret)を入力して、パスワードを確認します。 Enter を押します。 ウィザード手順 4 次の情報が表示されます。 Next, an IP address is setup. The IP address is defined on the OOB port.
ウィザード手順 5 次の情報が表示されます。 Finally, setup the default gateway. Please enter the IP address of the gateway from which this network is reachable (for example 192.168.1.1): (最後に、デフォルトゲートウェイを設定します。このネットワークから到達可能なゲート ウェイの IP アドレスを入力してください(例えば 192.168.1.1) :) 1 デフォルトゲートウェイ(例:192.168.1.1)を入力します。 2 Enter を押します。 次の情報が表示されます(上記のパラメータを入力した場合)。 This is the configuration information that has been collected: SNMP Interface = MYSETUPWIZARD@0.0.0.
www.dell.com | support.dell.com Configuring IP and subnet...... ............................... Thank you for using Dell Easy Setup Wizard. You will now enter CLI mode. (SNMP 管理インタフェースを設定しています。 ユーザーアカウントの設定 ....... IP およびサブネットの設定 ...... ...............................
Systemy Dell™ PowerConnect™ 6024/6024F Instrukcja uruchomienia www.dell.com | support.euro.dell.
Uwagi, ostrzeżenia i przestrogi UWAGA: UWAGA wskazuje na ważną informację, która pozwala lepiej wykorzystać posiadany system komputerowy. OSTRZEŻENIE: OSTRZEŻENIE informuje o sytuacjach, w których występuje ryzyko uszkodzenia sprzętu lub utraty danych i przedstawia sposoby uniknięcia problemu. PRZESTROGA: PRZESTROGA informuje o sytuacjach, w których występuje ryzyko uszkodzenia sprzętu, obrażeń lub śmierci. ____________________ Informacje zawarte w tym dokumencie mogą ulec zmianie bez uprzedzenia.
Instalacja Przegląd Ten dokument zawiera podstawowe informacje dotyczące instalacji, konfiguracji i działania systemów Dell™ PowerConnect™ 6024 i 6024F. Więcej informacji można znaleźć w Przewodniku użytkownika, który znajduje się na dysku CD z dokumentacją użytkownika, lub na stronie internetowej pomocy technicznej firmy Dell pod adresem support.euro.dell.com, gdzie zostały zamieszczone najnowsze aktualizacje dokumentacji i oprogramowania.
www.dell.com | support.dell.com • Instrukcja uruchomienia • Dokument zawierający informacje dotyczące bezpieczeństwa i prawne Rozpakowywanie urządzenia UWAGA: Przed rozpakowaniem urządzenia należy sprawdzić opakowanie i natychmiast zgłosić wszystkie ślady uszkodzenia. 1 Umieść opakowanie na czystej, płaskiej powierzchni i przetnij wszystkie paski zabezpieczające opakowanie. 2 Otwórz opakowanie lub zdejmij górę opakowania.
1 Umieść dostarczony wspornik do montażu w stojaku z jednej strony urządzenia, upewniając się, że otwory montażowe urządzenia pasują do otworów montażowych obejmy. Rysunek 1-1 pokazuje miejsce montażu wsporników. Rysunek 1-1. Montaż wsporników 2 Włóż dostarczone śruby w otwory do montażu w stojaku i dokręć je śrubokrętem. 3 Powtórz powyższe czynności dla wspornika do montażu w stojaku z drugiej strony urządzenia.
www.dell.com | support.dell.com Podłączanie urządzenia do zasilania Podłącz dostarczany kabel zasilania prądem zmiennym do złącza zasilania prądem zmiennym na panelu tylnym. UWAGA: Nie należy teraz podłączać kabla zasilania do uziemionego gniazdka prądu zmiennego. Należy podłączyć urządzenie do źródła zasilania w sposób opisany w punkcie „Uruchamianie i konfigurowanie urządzenia“.
Uruchamianie i konfigurowanie urządzenia Po wykonaniu wszystkich podłączeń zewnętrznych należy podłączyć do urządzenia terminal w celu skonfigurowania go. Dodatkowe zaawansowane funkcje są opisane w Przewodniku użytkownika znajdującym się na dysku CD z dokumentacją użytkownika. UWAGA: Przed kontynuowaniem należy przeczytać najnowsze informacje o urządzeniu. Najnowsze informacje można pobrać z witryny sieci Web pomocy technicznej firmy Dell pod adresem support.euro.dell.com.
www.dell.com | support.dell.com OSTRZEŻENIE: Podczas korzystania z programu HyperTerminal w systemie operacyjnym Microsoft Windows 2000 należy upewnić się, że zainstalowano dodatek Windows 2000 Service Pack 2 lub nowszy. Dodatek Windows 2000 Service Pack 2 zapewnia prawidłowe działanie klawiszy strzałek w przypadku emulacji VT100 programu HyperTerminal. Informacje na temat dodatków Service Pack do systemu Windows 2000 zostały podane pod adresem www.microsoft.com.
Wstępna konfiguracja UWAGA: Wstępna, prosta procedura konfiguracji jest oparta na następujących założeniach: • Urządzenie PowerConnect nie było nigdy przedtem konfigurowane i znajduje się w tym samym stanie, co w chwili dostawy. • Uruchomienie urządzenia PowerConnect zakończyło się powodzeniem. • Zostało nawiązane połączenie z konsolą i monit konsoli został wyświetlony na ekranie terminala VT100. Wstępna konfiguracja urządzenia odbywa się za pomocą portu konsoli.
www.dell.com | support.dell.com Welcome to Dell Easy Setup Wizard (Witamy w Kreatorze łatwej konfiguracji firmy Dell) The Setup Wizard guides you through the initial switch configuration, and gets you up and running easily and quickly. You can also skip the setup wizard, and enter CLI mode to manually configure the switch if you prefer. (Kreator konfiguracji poprowadzi Cię przez proces wstępnej konfiguracji przełącznika oraz umożliwi jego łatwe i szybkie uruchomienie.
• Setup the initial SNMP version 2 account now. (Skonfigurować teraz wstępne konto protokołu SNMP w wersji 2.) • Return later and setup the SNMP version 2 account. (For more information on setting up a SNMP version 2 account, see the user documentation). (Powrócić później do konfiguracji konta protokołu SNMP w wersji 2. [Więcej informacji na temat konfiguracji konta protokołu SNMP w wersji 2 można znaleźć w dokumentacji użytkownika.]).
www.dell.com | support.dell.com Etap 2 Kreatora Please enter the IP address of the Management System (A.B.C.D) or wildcard (0.0.0.0) to manage from any Management Station (Wpisz adres IP systemu zarządzania (A.B.C.D) lub znak uniwersalny (0.0.0.0), aby zarządzać z dowolnej stacji zarządzania):[0.0.0.0] 1 Wpisz – 2 adres IP systemu zarządzania, np. „0.0.0.0“, lub maskę uniwersalną. Naciśnij klawisz Enter.
5 Potwierdź hasło, wprowadzając identyczny ciąg znaków, np. „tajemnica“. 6 Naciśnij klawisz Enter. Etap 4 Kreatora Zostanie wyświetlona następująca informacja: Next, an IP address is setup. Adres IP jest definiowany na porcie OOB. This is the IP address you use to access the CLI, Web interface, or SNMP interface for the switch. (Następnie należy skonfigurować adres IP. Jest to adres IP używany do uzyskiwania dostępu do interfejsu CLI, WWW lub SNMP przełącznika.
www.dell.com | support.dell.com User Account setup = admin (Konfiguracja konta użytkownika = admin) Password = ********** (Hasło = **********) Management IP address = 192.168.1.100 255.255.255.0 (Adres IP zarządzania = 192.168.1.100 255.255.255.0) Default Gateway = 192.168.1.1 (Domyślna brama = 192.168.1.1) Etap 6 Kreatora Zostanie wyświetlona następująca informacja: If the information is correct, please select (Y) to save the configuration, and copy to the start-up configuration file.
Sistemas Dell™ PowerConnect™ 6024/6024F Guía de introducción w w w. d e l l . c o m | s u p p o r t . d e l l .
Notas, avisos y precauciones NOTA: Una NOTA indica información importante que le ayuda a hacer un mejor uso del equipo. AVISO: Un AVISO indica la posibilidad de daños en el hardware o pérdida de datos, y le explica cómo evitar el problema. PRECAUCIÓN: Un aviso de PRECAUCIÓN indica el riesgo de daños en la propiedad, lesiones personales o incluso la muerte. ____________________ La información contenida en este documento puede modificarse sin aviso previo. © 2004-2005 Dell Inc. Todos los derechos reservados.
Instalación Visión general En este documento se proporciona información básica para instalar, configurar y poner en funcionamiento los sistemas Dell™ PowerConnect™ 6024 y 6024F. Para obtener más información, consulte la Guía del usuario, que está disponible en el CD de documentación del usuario, o visite el sitio web Dell Support en support.dell.com para obtener las últimas actualizaciones de la documentación y el software.
www.dell.com | support.dell.com • Un conjunto de almohadillas de goma autoadhesivas para el dispositivo independiente (se incluyen cuatro almohadillas) • CD de documentación del usuario • Guía de introducción • Documento Información reglamentaria y de seguridad Desembalaje del dispositivo NOTA: Antes de desembalar el dispositivo, examine el contenedor e informe inmediatamente de cualquier daño.
1 Coloque el soporte de montaje en estante suministrado en un lateral del dispositivo y asegúrese de que los agujeros de montaje del dispositivo coinciden con los agujeros de montaje del soporte de montaje en estante. En la Figura 1-1 se muestra dónde montar los soportes. Figura 1-1. Fijación de los soportes 2 Inserte los tornillos suministrados en los agujeros de montaje en estante y apriételos con un destornillador.
www.dell.com | support.dell.com 1 Fije las almohadillas de goma autoadhesivas en cada una de las ubicaciones que se señalan en la parte inferior del chasis. 2 Coloque el dispositivo en una superficie plana y deje 5,08 cm (2 pulgadas) de separación a ambos lados y 12,7 cm (5 pulgadas) en la parte posterior. 3 Asegúrese de que el dispositivo está correctamente ventilado.
Inicio y configuración del dispositivo Después de realizar todas las conexiones externas, conecte un terminal al dispositivo para configurar el dispositivo. En la Guía del usuario que se encuentra en el CD de documentación del usuario se describen más funciones avanzadas. NOTA: Antes de continuar, lea las notas de la versión de este producto. Las notas de la versión se pueden descargar del sitio web Dell Support en la dirección support.dell.com.
www.dell.com | support.dell.com 3 Conecte el conector hembra del cable cruzado RS-232 directamente al puerto de la consola del dispositivo y apriete los tornillos cautivos de retención. Los puertos de consola de los dispositivos PowerConnect 6024 y 6024F se encuentran en el panel anterior tal como se muestra en la Figura 1-3. Figura 1-3.
Configuración inicial NOTA: El procedimiento de configuración sencilla inicial se basa en los siguientes supuestos: • El dispositivo PowerConnect no se ha configurado antes y se encuentra en el mismo estado que cuando lo recibió. • El dispositivo PowerConnect se ha iniciado correctamente. • Se ha establecido la conexión de la consola y la petición de consola aparece en la pantalla de un dispositivo de terminal VT100. La configuración inicial del dispositivo se realiza mediante el puerto de la consola.
www.dell.com | support.dell.com Después de que el dispositivo haya completado la POST y se haya iniciado, aparece la siguiente información: Welcome to Dell Easy Setup Wizard The Setup Wizard guides you through the initial switch configuration, and gets you up and running easily and quickly. You can also skip the setup wizard, and enter CLI mode to manually configure the switch if you prefer. You can exit the Setup Wizard at any time by entering [ctrl+Z].
Paso 1 del asistente Si escribe [Y] aparece la siguiente información: The system is not setup for SNMP management by default. To manage the switch using SNMP (required for Dell Network Manager) you can: • Setup the initial SNMP version 2 account now. • Return later and setup the SNMP version 2 account. (For more information on setting up a SNMP version 2 account, see the user documentation).
www.dell.com | support.dell.com cuenta. Puede utilizar Dell Network Manager u otras interfaces de gestión para modificar este valor más tarde así como para agregar un sistema de gestión adicional posteriormente. Si desea obtener más información sobre cómo agregar sistemas de gestión, consulte la documentación del usuario.
(Ahora es necesario configurar su cuenta de usuario de privilegio inicial (Nivel 15). Esta cuenta se utiliza para iniciar la sesión de la CLI y la interfaz web. Podrá configurar otras cuentas y cambiar los niveles de privilegio más tarde. Si desea obtener más información sobre la configuración de las cuentas de usuario y la modificación de los niveles de privilegio, consulte la documentación del usuario.
www.dell.com | support.dell.com Introduzca la dirección IP del dispositivo (A.B.C.D): Introduzca la máscara de subred IP (A.B.C.D o /nn):) 1 Introduzca la dirección IP, por ejemplo 192.168.1.100. 2 Pulse Intro. 3 Introduzca la máscara de subred IP, por ejemplo 255.255.255.0 4 Pulse Intro. Paso 5 del asistente Aparece la siguiente información: Finally, setup the default gateway. Please enter the IP address of the gateway from which this network is reachable (for example 192.168.1.
Paso 6 del asistente Aparece la siguiente información: If the information is correct, please select (Y) to save the configuration, and copy to the start-up configuration file. If the information is incorrect, select (N) to discard configuration and restart the wizard: [Y/N] (Si la información es correcta, seleccione (S) para guardar la configuración y copiarla en el archivo de configuración de inicio.
136 Guía de introducción www.dell.com | support.dell.
| 150מדריך מידע מערכת
User Account setup = admin ********** = Password Management IP address = 192.168.1.100 255.255.255.0 Default Gateway = 192.168.1.1 ממשק SNMP = MYSETUPWIZARD@0.0.0.0 הגדרת חשבון משתמש = admin סיסמה = ********** כתובת IPניהול = 255.255.255.0 192.168.1.100 שער ברירת מחדל = 192.168.1.1 שלב 6של האשף המידע הבא מופיע: If the information is correct, please select (Y) to save the configuration, and copy to the start-up configuration file.
.Enter הקש4 ."secret" לדוגמה,ידי הזנת מחרוזת זהה- על, אשר את הסיסמה5 .Enter הקש6 של האשף4 שלב :המידע הבא מופיע Next, an IP address is setup. The IP address is defined on the OOB port. This is the IP address you use to access the CLI, Web interface, or SNMP interface for the switch. To setup an IP address: Please enter the IP address of the device (A.B.C.D): Please enter the IP subnet mask (A.B.C.D or /nn): זוהי.OOB מוגדרת ביציאהIP - כתובת ה.
הזן את כתובת ה IP -של מערכת הניהול ) (A.B.C.Dאו תווים כלליים ) (0.0.0.0כדי לנהל מכל תחנת ניהול[0.0.0.0]: 1הזן כתובת IPשל מערכת ניהול ,לדוגמה " ,"0.0.0.0או מסיכת תווים כלליים. 2הקש .Enter שלב 3של האשף המידע הבא מופיע: Now we need to setup your initial privilege (Level 15) user account. This account is used to login to the CLI and Web interface. You may setup other accounts and change privilege levels later.
של האשף1 שלב : המידע הבא יופיע,[Y] אם תקיש The system is not setup for SNMP management by default. To manage the switch using SNMP (required for Dell Network Manager) you can: • Setup the initial SNMP version 2 account now. • Return later and setup the SNMP version 2 account. (For more information on setting up a SNMP version 2 account, see the user documentation). Would you like to setup the SNMP management interface now? (Y/N)[Y] כדי לנהל את המתג.
• מחרוזת קהילת SNMPוכתובת IPשל מערכת ניהול ) SNMPאופציונלי( • שם משתמש וסיסמה • כתובת IPשל יציאת ניהול Out-of-Band Ethernet • כתובת שער ברירת מחדל של יציאת ניהול Out-of-Band Ethernet לאחר שההתקן משלים את ה POST -ומאותחל ,מופיע המידע הבא: Welcome to Dell Easy Setup Wizard The Setup Wizard guides you through the initial switch configuration, and gets you up and running easily and quickly.
אתחול ההתקן כדי לאתחל את ההתקן ,בצע את השלבים הבאים: 1ודא שיציאת המסוף של ההתקן מחוברת להתקן מסוף VT100או למדמה מסוף ,VT100דרך כבל מוצלב .RS-232 2אתר שקע חשמל. 3נטרל את שקע החשמל. 4חבר את ההתקן אל השקע. 5הפעל את שקע החשמל. ברגע ההפעלה ,כאשר המסוף המקומי כבר מחובר ,ההתקן עובר בדיקה עצמית בהפעלה ).(POST - power-on self-test POSTמופעל בכל אתחול של ההתקן ובודק את רכיבי החומרה כדי לקבוע אם ההתקן מוכן לשימוש ,לפני אתחול מלא .
2 ודא שתוכנת הדמיית המסוף מוגדרת באופן הבא: aבחר את היציאה הטורית המתאימה )יציאה טורית 1או יציאה טורית (2לחיבור אל המסוף. bהגדר את קצב השידור ל.115200 baud - cהגדר את תבנית הנתונים ל 8 -סיביות נתונים ,סיבית עצירה ,1וללא זוגיות. dהגדר את בקרת הזרימה כ.none - eתחת ) Propertiesמאפיינים( ,בחר במצב .VT100 for Emulation fבחר Terminal keysעבור .Function, Arrow and Ctrl keysודא שההגדרה היא עבור Terminal ) keysלא עבור .
איור .2-1חיבור כבל החשמל הפעלה והגדרת תצורה של ההתקן לאחר השלמת כל החיבורים החיצוניים ,חבר מסוף להתקן ,כדי להגדיר את תצורת ההתקן .פונקציות מתקדמות נוספות מתוארות במדריך למשתמש הנמצא בתקליטור תיעוד המשתמש. הערה :לפני שתמשיך ,קרא את הערות המוצר של מוצר זה .ניתן להוריד את הערות המוצר מאתר התמיכה של Dellבכתובת .support.dell.com הערה :מומלץ להשיג את הגרסה המעודכנת ביותר של תיעוד המשתמש מאתר התמיכה של Dell בכתובת .support.dell.
3 חזור על התהליך עבור כן ההרכבה במעמד בצד השני של ההתקן. 4 הכנס את ההתקן לתוך מעמד 48.26ס”מ ) 19אינץ’( ,וודא שחורי ההרכבה במעמד בהתקן מיושרים עם חורי ההרכבה במעמד. 5 אבטח את היחידה למעמד באמצעות בורגי המעמד או באומים או באומים עם דסקיות )בהתאם לסוג המעמד שברשותך( .הדק תחילה את הברגים התחתונים ,לפני הידוק הברגים העליונים .ודא שחורי האוורור אינם חסומים. התראה :ודא שבורגי המעמד המצורפים מתאימים לחורים המוכנים במעמד.
3 הסר בזהירות את ההתקן מהאריזה והנח אותו על משטח יציב ונקי. 4 הסר את כל חומרי האריזה. 5 בדוק אם המוצר נפגע .דווח מיד על כל נזק. הרכבת ההתקן ההוראות הבאות חלות על התקני .PowerConnect 60xx seriesב PowerConnect 6024/6024F -יציאת המסוף נמצאת בלוח הקדמי. מחברי החשמל ממוקמים בלוח האחורי של ההתקן .מומלץ מאוד לחבר שני מקורות חשמל עם אפשרות החלפה חמה. התקנה במעמד התראה :אין להשתמש בערכות ההרכבה כדי לתלות את ההתקן מתחת לשולחן או כדי לחברו לקיר.
סקירה כללית מסמך זה מספק מידע בסיסי להתקנה ,להגדרת התצורה ולהפעלה של מערכות .Dell™ PowerConnect™ 6024/6024F לקבלת מידע נוסף ,עיין במדריך למשתמש ,אשר זמין בתקליטור תיעוד המשתמש שברשותך; לחילופין ,לקבלת עדכוני התיעוד והתוכנה האחרונים ,בקר באתר התמיכה של Dellבכתובת .support.dell.com הכנת האתר ניתן להרכיב התקני PowerConnect 60xxבמעמד ציוד סטנדרטי של 48.26ס"מ ) 19אינץ'( או להשאירם כהתקן עצמאי ,כלומר להניחם על שולחן .
הערות ,הודעות והתראות הערה” :הערה“ מציינת מידע חשוב המסייע להשתמש במחשב בית יעילות. שים לב” :שים לב“ מציין נזק אפשרי לחומרה או אובדן נתונים ,ומסביר כיצד ניתן למנוע את הבעיה. התראה” :התראה“ מציינת אפשרות של נזק לרכוש ,פגיעה גופנית או מוות. ____________________ המידע במסמך זה עשוי להשתנות ללא הודעה. .© 2004-2005 Dell Incכל הזכויות שמורות. חל איסור מוחלט על העתקה מכל סוג ללא הרשאה בכתב מ.
Dell™ PowerConnect™ 6024/6024F מערכות מדריך תחילת עבודה w w w. d e l l . c o m | s u p p o r t . d e l l .
Printed in China. 中国印刷. Vytištěno v Číně. Imprimé en Chine. Gedruckt in China. Εκτυπώθηκε στην Κίνα. Wydrukowano w Chinach. Impreso en China. .הודפס בסין Printed on Recycled Paper.