Dell™ PowerConnect™ M6348 Stackable Switches Getting Started Guide 使用入门指南 入門指南 Guide de mise en route Handbuch zum Einstieg Panduan Pengaktifan はじめに 시작 안내서 Guía de introducción מדריך תחילת עבודה Model PCM6348 w w w. d e l l . c o m | s u p p o r t . d e l l .
Dell™ PowerConnect™ M6348 Stackable Switch Getting Started Guide Model PCM6348 w w w. d e l l . c o m | s u p p o r t . d e l l .
Notes, Notices, and Cautions NOTE: A NOTE indicates important information that helps you make better use of your computer. NOTICE: A NOTICE indicates either potential damage to hardware or loss of data and tells you how to avoid the problem. CAUTION: A CAUTION indicates a potential for property damage, personal injury, or death. ____________________ Information in this document is subject to change without notice. © 2009 Dell Inc. All rights reserved.
Contents Installation Site Preparation . . . . . . . . . . . . . . . . . . . . . . . . . . . . . . Unpacking the Switch . . . . . . . . . . . . . . . . . . . . . . . . . . . Package Contents . Unpacking Steps . . . . . . . . . . . . . . . . . . . . . . . . . . . . . . . . . . . . . . . . . . . . . . . . . . . . . Connecting a Switch to a Terminal Assembling a Stack 5 5 5 5 . . . . . . . . . . . . . . . . . . . . . 6 . . . . . . . . . . . . . . . . . . . . . . . . . . . .
Advanced Configuration . . . . . . . . . . . . . . . . . . . . . . . . . . 16 . . . . . . . . . . 16 17 . . . . . . . . . . . . . . . . 20 . . . . . . . . . . . . . . . . . . . . . 20 20 Retrieving an IP Address From a DHCP Server . . . Security Management and Password Configuration . . . . . . . . . . . Managing the Switch Using a Web Browser to Manage the Switch Starting the Application . . . Understanding the Interface . 4 . . . . . . . . . . . . . . . . . . . . .
Installation This document provides basic information to install, configure, and operate Dell™ PowerConnect™ M6348 systems. For more information, see the Hardware Owner’s Manual, which is available on your User Documentation CD, or check the Dell Support web site at support.dell.com for the latest updates on documentation and firmware. Site Preparation Before installing the switch, make sure that the chosen installation location meets the site requirements specified in the Hardware Owner’s Manual.
www.dell.com | support.dell.com Connecting a Switch to a Terminal 1 Connect the DB9 connector of the USB-to-DB9 serial cable to a VT100 terminal or to a computer running VT100 terminal emulation software. 2 Connect the USB connector at the other end to the USB port on the switch. NOTE: If you are installing a stack of switches, connect the terminal to the Master Switch. When a stack is powered up for the first time, the switches elect the Master Switch, which may occupy any location in the stack.
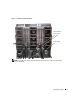
Figure 1. Connecting a Stack of Switches upper and lower stacking ports stacking cable NOTE: The resulting ring topology allows the entire stack to function as a single switch with resilient fail-over capabilities.
www.dell.com | support.dell.com Starting and Configuring the Switch After completing all external connections, connect a terminal to a switch to configure the switch or stack. Additional advanced functions are described in the User's Guide located on your User Documentation CD. NOTE: Read the release notes for this product before proceeding. You can download the release notes from the Dell Support website at support.dell.com.
3 Connect the USB type A connector on the USB cable directly to the switch USB console port. The PowerConnect M6348 USB console port is located on the left side of the rear panel, as shown in Figure 2. NOTE: If you are installing a stack of switches, connect the terminal to the Master Switch. When a stack is powered up for the first time, the switches elect the Master Switch, which may occupy any location in the stack. If you connect the terminal to a member switch, you will not be able to use the CLI.
www.dell.com | support.dell.com Before setting up the initial configuration of the switch, obtain the following information from your network administrator: • The IP address to be assigned to the management VLAN. • The IP subnet mask for the network. • The IP address of the management VLAN default gateway. Initial Configuration Procedure You can perform the initial configuration using the Dell Easy Setup Wizard, or by using the Command Line Interface (CLI).
The setup wizard configures the initial values as defined above. After you complete the wizard, the switch is configured as follows: • SNMPv1/2c is enabled and the community string is set up as defined above. SNMPv3 is disabled by default. • The admin user account is set up as defined. • A network management system is configured. From this management station, you can access the SNMP, HTTP, and CLI interfaces.
www.dell.com | support.dell.com Step 2: Now we need to setup your initial privilege (Level 15) user account. This account is used to login to the CLI and Web interface. You may setup other accounts and change privilege levels later. For more information on setting up user accounts and changing privilege levels, see the user documentation. To setup a user account: Please enter the user name.
Step 6: If the information is correct, please select (Y) to save the configuration, and copy to the start-up configuration file. If the information is incorrect, select (N) to discard configuration and restart the wizard: [Y/N] y Thank you for using Dell Easy Set up Wizard. You will now enter CLI mode. Managing a Stack Master and Member Switches A stack of switches can be managed as a single entity when connected together.
www.dell.com | support.dell.com Auto Stack ID Assignment During the stack formation process, every switch is assigned a Stack ID. Once Stack ID assignment is complete, each switch saves its Stack ID into the nonvolatile FLASH memory. You can use the CLI or the Web interface to view the stack IDs. Firmware Version Checking Following Stack ID assignment, the Master Switch performs a consistency check to make sure that all switches in the stack are running the same firmware version.
CLI/ Telnet/ Web Interface You can use the CLI / WEB / SNMP to synchronize the firmware that is stored in the Master Switch to a member switch. Insertion and Removal of Switches You can insert and remove switches to/from the current stack without cycling the power. The entire network may be affected when a topology change occurs, as a stack reconfiguration will take place. A new Master Switch will not be re-elected, unless the Master Switch was removed from the stack.
www.dell.com | support.dell.com Advanced Configuration This section provides summary information about such common tasks as: • Retrieving an IP Address From a DHCP Server • Security Management and Password Configuration NOTE: For detailed information on all the CLI commands available for the 8024 and 8024F M6348 switches, see the CLI Reference Guide. Retrieving an IP Address From a DHCP Server When using the DHCP protocol to retrieve an IP address, the switch acts as a DHCP client.
Routing Interfaces: Interface IP Address IP Mask Netdir Multi Bcast CastFwd ---------- --------------- --------------- -------- -------vlan1 192.168.10.10 255.255.255.0 Disable Disable vlan2 0.0.0.0 0.0.0.0 Enable Disable loopback2 0.0.0.0 0.0.0.0 Disable Disable Security Management and Password Configuration System security is handled through the AAA (Authentication, Authorization, and Accounting) mechanism that manages user access rights, privileges, and management methods.
www.dell.com | support.dell.
Configuring an Initial HTTPS Password To configure an initial HTTPS password, enter the following commands: console(config)#ip https authentication local NOTE: You should generate a new crypto certificate each time you upgrade (install a new version of) the control software application on the switch. Enter the following commands once when configuring to use an HTTPS session over a console, a Telnet, or an SSH session. NOTE: In the Web browser enable SSL 2.0 or greater for the page content to appear.
www.dell.com | support.dell.com Managing the Switch You can manage the switch by using the Web-based interface, command-line interface (CLI), or SNMP. To manage the switch by using a Web browser or SNMP, the switch must have an IP address, and it must be accessible from the management station. To manage the switch by using the CLI, you can use a direct console connection or a remote Telnet/SSH connection.
Dell™ PowerConnect™ M6348 交换机 使用入门指南 型号 PCM6348 w w w. d e l l . c o m | s u p p o r t . d e l l .
注、注意和警告 注:“注”表示可以帮助您更好地使用计算机的重要信息。 注意:“注意”表示可能会损坏硬件或导致数据丢失,并告诉您如何避免此类问题。 警告:“警告”表示可能会导致财产损失、人身伤害甚至死亡。 ____________________ 本说明文件中的信息如有更改,恕不另行通知。 © 2009 Dell Inc. 版权所有,翻印必究。 未经 Dell Inc. 书面许可,不得以任何方式进行复制。 本文中使用的商标:Dell、DELL 徽标和 PowerConnect 是 Dell Inc. 的商标; Microsoft 和 Windows 是 Microsoft Corporation 的注册 商标。 本说明文件中述及的其它商标和产品名称是指拥有相应商标和产品名称的公司或其制造的产品。 Dell Inc. 对本公司的商标和产品 名称之外的其它商标和产品名称不拥有任何专有权。 型号 PCM6348 2009 年 11 月 P/N H851N Rev.
目录 安装 现场准备 25 . . . . . . . . . . . . . . . . . . . . . . . . . . . . . . . . . 打开交换机包装 . . . . . . . . . . . . . . . . . . . . . . . . . . . . . 25 包装箱物品 . . . . . . . . . . . . . . . . . . . . . . . . 25 打开包装步骤 . . . . . . . . . . . . . . . . . . . . . . . 25 将交换机连接至终端 组装堆栈 . . . . . . . . . . . . . . . . . . . . . . . . . . . 25 . . . . . . . . . . . . . . . . . . . . . . . . . . . . . . . . . 26 启动和配置交换机 将终端连接至交换机 引导交换机 . . . . . . . . . . . . . . . . . . . . . . . . . . . . 27 . . . . . .
高级配置 35 从 DHCP 服务器检索 IP 地址 . . . . . . . . . . . . . . . . . 35 安全保护管理和密码配置 . . . . . . . . . . . . . . . . . . 37 . . . . . . . . . . . . . . . . . . . . . . . . . . . . . . . . . 管理交换机 使用 Web 浏览器管理交换机 . . . . . . . . . . . . . . . . . . . . . . . 39 启动应用程序 . . . . . . . . . . . . . . . . . . . . . . . 39 了解接口 . . . . . . . . . . . . . . . . . . . . . . . . .
安装 本说明文件介绍有关安装、配置和操作 Dell™ PowerConnect™ M6348 系统的基本信息。 有关详情,请参阅 User Documentation CD 上的《硬件用户手册》,或访问 Dell 支持网站 support.dell.
www.dell.com | support.dell.com 组装堆栈 软件最多支持 12 个堆栈式交换机,最多支持 576 个 1G 端口。 每台 PowerConnect M6348 交换机在交换机底部提供两个堆栈端口。 警告:将交换机添加到堆栈之前,确保该交换机已关闭。 使用 1 米长的堆栈电缆按以下方式连接堆栈端口: 1 将堆栈电缆插入到第一台交换机的底部堆栈端口中。 2 将电缆连接至下一台交换机的顶部堆栈端口。 3 继续将每台交换机连接至下一台交换机,直到将所有的交换机连接成环型。 4 在堆栈中的最后一台交换机上,将电缆连接至第一台交换机的顶部堆栈端口以构成 环路。 如果有必要,请使用单独购买的 3 米长堆栈电缆将最后一台交换机连接至第一台交 换机。 图 1 所示为包含 6 个已连接 M6348 交换机的机箱。 图 1.
启动和配置交换机 完成所有外部连接后,将某个终端与交换机相连,以配置交换机或堆栈。 User Documentation CD 上的《用户指南》中介绍了其它高级功能。 注:在继续操作之前,请阅读本产品的版本注释。可以从 Dell 支持网站 support.dell.com 下载版 本注释。 注:我们建议您从 Dell 支持网站 support.dell.
www.dell.com | support.dell.com 图 2.
初始配置过程 可以使用 Dell 简易安装向导或命令行界面 (CLI) 来进行初始配置。当交换机配置文件为 空时,将自动启动该安装向导。可以随时通过输入 [ctrl+z] 退出向导,但指定的所有配置 设置将被丢弃(交换机将使用默认值)。 有关 CLI 初始配置的详情,请参阅《用户指南》。 本《使用入门指南》说明了如何使用该 安装向导来进行初始交换机配置。该向导设置交换机的以下配置: • 建立具有权限的初始用户帐户以及有效的密码。在安装过程中,该向导将配置一个具有 权限的用户帐户。 • 启用 CLI 登录和 HTTP 访问,以便仅使用本地验证设置。 • 设置管理 VLAN 的 IP 地址。 • 设置 SNMP 管理器在指定 IP 地址要使用的 SNMP 团体字符串。如果该交换机不使用 SNMP 管理,则可以选择跳过这一步。 • 可以指定管理服务器 IP,或允许从所有 IP 地址中进行管理访问。 • 配置默认网关 IP 地址。 示例会话 本节介绍了一个简易安装向导会话。示例会话将使用以下值: • 要使用的 SNMP 团体字符串为 DellNetworkManager。 • 网络管理系
www.dell.com | support.dell.com 以下示例包含与使用上面列出的输入值运行 Dell 简易安装向导示例会话相关的提示和响应 序列。 交换机完成 POST 并引导后,将显示以下对话信息: Unit 1 - Waiting to select management unit (单元 1 - 正在等待选择管理 单元) )> Applying configuration, please wait ... (正在应用配置,请稍候 ...) Welcome to Dell Easy Setup Wizard (欢迎使用 Dell 简易安装向导) The Setup Wizard guides you through the initial switch configuration, and gets you up and running as quickly as possible.You can skip the setup wizard, and enter CLI mode to manually configure the switch.
To setup the SNMP management account you must specify the management system IP address and the "community string" or password that the particular management system uses to access the switch. The wizard automatically assigns the highest access level [Privilege Level 15] to this account. You can use Dell Network Manager or other management interfaces to change this setting and to add additional management systems later. For more information on adding management systems, see the User's Guide.
www.dell.com | support.dell.com 步骤 3: Next, an IP address is setup. The IP address is defined on the default VLAN (VLAN #1), of which all ports are members. This is the IP address you use to access the CLI, Web interface, or SNMP interface for the switch. Optionally you may request that the system automatically retrieve an IP address from the network via DHCP (this requires that you have a DHCP server running on the network).
步骤 6: If the information is correct, please select (Y) to save the configuration, and copy to the start-up configuration file. If the information is incorrect, select (N) to discard configuration and restart the wizard:[Y/N](如果信息正确,请选择 [Y] 保存配置,并将其复制到启 动配置文件。如果信息不正确,请选择 [N] 丢弃配置,然后重新启动向导:[Y/N]) y Thank you for using Dell Easy Set up Wizard. You will now enter CLI mode.
www.dell.com | support.dell.
堆栈 ID 重新编号 可以手动为交换机分配堆栈 ID。 一台交换机只能分配一个堆栈 ID,而且该堆栈 ID 尚未分 配给堆栈中的其它交换机。 为新堆栈 ID 保存的任何配置信息将应用到获得该堆栈 ID 的交 换机。 用户控件 使用以下 CLI 命令控制这一功能。有关每个命令的语法的详情,请参阅《CLI 参考手册》。 movemanagement reload member set description switch priority switch renumber stacking show stack-port show stack-port counters show stack-port diag show switch show supported switchtype 高级配置 本节提供有关以下常见任务的摘要信息: • 从 DHCP 服务器检索 IP 地址 • 安全保护管理和密码配置 注:有关可用于 8024 和 8024F M6348 交换机的所有 CLI 命令的详情,请参阅《CLI 参考指南》。 从 DHCP 服务器检索 IP 地址 使用 DHCP 协议检索 IP 地址时,该交换机
www.dell.com | support.dell.com 2 输入以下命令,以使用选定的端口来获取 IP 地址。 console#config console(config)#ip address dhcp 接口将自动获取 IP 地址。 3 要验证 IP 地址,请在系统提示符后输入 show ip interface 命令,如下例中所示。 console#show ip interface Management Interface: (管理接口:) IP Address (IP 地址) ............................. 10.240.4.125 Subnet Mask (子网掩码) ........................... 255.255.255.0 Default Gateway (默认网关) .......................... 10.240.4.1 Burned In MAC Address (固化 MAC 地址) .........
安全保护管理和密码配置 系统安全保护是通过 AAA(验证、授权和计费)机制进行处理的,它可以管理用户访问 权限、特权和管理方法。AAA 使用本地和远程用户数据库。数据加密是通过 SSH 机制进行 处理的。 系统在出厂时未配置默认密码;所有密码均由用户定义。 如果用户定义的密码丢失,则可 以从 Boot(引导)菜单中调用密码恢复程序。该程序仅适用于本地终端,并允许在不输入 密码的情况下从本地终端一次性访问交换机。 配置安全保护密码 您可以为以下服务配置安全保护密码: 控制台 • • Telnet • SSH • HTTP • HTTPS 注:创建用户名时,默认的优先级为 "1",即允许访问权限但不允许配置权限。必须将优先级设 置为 "15" 才能启用对交换机的访问权限和配置权限。 配置初始控制台密码 要配置初始控制台密码,请输入以下命令: console(config)#aaa authentication login default line console(config)#aaa authentication enable default line console(config)#li
www.dell.com | support.dell.
管理交换机 您可以通过基于 Web 的接口、命令行界面 (CLI) 或 SNMP 管理交换机。 要通过 Web 浏览 器或 SNMP 管理交换机,交换机必须具有 IP 地址,并且必须可从管理站进行访问。 要通 过 CLI 管理交换机,可以使用直接的控制台连接或远程 Telnet/SSH 连接。 要建立到 CLI 的直接控制台连接,请参阅第 27 页的“将终端连接至交换机”。 您可以 使用简易安装向导执行初始配置,以允许远程管理访问(请参阅第 29 页的“初始配置 过程”)。 有关使用 CLI 配置远程管理的说明,请参阅《用户指南》。 使用 Web 浏览器管理交换机 启动应用程序 1 打开 Web 浏览器。 2 在地址栏中输入交换机的 IP 地址(如 CLI 中所定义)并按 键。 有关为交换机分配 IP 地址的信息,请参阅第 28 页的“初始配置”。 3 当显示 Login(登录)窗口时,请输入用户名和密码。 注:交换机未配置默认密码,可以在通过控制台端口连接到 CLI 时对交换机进行配置而无需输 入密码。密码区分大小写,并且只能为字母数字。 有关恢复丢失密码的信息,请参阅《用户 指南》。 4
40 使用入门指南 www.dell.com | support.dell.
Dell™ PowerConnect™ M6348 交換機 入門指南 機型 PCM6348 w w w. d e l l . c o m | s u p p o r t . d e l l .
註,注意,警示 註:「註」指出可協助您善加利用電腦的重要資訊。 注意:「注意」表示可能會損壞硬體或導致資料遺失,並告訴您如何避免此類問題的發生。 警示 : 「警示」表示可能會導致財產損壞、人身受傷或生命危險。 ____________________ 對本文件中所含資訊之變更恕不另行通知。 © 2009 Dell Inc. 版權所有,翻印必究。 未經 Dell Inc. 之書面許可,不得以任何方式重製。 本文所用商標:Dell、DELL 標誌以及 PowerConnect 是 Dell Inc. 的商標;Microsoft 和 Windows 是 Microsoft Corporation 的註冊 商標。 本文件所述及之其他商標或品牌名稱,均各自分屬其商標或產品名稱之申請者或擁有者所擁有。Dell Inc. 對本公司之外的商標和 產品名稱不擁有任何專有權。 機型 PCM6348 2009 年 11 月 P/N H851N Rev.
目錄 安裝 現場準備 . . . . . . . . . . . . . . . . . . . . . . . . . . . . . . . . . 拆開交換機包裝 . . . . . . . . . . . . . . . . . . . . . . . . . . . . . 45 45 包裝箱物品 . . 拆開包裝的步驟 . . . . . . . . . . . . . . . . . . . . . . . . . . . 45 45 將交換機連接至終端 . . . . . . . . . . . . . . . . . . . . . . . . . . . 46 . . . . . . . . . . . . . . . . . . . . . . . . . . . . . . . . . 46 組裝堆疊 . . . . . . . . . . . . . . . . . . . . . . . . . . . 啟動和設定交換機 將終端連接至交換機 . . . . . . . . . . . . . . . . . . . . . . . . . . .
進階設定 . . . . . . . . . . . . . . . . . . . . . . . . . . . . . . . . . 從 DHCP 伺服器擷取 IP 位址 . 安全管理和密碼設定 . . . . . . . . . . . . . . . . . . . . . . . . 56 . . . . . . . . . . . . . . . . . . . . 56 58 . . . . . . . . . . . . . . . . . . . . . . . 60 . . . . . . . . . . . . . . . . . . . . . . . . . . . . 60 60 管理交換機 使用 Web 瀏覽器管理交換機 啟動應用程式 瞭解介面 . . . 44 . . . . . . . . . . . . . . . . . . . . . . . . . . . .
安裝 本文件提供安裝、設定及操作 Dell™ PowerConnect™ M6348 系統的基本資訊。 如需詳細 資訊,請參閱 User Documentation CD 上的《硬體使用者手冊》,或存取 Dell 支援網站 support.dell.
www.dell.com | support.dell.
圖 1.
www.dell.com | support.dell.com 啟動和設定交換機 完成所有外部連接之後 ,,將終端連接至交換機以設定該交換機或堆疊。 User Documentation CD 上的《使用者指南》中介紹了其他進階功能。 註:在繼續操作之前,請閱讀本產品的版本說明。可以從 Dell 支援網站 support.dell.com 下載版 本說明。 註:建議從 Dell 支援網站 support.dell.
3 將 USB 纜線上的 USB A 連接器直接連接至交換機的 USB 主控台連接埠。PowerConnect M6348 的 USB 主控台連接埠位於背面板左側,如圖 1-2 所示。 註:如果安裝的是交換機堆疊,請將終端連接至主交換機。 交換機堆疊首次通電時,這些交換 機就會選出主交換機,主交換機可能位於堆疊中的任何位置。 如果將終端連接至成員交換機, 將無法使用 CLI。 圖 2.
www.dell.com | support.dell.
交換機完成 POST 並啟動後,將顯示以下對話資訊: Unit 1 - Waiting to select management unit ( 單元 1 – 正在等待選擇管 理單元 )> Applying configuration, please wait ...( 正在套用組態,請稍候 ...) Welcome to Dell Easy Setup Wizard ( 歡迎使用 Dell 簡易安裝精靈 ) The Setup Wizard guides you through the initial switch configuration, and gets you up and running as quickly as possible. You can skip the setup wizard, and enter CLI mode to manually configure the switch.
www.dell.com | support.dell.com 步驟 2: Now we need to setup your initial privilege (Level 15) user account. This account is used to login to the CLI and Web interface. You may setup other accounts and change privilege levels later. For more information on setting up user accounts and changing privilege levels, see the user documentation. ( 現在需要設定 初始權限 (15 級 ) 使用者帳戶。此帳戶用於登入 CLI 及 Web 介面。您稍後可以設定 其他帳戶和變更權限。如需設定使用者帳戶及變更權限的詳細資訊,請參閱使用者文件 )。 To setup a user account: ( 若要設定使用者帳戶:) Please enter the user name.
步驟 4: Finally, setup the default gateway. Please enter the IP address of the gateway from which this network is reachable. [0.0.0.0]: ( 最後設定預設閘道。請輸入網路可達的閘道之 IP 位址。[0.0.0.0]:) This is the configuration information that has been collected: ( 以下是已收集的組態資訊:) User Account setup ( 使用者帳戶設定 ) = root Password = ******** ( 密碼 = ********) Management IP address = 192.168.2.1 255.255.255.0 ( 管理 IP 位址 = 192.168.2.1 255.255.255.0) Default Gateway = 0.0.0.0 ( 預設閘道 = 0.0.0.
www.dell.com | support.dell.
系統初始化 在韌體版本一致性檢查期間,如果主交換機確定所有交換機都在使用相同的韌體版本, 則該交換機將初始化為堆疊模式。 系統初始化為正常堆疊模式 主交換機將使用上一次儲存的系統設定檔來對堆疊進行初始化。 對於沒有設定檔的交 換機,系統將對它們套用預設設定。 如果設定檔已損壞,主交換機將對堆疊進行初始化,並將其設定為出廠預設組態。 您可以儲存該設定檔。 主交換機自動為成員交換機分發設定檔。 如果稍後主交換機變得無 法使用,某台成員交換機可以成為新的主交換機,並套用從原主交換機同步處理的最新設 定來設定堆疊。 系統初始化為暫停堆疊模式 系統初始化完成後,如果堆疊的韌體版本不一致,主交換機將進入暫停堆疊模式。 在此模 式下,僅使用設定檔資訊對主交換機進行初始化, 而不對任何成員交換機進行起始化。 這將強制所有成員交換機保持為非作業模式。 註:預設停用所有連接埠。 CLI/Telnet/Web 介面 您可以使用 CLI/WEB/SNMP 來同步處理主交換機中儲存的韌體與成員交換機中的韌體。 插入和移除交換機 您可以在目前堆疊中插入交換機或從中移除交換機,而無需執行電源循環。 拓樸發生變 化時,將會發生堆疊重
www.dell.com | support.dell.
2 輸入以下指令,以使用選定的連接埠來獲取 IP 位址。 console#config console(config)#ip address dhcp 介面將自動獲取 IP 位址。 3 要驗證 IP 位址,請在系統提示符後輸入 show ip interface 指令,如下例中所示。 console#show ip interface Management Interface: ( 管理介面:) IP Address (IP 位址 ).............................. 10.240.4.125 Subnet Mask ( 子網路遮罩 )......................... 255.255.255.0 Default Gateway ( 預設閘道 )......................... 10.240.4.1 Burned In MAC Address ( 燒錄 MAC 位址 ) ........00:10:18:82:04:35 Network Configuration Protocol Current ( 目前網路設定協定 )...
www.dell.com | support.dell.
設定初始 Telnet 密碼 要設定初始的 Telnet 密碼,請輸入以下指令: console(config)#aaa authentication login default line console(config)#aaa authentication enable default line console(config)#line telnet console(config-line)#login authentication default console(config-line)#enable authentication default console(config-line)#password pass1234 • 透過 Telnet 作業階段首次登入交換機時,請在密碼提示符後輸入 pass1234。 • 將交換機的模式變更為啟用時,請輸入 pass1234。 設定初始 HTTP 密碼 要設定初始 HTTP 密碼,請輸入以下指令: console(config)#ip http authentication local console(config)#username admin
www.dell.com | support.dell.
Connecteur Dell™ PowerConnect™ M6348 Guide de mise en route Modèle PCM6348 w w w. d e l l . c o m | s u p p o r t . d e l l .
Remarques, avis et précautions REMARQUE : Une REMARQUE indique des informations importantes qui peuvent vous aider à mieux utiliser votre ordinateur. AVIS : Un AVIS vous avertit d'un risque de dommage matériel ou de perte de données et vous indique comment éviter le problème. PRÉCAUTION : Une PRÉCAUTION indique un risque potentiel d'endommagement du matériel, de blessure corporelle ou de mort. ____________________ Les informations contenues dans ce document peuvent être modifiées sans préavis.
Table des Matières Installation Préparation du site . . . . . . . . . . . . . . . . . . . . . . . . . . . . . . . . . . . . . . . . . . . . . . . . . . . . 65 . . . . . . . . . . . . . . . . . . . . . . . . . . 65 65 Déballage du commutateur . Contenu du carton Déballage. . . . . . . . . . . . . . . . . . . . . . . . . . . . . . . Connexion du commutateur à un terminal . Assemblage d'une pile . 65 . . . . . . . . . . . . . . . . . 66 . . . . . . . . . . . . . . . . . . . . . . . . . .
Configuration avancée . . . . . . . . . . . . . . . . . . . . . . . . . . . 77 . . . . . . . . 77 78 . . . . . . . . . 81 . . . . . . . . . . . . . . . . . . . . . . 81 81 Obtention d'une adresse IP à partir d'un serveur DHCP . Gestion de la sécurité et configuration du mot de passe . . . . . . . . . Gestion du commutateur Utilisation d'un navigateur Web pour gérer le commutateur Démarrage de l'application Présentation de l'interface 64 . . . . . . . . . . . . . . . . . . . . . .
Installation Ce document contient des informations de base sur l'installation, la configuration et le fonctionnement des systèmes Dell™ PowerConnect™ M6348. Pour obtenir des informations plus détaillées, voir le Hardware Owner's Manual (Manuel du propriétaire), que vous trouverez sur le CD User Documentation (Documentation utilisateur). Vous pouvez également vous rendre sur le site support.dell.com pour prendre connaissance des dernières mises à jour apportées à la documentation et au micrologiciel.
www.dell.com | support.dell.com Connexion du commutateur à un terminal 1 Branchez le connecteur DB9 du câble série de type RJ-45 au terminal VT100 ou un ordinateur exécutant un logiciel d'émulation de terminal VT100. 2 Branchez le connecteur USB situé à l'autre extrémité du câble sur le port USB du commutateur. REMARQUE : Si vous installez une pile de commutateurs, connectez le terminal au commutateur maître.
La figure 1 affiche un châssis de six commutateurs M6348 connectés. Figure 1. Connexion d'une pile de commutateurs Câbles d'empilage supérieurs et inférieurs câble d'empilage REMARQUE : La topologie en anneau ainsi créée permet à la pile de fonctionner comme un commutateur unique doté de capacités de prise de relais.
www.dell.com | support.dell.com Démarrage et configuration du commutateur Une fois toutes les connexions externes établies, connectez un terminal à un commutateur en vue de configurer le commutateur ou la pile. Les fonctions supplémentaires disponibles sont décrites dans le document User's Guide (Guide d'utilisation), qui se trouve sur le CD User Documentation (Documentation utilisateur). REMARQUE : Avant de continuer, lisez les notes d'édition concernant ce produit.
REMARQUE : Si vous utilisez HyperTerminal sous Microsoft Windows 2000, assurez-vous que le Service Pack 2 (ou suivant) du système d'exploitation est installé. Ce service pack permet aux touches fléchées de fonctionner correctement dans l'émulation VT100 d'HyperTerminal. Pour plus d'informations concernant les services pack Windows 2000, rendez-vous sur le site www.microsoft.com. 3 Enfichez le USB de type ARJ-45 directement sur le port de console USB.
www.dell.com | support.dell.com REMARQUE : Le commutateur ne possède pas de nom d'utilisateur ni de mot de passe par défaut. REMARQUE : Tous les paramètres suivants sont nécessaires pour permettre la gestion à distance du commutateur via Telnet (client Telnet) ou HTTP (navigateur Web).
L'assistant définit les valeurs initiales comme indiqué ci-dessus. Une fois son exécution terminée, le commutateur est configuré de la façon suivante : • SNMPv1/2c est activé et la chaîne de communauté est définie comme indiqué ci-dessus. SNMPv3 est désactivé par défaut. • Le compte utilisateur admin est configuré comme indiqué ci-dessus. • Un système de gestion du réseau est configuré. À partir de cette station de gestion, vous pouvez accéder aux interfaces SNMP, HTTP et CLI.
www.dell.com | support.dell.com Étape 1 : The system is not setup for SNMP management by default. To manage the switch using SNMP (required for Dell Network Manager) you can: . Set up the initial SNMP version 2 account now. . Return later and setup other SNMP accounts. (For more information on setting up an SNMP version 1 or 3 account, see the user documentation).
Étape 4 : Finally, setup the default gateway. Please enter the IP address of the gateway from which this network is reachable. [0.0.0.0]: This is the configuration information that has been collected: User Account setup = root Password = ********** Management IP address = 192.168.2.1 255.255.255.0 Default Gateway = 0.0.0.
www.dell.com | support.dell.com Gestion d'une pile Commutateur maître et commutateurs membres Une pile de commutateurs peut être gérée comme une entité unique lorsque les unités qui la composent sont connectées les unes aux autres. La pile peut être gérée via une interface web, une station de gestion SNMP ou une interface CLI. Lorsque la pile est créée, l'un des commutateurs est automatiquement désigné comme maître.
Vérification de la version du micrologiciel Une fois l'attribution des ID d'empilage terminée, le commutateur maître vérifie que tous les commutateurs de la pile exécutent la même version du micrologiciel. Si tel n'est pas le cas, les ports des commutateurs membres ne pourront pas fonctionner. La pile est alors en mode SSM (Suspended Stacking Mode). Vous pouvez ensuite synchroniser les logiciels des commutateurs membres avec ceux du commutateur maître.
www.dell.com | support.dell.com Fonctionnement en mode autonome Si aucun partenaire n'est détecté sur le port d'empilage d'un commutateur, ce dernier fonctionne en mode autonome. Dans le cas contraire, le commutateur opère toujours en mode d'empilage. Réattribution des ID d'empilage Vous pouvez attribuer manuellement un ID d'empilage à un commutateur. L'ID d'empilage attribué à un commutateur ne doit avoir été associé à aucun autre commutateur de la pile.
Configuration avancée Cette section présente des informations récapitulatives sur des tâches courantes telles que les suivantes : • Obtention d'une adresse IP à partir d'un serveur DHCP • Gestion de la sécurité et configuration du mot de passe REMARQUE : Pour obtenir des informations détaillées sur les commandes CLI disponibles pour les commutateurs de la série 8024, 8024F et M6348, voir le document CLI Reference Guide (Guide de référence CLI).
www.dell.com | support.dell.com Routing Interfaces: Interface Adresse IP Masque IP Netdir Multi Bcast CastFwd ---------- --------------- --------------- -------- -------vlan1 192.168.10.10 255.255.255.0 Disable Disable vlan2 0.0.0.0 0.0.0.0 Enable Disable loopback2 0.0.0.0 0.0.0.
Configuration d'un mot de passe de console initial Pour configurer un mot de passe de console initial, entrez les commandes suivantes : console(config)#aaa authentication login default line console(config)#aaa authentication enable default line console(config)#line console console(config-line)#login authentication default console(config-line)#enable authentication default console(config-line)#password secret123 • Lorsque vous vous connectez pour la première fois à un commutateur à partir d'une session de
www.dell.com | support.dell.com Configuration d'un mot de passe HTTPS initial Pour configurer un mot de passe HTTPS, entrez les commandes suivantes : console(config)#ip https authentication local REMARQUE : Vous devez générer un nouveau certificat de cryptographie à chaque fois que vous mettez à niveau le logiciel de contrôle du commutateur. Entrez les commandes ci-dessous une fois lorsque vous configurez l'utilisation d'une session HTTPS via une console, Telnet ou SSH.
Gestion du commutateur Vous pouvez gérer le commutateur à l'aide de l'interface web, l'interface de ligne de commande (CLI), ou SNMP. Pour gérer le commutateur à l'aide du navigateur Web ou SNMP, le commutateur doit avoir une adresse IP et doit être accessible à partir de la station de gestion. Pour gérer le commutateur à l'aide de l'interface CLI, vous pouvez utiliser une connexion directe avec le port de la console ou par l'intermédiaire d'une connexion à distance Telnet/SSH.
82 Guide de mise en route www.dell.com | support.dell.
Dell™ PowerConnect™ M6348 Switch Handbuch zum Einstieg Modelle PCM6348 w w w. d e l l . c o m | s u p p o r t . d e l l .
Anmerkungen, Hinweise und Vorsichtshinweise ANMERKUNG: Eine ANMERKUNG macht auf wichtige Informationen aufmerksam, mit denen Sie das System besser einsetzen können. HINWEIS: Ein HINWEIS warnt vor möglichen Beschädigungen der Hardware oder vor Datenverlust und zeigt auf, wie derartige Probleme vermieden werden können. VORSICHT: Hiermit werden Sie auf eine potenziell gefährliche Situation hingewiesen, die zu Sachschäden, Verletzungen oder zum Tod führen könnte.
Inhalts Installation Standortvorbereitung . . . . . . . . . . . . . . . . . . . . . . . . . . . Auspacken des Switches . . . . . . . . . . . . . . . . . . . . . . . . . Inhalt der Verpackung . Auspacken . . . . . . . . . . . . . . . . . . . . . . . . . . . . . . . . . . . . . . . . . . . . . . . . . . . . . . Verbinden eines Switches mit einem Terminal Zusammenfügen eines Stacks 87 87 87 87 . . . . . . . . . . . . . . . 88 . . . . . . . . . . . . . . . . . . . . . . .
Fortgeschrittene Konfiguration . . . . . . . . . . . . . . . . . . . . . . . 99 . . . . . . . . . . 99 101 . . . . . . . . . . . . 103 . . . . . . . . . . . . . . . . . . . 103 103 Abrufen einer IP-Adresse von einem DHCP-Server Sicherheitsverwaltung und Kennwortkonfiguration . . . . . . . . . . . Switch-Verwaltung Verwalten des Switches über einen Web-Browser Starten der Anwendung . . . . Aufbau der Benutzeroberfläche 86 . . . . . . . . . . . . . . . . . . .
Installation Dieses Dokument enthält grundlegende Informationen zu Installation, Konfiguration und Betrieb von Dell™ PowerConnect™ M6348-Systemen. Weitere Informationen finden Sie im auf der CD User Documentation (Benutzerdokumentation). Aktuelle Updates von Dokumentation und Firmware erhalten Sie auf der Dell Support-Website unter support.dell.com.
www.dell.com | support.dell.com Verbinden eines Switches mit einem Terminal 1 Verbinden Sie den DB9-Anschluss des USB-auf-DB9-seriell-Kabels mit einem VT100Terminal oder einem Computer, auf dem VT100-Terminalemulationssoftware läuft. 2 Verbinden Sie den USB-Stecker am anderen Kabelende mit dem USB-Anschluss des Switches. ANMERKUNG: Wenn Sie einen Switch-Stack installieren, verbinden Sie das Terminal mit dem MasterSwitch.
Abbildung 1 zeigt ein Gehäuse mit sechs verbundenen M6348-Switches. Abbildung 1. Switch-Stack verbinden obere und untere Stack-Anschlüsse Stack-Kabel ANMERKUNG: Mit dieser Ring-Topologie lässt sich der gesamte Stack als einzelner Switch mit flexibler Failover-Funktionalität betreiben.
www.dell.com | support.dell.com Starten und Konfigurieren des Switches Nachdem Sie alle externen Verbindungen vorgenommen haben, schließen Sie das Gerät an ein Terminal an, um den Switch oder Stack zu konfigurieren. Weitere Funktionen sind im Benutzerhandbuch auf der User Documentation-CD (Benutzerdokumentation) beschrieben. ANMERKUNG: Lesen Sie die Versionshinweise für dieses Produkt, bevor Sie fortfahren. Sie können die Versionshinweise von der Dell Support-Website unter support.dell.com herunterladen.
ANMERKUNG: Wenn Sie HyperTerminal mit Microsoft Windows 2000 verwenden, stellen Sie sicher, dass Windows 2000 Service-Pack 2 oder höher installiert ist. Mit Windows 2000 Service-Pack 2 funktionieren die Pfeiltasten in der VT100-Emulierung von HyperTerminal ordnungsgemäß. Weitere Informationen zu den Service-Packs für Windows 2000 finden Sie unter www.microsoft.com. 3 Verbinden Sie den USB Typ A-Stecker des USB-Kabels direkt mit dem USBKonsolenanschluss des Switches.
www.dell.com | support.dell.com ANMERKUNG: Alle folgenden Einstellungen sind für die Fernverwaltung des Switches über Telnet (Telnet-Client) oder HTTP (Web-Browser) erforderlich.
Der Setup-Assistent konfiguriert die Anfangswerte wie oben definiert. Nach dem Abschließen des Assistenten ist der Switch wie folgt konfiguriert: • SNMPv1/2c ist aktiviert, und der Community-String ist eingerichtet wie oben definiert. SNMPv3 ist standardmäßig deaktiviert. • Das admin-Benutzerkonto ist eingerichtet wie definiert. • Ein Netzwerk-Management-System ist konfiguriert. Von dieser Management-Station können Sie auf die SNMP-, HTTP- und CLI-Schnittstelle zugreifen.
www.dell.com | support.dell.com Schritt 1: The system is not setup for SNMP management by default. To manage the switch using SNMP (required for Dell Network Manager) you can . Set up the initial SNMP version 2 account now. . Return later and setup other SNMP accounts. (For more information on setting up an SNMP version 1 or 3 account, see the user documentation).
Schritt 4: Finally, setup the default gateway. Please enter the IP address of the gateway from which this network is reachable. [0.0.0.0]: This is the configuration information that has been collected: User Account setup = root Password = ******** Management IP address = 192.168.2.1 255.255.255.0 Default Gateway = 0.0.0.
www.dell.com | support.dell.com Verwalten eines Stacks Master- und untergeordnete Switches Ein zusammengeschalteter Switch-Stack lässt sich als einzelne Einheit verwalten. Dies kann über eine Web-Oberfläche, eine SNMP-Verwaltungsstation oder eine Befehlszeilenschnittstelle erfolgen. Bei der Bildung eines Stacks wird einer der Switches automatisch zum Master-Switch bestimmt. Sie können dem Master-Switch mit der Konsole manuell eine IP-Adresse zuweisen oder dies mit DHCP automatisch vornehmen lassen.
Firmware-Versionsüberprüfung Nach der Zuweisung der Stack-IDs führt der Master-Switch eine Konsistenzprüfung durch, um sicherzustellen, dass alle Switches im Stack die gleiche Firmware-Version verwenden. Wenn die Softwareversionen der Switches nicht übereinstimmen, werden die Ports des betreffenden untergeordneten Switches nicht für den Betrieb freigegeben. Dieser Zustand wird als ausgesetzter Stack-Betrieb (Suspended Stacking Mode) bezeichnet.
www.dell.com | support.dell.com Befehlszeilen-/Telnet-/Web-Schnittstelle Über die Schnittstellen CLI / WEB / SNMP können Sie die im Master-Switch gespeicherte Firmware auf einen untergeordneten Switch übertragen. Hinzufügen und Entfernen von Switches Sie können dem Stack Switches hinzufügen bzw. aus ihm entfernen, ohne die Stromversorgung zu unterbrechen. Falls sich die Topologie ändert, kann das gesamte Netzwerk betroffen sein, da eine Neukonfiguration des Stacks stattfindet.
Vom Benutzer ausführbare Steuerbefehle Verwenden Sie zum Steuern dieser Funktion die folgenden Befehlszeilenkommandos (CLI). Ausführliche Angaben zur Syntax der einzelnen Befehle können Sie dem Referenzhandbuch zur Befehlszeilenschnittstelle entnehmen.
www.dell.com | support.dell.com 2 Geben Sie die nachfolgenden Befehle ein, um den gewählten Port für den Empfang der IPAdressen zu nutzen. console#config console(config)#ip address dhcp Die IP-Adresse wird über die Schnittstelle automatisch empfangen. 3 Geben Sie an der Systemeingabeaufforderung den Befehl show ip interface wie im nachfolgenden Beispiel gezeigt ein, um die IP-Adresse zu überprüfen. console#show ip interface Management Interface: IP Address...................................... 10.240.4.
Sicherheitsverwaltung und Kennwortkonfiguration Die Systemsicherheit wird über den so genannten AAA-Mechanismus (Authentifizierung, Autorisierung und Accounting) realisiert, der eine Verwaltung der benutzerspezifischen Zugriffsrechte, Privilegien und Management-Verfahren ermöglicht. AAA greift hierbei auf lokale und dezentral installierte Benutzerdatenbanken zurück. Die Datenverschlüsselung erfolgt über den SSH-Mechanismus.
www.dell.com | support.dell.
Switch-Verwaltung Der Switch kann über die webbasierte Schnittstelle, die Befehlszeilenschnittstelle (CLI) oder per SNMP verwaltet werden. Für die Verwaltung über einen Web-Browser oder per SNMP muss der Switch eine IP-Adresse besitzen und von der Verwaltungsstation aus zugänglich sein. Die Verwaltung des Switches über die Befehlszeilenschnittstelle (CLI) kann über eine direkte Konsolenverbindung oder eine Fernverbindung per Telnet/SSH erfolgen.
104 Handbuch zum Einstieg www.dell.com | support.dell.
Dell™ PowerConnect™ Switch M6348 Panduan Pengaktifan Model PCM6348 w w w. d e l l . c o m | s u p p o r t . d e l l .
Catatan, Pemberitahuan, dan Perhatian CATATAN: CATATAN menunjukkan informasi penting yang membantu Anda untuk menggunakan komputer dengan lebih baik. PEMBERITAHUAN: PEMBERITAHUAN menunjukkan kemungkinan kerusakan perangkat keras atau kehilangan data dan memberitahu Anda cara menghindari masalah tersebut. PERHATIAN: PERHATIAN menunjukkan kemungkinan kerusakan barang, cedera tubuh, atau kematian. ____________________ Informasi dalam dokumen ini dapat berubah tanpa pemberitahuan. © 2009 Dell Inc.
Daftar Isi Instalasi Penyiapan Tempat . . . . . . . . . . . . . . . . . . . . . . . . . . . . Membuka Kemasan Switch . . . . . . . . . . . . . . . . . . . . . . . Isi Kemasan . . . . . . . . Langkah Membuka Kemasan . . . . . . . . . . . . . . . . . . . . . . . . . . . . . . . . . . . . . . . . Menghubungkan Switch ke Terminal . Merakit Tumpukan . 109 109 109 109 . . . . . . . . . . . . . . . . . . 110 . . . . . . . . . . . . . . . . . . . . . . . . . . .
Pengelolaan Keamanan dan Konfigurasi Kata Sandi . . . . . . . . . 121 . . . . . . . . . . 124 . . . . . . . . . . . . . . . . . . . . . . . 124 124 Mengelola Switch Menggunakan Browser Web untuk Mengelola Switch Memulai Aplikasi . . . Memahami Antarmuka 108 . . . . . . . . . . . . . . . . . . . . . . .
Instalasi Dokumen ini menguraikan informasi dasar untuk menginstal, mengkonfigurasikan, dan mengoperasikan sistem Dell™ PowerConnect™ M6348. Untuk informasi lebih lanjut, lihat Panduan Pemilik Perangkat Keras, yang tersedia pada CD Dokumentasi Pengguna, atau kunjungi situs web Dukungan Dell di support.dell.com untuk update terbaru mengenai dokumentasi dan firmware.
www.dell.com | support.dell.com Menghubungkan Switch ke Terminal 1 Hubungkan konektor DB9 pada kabel serial USB-ke-DB9 ke terminal VT100 atau komputer yang menggunakan perangkat lunak emulasi terminal VT100. 2 Sambungkan konektor USB di ujung lainnya ke port USB pada switch. CATATAN: Jika Anda menginstal tumpukan switch, hubungkan terminal ke Switch Master. Pada saat tumpukan diaktifkan untuk pertama kalinya, switch akan menentukan Switch Master, yang mungkin terdapat di lokasi manapun dalam tumpukan.
Gambar 1. Menghubungkan Tumpukan Switch port tumpukan atas dan bawah kabel tumpukan CATATAN: Topologi cincin yang dihasilkan memungkinkan seluruh tumpukan untuk berfungsi sebagai switch tunggal dengan kemampuan pengalihan jika terjadi kegagalan.
www.dell.com | support.dell.com Mengaktifkan dan Mengkonfigurasi Switch Setelah menyelesaian semua sambungan eksternal, hubungkan terminal ke switch untuk mengkonfigurasikan switch atau tumpukan. Fungsi lanjutan tambahan diurakan dalam Panduan Pengguna yang terdapat pada CD Dokumentasi Pengguna Anda. CATATAN: Bacalah catatan rilis untuk produk ini sebelum melanjutkan. Anda dapat mendownload catatan rilis dari situs web Dukungan Dell di support.dell.com.
CATATAN: Apabila menggunakan HyperTerminal dengan Microsoft Windows 2000, pastikan bahwa Windows 2000 Service Pack 2 atau yang lebih baru telah diinstal. Dengan Windows 2000 Service Pack 2, tombol panah akan berfungsi dengan benar pada emulasi VT100 HyperTerminal. Kunjungi www.microsoft.com untuk informasi lebih lanjut tentang service pack Windows 2000. 3 Hubungkan konektor USB tipe A pada kabel USB langsung ke port konsol USB pada switch.
www.dell.com | support.dell.com Sebelum menata konfigurasi awal switch, dapatkan informasi berikut dari administrator jaringan Anda: • Alamat IP yang akan ditetapkan ke VLAN pengelolaan. • Mask subnet IP untuk jaringan tersebut. • Alamat IP gateway default VLAN pengelolaan. Prosedur Konfigurasi Awal Anda dapat menetapkan konfigurasi awal menggunakan Wizard Penataan Mudah Dell, atau dengan menggunakan Antarmuka Baris Perintah (CLI).
• SNMPv1/2c diaktifkan dan string komunitas ditetapkan seperti diuraikan di atas. SNMPv3 dinonaktifkan secara default. • Account pengguna admin dibuat seperti diuraikan. • Sistem pengelolaan jaringan dikonfigurasikan. Dari stasiun pengelolaan ini, Anda dapat mengakses antarmuka SNMP, HTTP, dan CLI. Anda juga dapat memilih untuk membolehkan semua alamat IP untuk mengakses antarmuka pengelolaan dengan memilih alamat IP (0.0.0.0). • Alamat IP dikonfigurasikan untuk VLAN pengelolaan default (1).
www.dell.com | support.dell.com Langkah 1: The system is not setup for SNMP management by default. To manage the switch using SNMP (required for Dell Network Manager) you can . Set up the initial SNMP version 2 account now. . Return later and setup other SNMP accounts. (For more information on setting up an SNMP version 1 or 3 account, see the user documentation).
Langkah 4: Finally, setup the default gateway. Please enter the IP address of the gateway from which this network is reachable. [0.0.0.0]: This is the configuration information that has been collected: User Account setup = root Password = ******** Management IP address = 192.168.2.1 255.255.255.0 Default Gateway = 0.0.0.
www.dell.com | support.dell.com Pengaktifan Tumpukan Penemuan Topologi Setelah tumpukan terbentuk, proses penemuan topologi akan menyusun basis data yang berisi informasi tentang semua switch dalam tumpukan, termasuk Versi Firmware, Versi Perangkat Keras, Preferensi Pengelolaan, Alamat MAC Switch, dan Nomor Seri Switch. Anda dapat menggunakan antarmuka baris perintah (CLI) atau antarmuka Web untuk melihat informasi ini.
Inisialisasi Sistem untuk Mode Tumpukan Ditangguhkan Setelah inisialisasi sistem selesai, Switch Master akan beralih ke Mode Tumpukan Ditangguhkan jika versi firmware tumpukan tidak konsisten. Dalam mode ini, hanya Switch Master yang diinisialisasi dengan informasi file konfigurasi. Tidak ada switch anggota yang diinisialisasi. Hal ini akan memaksa semua witch anggota tetap dalam mode non-operasional. CATATAN: Semua port dinonaktifkan secara default.
www.dell.com | support.dell.com Kontrol Pengguna Gunakan perintah CLI berikut untuk mengontrol fitur ini. Lihat Panduan Referensi CLI untuk rincian mengenai sintaksis setiap perintah.
2 Masukkan perintah berikut untuk menggunakan port yang dipilih untuk menerima alamat IP. console#config console(config)#ip address dhcp Antarmuka akan menerima alamat IP secara otomatis. 3 Untuk memverifikasi alamat IP, masukkan perintah show ip interface pada prompt sistem seperti ditunjukkan dalam contoh berikut. console#show ip interface Management Interface: IP Address....................................... 10.240.4.125 Subnet Mask..................................... 255.255.255.0 Default Gateway..
www.dell.com | support.dell.com Mengkonfigurasi Kata Sandi Keamanan Kata sandi keamanan dapat dikonfigurasikan untuk layanan berikut: • Konsol • Telnet • SSH • HTTP • HTTPS CATATAN: Apabila membuat nama pengugna, prioritas default adalah "1", yang memungkinkan akses tetapi tanpa hak konfigurasi. Priritas "15" harus ditetapkan untuk memungkinkan akses dan hak konfigurasi ke switch.
Mengkonfigurasikan Kata Sandi Awal HTTP Untuk mengkonfigurasikan kata sandi awal HTTP, masukkan perintah berikut: console(config)#ip http authentication local console(config)#username admin password user1234 level 15 Mengkonfigurasikan Kata Sandi Awal HTTPS Untuk mengkonfigurasikan kata sandi awal HTTPS, masukkan perintah berikut: console(config)#ip https authentication local CATATAN: Anda harus membuat sertifikat crypto baru setiap kali melakukan upgrade (menginstal versi baru) aplikasi perangkat lunak k
www.dell.com | support.dell.com Mengelola Switch Anda dapat mengelola switch dengan menggunakan antarmuka berbasis Web, antarmuka baris perintah (CLI), atau SNMP. Untuk mengelola switch dengan menggunakan browser Web atau SNMP, switch harus memiliki alamat IP, dan harus dapat diakses dari stasiun pengelolaan. Untuk mengelola switch dengan menggunakan CLI, Anda dapat menggunakan koneksi langsung konsol atau koneksi jarak jauh Telnet/SSH.
Dell™ PowerConnect™ M6348 スイッチ はじめに モデル PCM6348 w w w. d e l l . c o m | s u p p o r t . d e l l .
メモ、注意、警告 メモ:コンピュータを使いやすくするための重要な情報を説明しています。 注意:ハードウェアの損傷やデータの損失の可能性を示し、その危険を回避するための方法を説明 しています。 警告:物的損害、けが、または死亡の原因となる可能性があることを示しています。 ____________________ 本書の内容は予告なく変更されることがあります。 © 2009 すべての著作権は Dell Inc. にあります。 Dell Inc. の書面による許可のない複製は、いかなる形態においても厳重に禁じられています。 本書に使用されている商標:Dell、DELL ロゴ、および PowerConnect は Dell Inc. の商標です。Microsoft および Windows は Microsoft Corporation の登録商標です。 商標または製品の権利を主張する事業体を表すためにその他の商標および社名が使用されていることがあります。それらの商 標や会社名は、一切 Dell Inc.
目次 設置 設置場所の準備 . . . . . . . . . . . . . . . . . . . . . . . . . . . . 129 スイッチの開梱 . . . . . . . . . . . . . . . . . . . . . . . . . . . . 129 パッケージの内容 . 開梱の手順 . . . . . . . . . . . . . . . . . . . . . . . . . . . . . . . . . . . . . . . . . . . . . . . . . . . . 129 129 ターミナルへの接続 . . . . . . . . . . . . . . . . . . . . . . . . . . 130 スタックの組み立て . . . . . . . . . . . . . . . . . . . . . . . . . . 130 スイッチの起動と設定 ターミナルとスイッチの接続 . . . . . . . . . . . . . . . . . . . . . 132 . . . . . . . . . .
詳細設定 . . . . . . . . . . . . . . . . . . . . . . . . . . . . . . . . DHCP サーバーからの IP アドレスの読み出し セキュリティ管理とパスワードの設定 . . . . . . . . . . . . . . 140 . . . . . . . . . . 140 142 . . . . . . . . . . . . . . 144 . . . . . . . . . . . . . . . . . . . . . 144 144 スイッチの管理 Web ブラウザを使用したスイッチの管理 . アプリケーションの起動 インタフェースの概要 . 128 . . . . . . . . . . . . . . . . . . . . .
設置 本書では、Dell™ PowerConnect™ M6348 システムの設置、設定、操作の基本について説 明しています。詳細については、『User Documentation CD』に収録されている『ハード ウェアオーナーズマニュアル』を参照してください。マニュアルとファームウェアのアッ プデート版は、デルサポートサイト support.dell.
www.dell.com | support.dell.
M6348 スイッチ 6 台を接続したシャーシを 図 1 に示します。 図 1 スイッチのスタックの接続 上下のスタッ キングポート スタッキングケー ブル メモ:出来上がるリングトポロジにより、スタック全体が回復の早いフェイルオーバー機能 を持つ単一のスイッチとして機能します。 はじめに 131
www.dell.com | support.dell.com スイッチの起動と設定 すべての外部接続の完了後、ターミナルをスイッチに接続してスイッチまたはスタックの 設定を行います。詳細な機能については、『User Documentation CD』に収録されている 『ユーザーズガイド』に説明があります。 メモ:以下の手順を実行する前に本製品のリリースノートをお読みください。リリースノー トは、デルサポートサイト support.dell.com からダウンロードできます。 メモ:ユーザーマニュアルは、デルサポートサイト support.dell.
メモ:Microsoft Windows 2000 でハイパーターミナルを使用する場合は、Windows 2000 Service Pack 2 またはそれ以降のバージョンがインストールされていることを確認してください。 Windows 2000 Service Pack 2 を使用すると、ハイパーターミナルの VT100 エミュレーションで 矢印キーが正しく機能します。Windows 2000 のサービスパックの詳細については、 www.microsoft.
www.dell.com | support.dell.
• 管理 VLAN の IP アドレスは、192.168.2.1:255.255.255.0 です。 • デフォルトゲートウェイは 0.0.0.0 です。 初期値は上記のように設定されます。ウィザードを完了すると、スイッチは以下のように設 定されます。 • SNMPv1/2c が有効になり、コミュニティストリングは上記のように設定されます。 SNMPv3 はデフォルトで無効です。 • 管理ユーザーアカウントは定義のとおりに設定されます。 • ネットワーク管理システムが設定されます。この管理ステーションから、SNMP、 HTTP、および CLI の各インタフェースにアクセスできます。また、(0.0.0.
www.dell.com | support.dell.com . Return later and setup other SNMP accounts. (For more information on setting up an SNMP version 1 or 3 account, see the user documentation). Would you like to setup the SNMP management interface now? [Y/N] n 手順 2: Now we need to setup your initial privilege (Level 15) user account. This account is used to login to the CLI and Web interface. You may setup other accounts and change privilege levels later.
手順 5: Do you want to select the operational mode as Simple Mode? [Y/N] ? 手順 6 : If the information is correct, please select (Y) to save the configuration, and copy to the start-up configuration file. If the information is incorrect, select (N) to discard configuration and restart the wizard: [Y/N] y Thank you for using Dell Easy Set up Wizard. You will now enter CLI mode.
www.dell.com | support.dell.
設定ファイルは保存できます。マスタースイッチは設定ファイルをメンバースイッチに自動 的に配信します。マスタースイッチが後に使用できなくなると、メンバースイッチの 1 台が 新しいマスタースイッチとなり、マスタースイッチから同期化された最新の設定情報を使 用してスタックが設定されます。 サスペンドスタッキングモード用の初期化 システムの初期化が完了すると、スタックのファームウェアバージョンが一致していない 場合、マスタースイッチはサスペンドスタッキングモードに入ります。このモードでは、設 定ファイル情報によって初期化されるのはマスタースイッチだけです。メンバースイッチは いずれも初期化されません。このため、メンバースイッチはすべて非稼動モードのままとな ります。 メモ:すべてのポートがデフォルトでは無効になっています。 CLI/ Telnet/ Web インタフェース CLI / WEB / SNMP を使用して、マスタースイッチに保存されているファームウェアをメン バースイッチと同期化できます。 スイッチの挿入と取り外し 現在のスタックでは、電源を落とさずにスイッチの着脱ができます。トポロジが変化すると
www.dell.com | support.dell.
console#config console(config)#ip address dhcp インタフェースは IP アドレスを自動的に受け取ります。 3 IP アドレスを確認するには、次の例に示すように、システムプロンプトで show ip interface コマンドを入力します。 console#show ip interface Management Interface: IP Address....................................... 10.240.4.125 Subnet Mask..................................... 255.255.255.0 Default Gateway.................................... 10.240.4.1 Burned In MAC Address........................00:10:18:82:04:35 Network Configuration Protocol Current...................
www.dell.com | support.dell.
初期 Telnet パスワードの設定 初期 Telnet パスワードを設定するには、以下のコマンドを入力します。 console(config)#aaa authentication login default line console(config)#aaa authentication enable default line console(config)#line telnet console(config-line)#login authentication default console(config-line)#enable authentication default console(config-line)#password pass1234 • Telnet セッションを介してスイッチに初めてログオンする場合は、パスワードプロン プトで pass1234 と入力します。 • スイッチのモードを有効に変更する場合は、pass1234 と入力します。 初期 HTTP パスワードの設定 初期 HTTP パスワードを設定するには、以下のコマンドを入力します。 console(config
www.dell.com | support.dell.
Dell™ PowerConnect™ M6348 스위치 시작 안내서 PCM6348 모델 w w w. d e l l . c o m | s u p p o r t . d e l l .
주, 주의사항 및 주의 주 : " 주 " 는 컴퓨터를 보다 효율적으로 사용하는데 도움이 되는 중요 정보를 제공합니다 . 주의사항: "주의사항"은 하드웨어의 손상 또는 데이터 유실 위험을 설명하며, 이러한 문제를 방지할 수 있는 방 법을 알려줍니다. 주의: "주의"는 재산상의 피해나 심각한 부상 또는 사망을 유발할 수 있는 위험이 있음을 나타냅니다. ____________________ 본 설명서에 수록된 정보는 사전 통보 없이 변경될 수 있습니다. © 2009 Dell Inc. 저작권 본사 소유. Dell Inc.의 서면 승인 없이 어떠한 경우에도 무단 복제하는 것을 엄격히 금합니다. 본 설명서에 사용된 상표인 Dell, DELL 로고 및 PowerConnect는 Dell Inc.의 상표입니다. Microsoft 및 Windows는 Microsoft Corporation 의 등록 상표입니다. 본 설명서에서 특정 회사의 표시나 제품 이름을 지칭하기 위해 기타 상표나 상호를 사용할 수도 있습니다.
차례 설치 설치 사이트 준비 . . . . . . . . . . . . . . . . . . . . . . . . . . . . 149 스위치 포장 풀기 . . . . . . . . . . . . . . . . . . . . . . . . . . . . 149 패키지 내용물 . 포장 풀기 단계 . . . . . . . . . . . . . . . . . . . . . . . . . . . . . . . . . . . . . . . . . . . . . . . . . . . . . . . . . . . . . . . . . . . . . . . . . . . . . 150 . . . . . . . . . . . . . . . . . . . . . . . . . . . . . . 150 스위치를 터미널에 연결 스택 만들기. 149 149 스위치 시작 및 구성 터미널을 스위치에 연결 . . . . . . . . . . . . . . . . . . . . . . . . 152 . .
보안 관리 및 암호 구성 . . . . . . . . . . . . . . . . . . . . . . 162 스위치 관리 웹 브라우저를 사용하여 스위치 관리. 응용프로그램 시작 인터페이스 이해 . . 148 . . . . . . . . . . . . . . . . . 164 . . . . . . . . . . . . . . . . . . . . . . . . 164 164 . . . . . . . . . . . . . . . . . . . . . . . .
설치 본 설명서에서는 Dell™ PowerConnect™ M6348 시스템의 설치, 구성, 작동과 관련된 기본적 인 내용에 대해 설명합니다. 자세한 내용은 하드웨어 소유자 매뉴얼 (사용 설명서 CD에 수 록됨)를 참조하거나 Dell 지원 웹 사이트(support.dell.com)에서 설명서 및 펌웨어에 대한 최 신 업데이트를 확인하십시오. 설치 사이트 준비 스위치를 설치하기 전에, 선택한 설치 위치가 하드웨어 소유자 매뉴얼에 명시된 사이트 요 구사항을 준수하는지 확인하십시오. 스위치 포장 풀기 패키지 내용물 스위치의 포장을 풀면서 다음 항목이 들어 있는지 확인하십시오. • PowerConnect 스위치 1대 • USB 유형의 A-DB9 직렬 케이블 1개 • 사용 설명서 CD • 시작 안내서 • 제품 정보 안내 포장 풀기 단계 주: 스위치의 포장을 풀기 전에 용기를 살펴보고 파손된 흔적이 발견되면 즉시 알려주십시오.
www.dell.com | support.dell.com 스위치를 터미널에 연결 1 USB 대 DB9 직렬 케이블의 DB9 커넥터를 VT100 터미널 또는 VT100 터미널 에뮬레이 션 소프트웨어를 실행 중인 컴퓨터에 연결합니다. 2 다른 쪽 끝의 USB 커넥터를 스위치의 USB 포트에 연결합니다. 주: 스위치 스택을 설치할 경우 터미널을 마스터 스위치에 연결하십시오. 스택에 처음 전원을 공급 하면 스위치에서 마스터 스위치(스택에서의 위치는 상관 없음)를 선택합니다. 터미널을 다른 구성 원 스위치(마스터 아님)에 연결하면 CLI(Command Line Interface)를 사용할 수 없습니다. 스택 만들기 소프트웨어는 적재된 스위치를 12개까지, 1G 포트는 576개까지 지원합니다. 각 PowerConnect M6348 스위치의 하단에는 2개의 스태킹 포트가 있습니다. 주의: 스택에 추가하기 전에 스위치가 꺼져 있는지 확인하십시오.
그림 1. 스위치 스택 연결 상위 및 하위 스태 킹 포트 스태킹 케이블 주: 최종적인 링형 토폴로지를 통해 전체 스택이 고속 장애 복구 기능을 가진 단일 스위치로 작동할 수 있습니다.
www.dell.com | support.dell.com 스위치 시작 및 구성 모든 외부 연결을 완료했으면 터미널을 스위치에 연결하여 스위치 또는 스택을 구성합 니다. 기타 고급 기능에 대한 설명은 사용 설명서 CD에 있는 사용 설명서를 참조하십시오. 주: 진행하기 전에 이 제품의 릴리즈 노트를 읽으십시오. Dell 지원 웹 사이트 (support.dell.com) 에서 릴리즈 노트를 다운로드할 수 있습니다. 주: Dell 지원 웹 사이트 (support.dell.com) 에서 최신 사용 설명서를 다운로드하는 것이 좋습니다. 터미널을 스위치에 연결 직렬 콘솔을 통해 스위치를 모니터하고 구성하려면 스위치 뒤쪽의 콘솔 포트를 사용하여 VT100 터미널 또는 VT100 터미널 에뮬레이션 소프트웨어를 실행하는 컴퓨터에 연결하십 시오. 콘솔 포트는 DTE(Data Terminal Equipment) 커넥터로 수행됩니다. 콘솔 포트를 사용하려면 다음 항목이 필요합니다.
3 USB 케이블의 USB 유형 A 커넥터를 스위치 USB 콘솔 포트에 직접 연결합니다. PowerConnect M6348 USB 콘솔 포트는 그림 2와 같이 후면 패널 왼쪽의 있습니다. 주: 스위치 스택을 설치할 경우 터미널을 마스터 스위치에 연결하십시오. 스택에 처음 전원을 공급 하면 스위치에서 마스터 스위치(스택에서의 위치는 상관 없음)를 선택합니다. 터미널을 다른 구성 원 스위치에 연결하면 CLI를 사용하지 못합니다. 그림 2. 콘솔 포트에 연결 콘솔 포트 스위치 부팅 스위치 부팅에 대한 자세한 내용은 하드웨어 소유자 매뉴얼을 참조하십시오.
www.dell.com | support.dell.com 초기 구성 주: 다음의 전제 하에 초기의 간단한 구성 절차가 이루어지는 것으로 가정합니다. • PowerConnect 스위치는 이전에 구성된 적이 없으며 스위치를 받았을 때와 동일한 상태 입니다 . • PowerConnect 스위치가 정상적으로 부팅되었습니다 . • 콘솔 연결이 설정되었고 Dell Easy Setup Wizard 프롬프트가 VT100 터미널 또는 동등한 장치의 화면에 표시됩니다 . 초기 스위치 구성은 콘솔 포트를 통해 수행됩니다. 초기 구성 후에는 이미 연결된 콘솔 포 트에서 또는 초기 구성 중에 정의된 인터페이스를 통해 원격으로 스위치를 관리할 수 있습 니다. 주: 스위치에는 기본 사용자 이름과 암호가 구성되어 있지 않습니다. 주: 텔넷(텔넷 클라이언트)이나 HTTP(웹 브라우저)를 통해 스위치를 원격 관리하기 위해서는 아래의 모든 설정이 필요합니다.
세션 예 아래에서는 Easy Setup Wizard 세션을 설명합니다. 예제 세션에서는 다음 값들을 사용합 니다. • 사용할 SNMP 커뮤니티 문자열: DellNetworkManager • 네트워크 관리 시스템 IP 주소: 192.168.2.1 • 사용자 이름은 admin, 암호는 admin123입니다. • 관리 VLAN용 IP 주소는 192.168.2.1:255.255.255.0입니다. • 기본 게이트웨이는 0.0.0.0입니다. 설치 마법사에서 초기 값을 위와 같이 구성합니다. 마법사를 완료하면 스위치는 다음과 같 이 구성됩니다. • SNMPv1/2c가 사용하도록 설정되고 커뮤니티 문자열은 위에 정의된 대로 설정됩니다. SNMPv3은 기본적으로 사용하지 않도록 설정됩니다. • admin 사용자 계정은 정의된 대로 설정됩니다. • 네트워크 관리 시스템이 구성됩니다. 이 관리 시스템에서 SNMP, HTTP 및 CLI 인터페 이스를 액세스할 수 있습니다. 또한 (0.0.0.
www.dell.com | support.dell.com Would you like to run the setup wizard (you must answer this question within 60 seconds)? [Y/N] y 1 단계 : The system is not setup for SNMP management by default. To manage the switch using SNMP (required for Dell Network Manager) you can . Set up the initial SNMP version 2 account now. . Return later and setup other SNMP accounts. (For more information on setting up an SNMP version 1 or 3 account, see the user documentation).
4 단계 : Finally, setup the default gateway. Please enter the IP address of the gateway from which this network is reachable. [0.0.0.0]: This is the configuration information that has been collected: User Account setup = root Password = ******** Management IP address = 192.168.2.1 255.255.255.0 Default Gateway = 0.0.0.
www.dell.com | support.dell.com 스택 시작 토폴로지 발견 스택이 만들어지면 토폴로지 발견 프로세스를 통해 스택의 모든 스위치에 관한 정보가 포함 된 데이터베이스가 구축됩니다. 정보에는 펌웨어 버전, 하드웨어 버전, 관리 기본설정, 스위 치 MAC 주소, 스위치 일련 번호가 포함됩니다. CLI(Command Line Interface) 또는 웹 인터 페이스를 사용하여 이 정보를 볼 수 있습니다. 주: CLI 및 웹 인터페이스에 대한 내용은 CLI 참조 설명서 및 사용 설명서를 참조하십시오. 자동 스택 ID 할당 스택 형성 과정 중에 모든 스위치에 스택 ID가 할당됩니다. 스택 ID 할당이 완료되면 각 스 위치는 자신의 스택 ID를 비휘발성 플래시 메모리에 저장합니다. CLI 또는 웹 인터페이스를 사용하여 스택 ID를 볼 수 있습니다.
스태킹 일시 중지 모드에서 시스템 초기화 시스템 초기화가 완료된 후 스택의 펌웨어 버전이 일관성이 없는 경우 마스터 스위치는 스 태킹 일시 중지 모드로 바뀝니다. 이 모드에서는 마스터 스위치만 구성 파일 정보로 초기화 됩니다. 구성원 스위치는 초기화되지 않습니다. 이렇게 하면 구성원 스위치 모두 비작동 모 드로 남게 됩니다. 주: 모든 포트는 기본적으로 사용할 수 없게 설정됩니다. CLI/ 텔넷/ 웹 인터페이스 CLI / WEB / SNMP를 사용하여 마스터 스위치에 저장된 펌웨어를 구성원 스위치에 동기화 할 수 있습니다. 스위치 삽입 및 제거 전원을 껐다 켜지 않고 현재 스택에 스위치를 삽입하거나 스택에서 스위치를 제거할 수 있 습니다. 이 경우 스택 재구성이 이루어지므로 토폴로지 변경으로 인해 전체 네트워크가 영 향을 받습니다. 마스터 스위치가 스택에서 제거되지 않는 한 새 마스터 스위치가 선택되지 않습니다.
www.dell.com | support.dell.com 사용자 제어 다음 CLI 명령을 사용하여 이 기능을 제어하십시오. 각 명령 구문에 관한 자세한 내용은 CLI 참조 설명서를 살펴보십시오. movemanagement reload member set description switch priority switch renumber stacking show stack-port show stack-port counters show stack-port diag show switch show supported switchtype 고급 구성 이 절에서는 다음과 같은 공통 작업에 대한 요약 정보를 제공합니다. • DHCP 서버에서 IP 주소 검색 • 보안 관리 및 암호 구성 주: 8024 및 8024F M6348 스위치에 사용 가능한 모든 CLI 명령에 대한 자세한 내용은 CLI 참조 안내서를 참조하십시오.
2 IP 주소 검색을 위해 선택한 포트를 사용하려면 다음 명령을 입력합니다. console#config console(config)#ip address dhcp 인터페이스가 자동으로 IP 주소를 검색합니다. 3 IP 주소를 확인하려면 다음 예에 표시된 것처럼 시스템 프롬프트에 show ip interface 명 령을 입력합니다. console#show ip interface Management Interface: IP Address........................................... 10.240.4.125 Subnet Mask......................................... 255.255.255.0 Default Gateway........................................ 10.240.4.1 Burned In MAC Address............................
www.dell.com | support.dell.com 보안 관리 및 암호 구성 시스템 보안은 사용자 액세스 권한, 권한 및 관리 방법을 관리하는 AAA (인증, 권한 및 계정) 메커니즘을 통해 처리됩니다. AAA는 로컬 및 원격 사용자 데이터베이스를 모두 사용합 니다. 데이터 암호화는 SSH 메커니즘을 통해 처리됩니다. 시스템은 기본 암호 구성 없이 전달되며 모든 암호는 사용자가 정의합니다. 사용자 정의 암 호를 분실할 경우 Boot(부팅) 메뉴에서 암호 복구 절차를 호출할 수 있습니다. 이 절차는 로 컬 터미널에만 해당하며 암호 입력 없이 로컬 터미널에서 한 번에 스위치에 액세스할 수 있 습니다. 보안 암호 구성 다음 서비스에 대해 보안 암호를 구성할 수 있습니다. • 콘솔 • Telnet(텔넷) • SSH • HTTP • HTTPS 주: 사용자 이름을 만들 경우 기본 우선 순위는 "1"이며 액세스할 수 있지만 구성 권한은 없습니다.
초기 텔넷 암호 구성 초기 텔넷 암호를 구성하려면 다음 명령을 입력하십시오. console(config)#aaa authentication login default line console(config)#aaa authentication enable default line console(config)#line telnet console(config-line)#login authentication default console(config-line)#enable authentication default console(config-line)#password pass1234 • 텔넷 세션을 통해 스위치에 처음으로 로그온하는 경우 암호 프롬프트에 pass1234를 입력합니다. • 스위치 모드를 사용하도록 설정하는 경우 pass1234를 입력합니다. 초기 HTTP 암호 구성 초기 HTTP 암호를 구성하려면 다음 명령을 입력하십시오.
www.dell.com | support.dell.com 스위치 관리 웹 기반 인터페이스, CLI(명령줄 인터페이스) 또는 SNMP를 사용하여 스위치를 관리할 수 있습니다. 웹 브라우저나 SNMP를 사용하여 스위치를 관리하려면 스위치에 IP 주소가 있어 야 하며 관리 스테이션에서 스위치에 액세스할 수 있어야 합니다. CLI를 사용하여 스위치를 관리하려면 직접 콘솔 연결이나 원격 Telnet/SSH 연결을 사용할 수 있습니다. CLI에 대한 직접 콘솔 연결을 설정하려면 "터미널을 스위치에 연결 152페이지의을 참조하 십시오. Easy Setup Wizard를 사용하여 원격 관리 액세스를 허용하는 초기 구성을 수행할 수 있습니다("초기 구성 절차 154페이지의 참조). CLI를 사용하여 원격 관리를 구성하는 방법 에 대한 자세한 내용은 사용 설명서를 참조하십시오. 웹 브라우저를 사용하여 스위치 관리 응용프로그램 시작 1 웹 브라우저를 엽니다.
Conmutadores Dell™ PowerConnect™ M6348 Guía de introducción Modelo PCM6348 w w w. d e l l . c o m | s u p p o r t . d e l l .
Notas, avisos y precauciones NOTA: Una NOTA proporciona información importante que le ayudará a utilizar mejor el ordenador. AVISO: Un AVISO indica la posibilidad de daños en el hardware o la pérdida de datos, e informa de cómo evitar el problema. PRECAUCIÓN: Un mensaje de PRECAUCIÓN indica el riesgo de daños materiales, lesiones o incluso la muerte. ____________________ La información contenida en este documento puede modificarse sin previo aviso. © 2009 Dell Inc. Todos los derechos reservados.
Contenido Instalación Preparación del sitio. . . . . . . . . . . . . . . . . . . . . . . . . . . . . . . . . . . . . . . . . . . . . . . . . 169 . . . . . . . . . . . . . . . . . . . . . . . 169 169 Desembalaje del conmutador Contenido del paquete Pasos del desembalaje . . . . . . . . . . . . . . . . . . . . . . . . . . . . . . . . . . . . . . . 170 . . . . . . . . . . . . . . . . . . . . . . . . .
Configuración avanzada . . . . . . . . . . . . . . . . . . . . . . . . . Recuperación de una dirección IP de un servidor DHCP. Gestión de la seguridad y configuración de contraseñas 181 . . . . . . . 181 183 . . . . . . . . 185 . . . . . . . . . . . . . . . . . . . . . . 185 185 . . . . . . . Administración del conmutador Uso de un explorador web para administrar el conmutador Inicio de la aplicación . . Descripción de la interfaz 168 . . . . . . . . . . . . . . . . . . . . . .
Instalación En este documento se proporciona información básica para instalar, configurar y utilizar los sistemas Dell™ PowerConnect™ M6348. Para obtener más información, consulte el documento Manual del propietario del hardware incluido en el CD User Documentation (Documentación del usuario) o visite la página web de asistencia de Dell (support.dell.com) para ver las últimas actualizaciones de la documentación y del firmware.
www.dell.com | support.dell.com Conexión de un conmutador a un terminal 1 Conecte el conector DB9 del cable serie de USB a DB9 a un terminal VT100 o a un ordenador que ejecute software de emulación de terminal VT100. 2 Conecte el conector USB del otro extremo al puerto USB del conmutador. NOTA: Si instala una pila de conmutadores, conecte el terminal al conmutador maestro.
Ilustración 1. Conexión de una pila de conmutadores Puertos de apilamiento superior e inferior Cable de apilamiento NOTA: La topología de anillo resultante permite que toda la pila funcione como un conmutador único con funciones flexibles de sustitución tras error.
www.dell.com | support.dell.com Inicio y configuración del conmutador Una vez realizadas todas las conexiones externas, conecte un terminal a un conmutador para configurar el conmutador o la pila. Las funciones avanzadas adicionales se describen en la Guía del usuario que se encuentra en el CD User Documentation. NOTA: Antes de continuar, lea las notas de la versión de este producto. Puede descargar las notas de la versión desde la página web de asistencia de Dell (support.dell.com).
NOTA: Si utiliza HyperTerminal con Microsoft Windows 2000, debe tener instalado Windows 2000 Service Pack 2 o posterior. Con Windows 2000 Service Pack 2, las teclas de flecha funcionan correctamente en la emulación VT100 de HyperTerminal. Vaya a www.microsoft.com para obtener información sobre los Service Pack de Windows 2000. 3 Conecte el conector USB de tipo A del cable USB directamente al puerto de consola USB del conmutador.
www.dell.com | support.dell.com NOTA: Todos los valores siguientes son necesarios para poder administrar de forma remota el conmutador mediante Telnet (cliente Telnet) o HTTP (explorador web).
El asistente para instalación define los valores iniciales como se ha indicado anteriormente. Cuando haya completado el asistente, el conmutador estará configurado del modo siguiente: • Se ha habilitado SNMPv1/2c y se ha configurado la cadena de comunidad de la forma indicada anteriormente. SNMPv3 está deshabilitado de forma predeterminada. • Se ha configurado la cuenta de usuario admin de la forma indicada. • Se ha configurado un sistema de administración de red.
www.dell.com | support.dell.com Paso 1: The system is not setup for SNMP management by default. To manage the switch using SNMP (required for Dell Network Manager) you can . Set up the initial SNMP version 2 account now. . Return later and setup other SNMP accounts. (For more information on setting up an SNMP version 1 or 3 account, see the user documentation). Would you like to setup the SNMP management interface now? [Y/N] n Paso 2: Now we need to setup your initial privilege (Level 15) user account.
Paso 4: Finally, setup the default gateway. Please enter the IP address of the gateway from which this network is reachable. [0.0.0.0]: This is the configuration information that has been collected: User Account setup = root Password = ******** Management IP address = 192.168.2.1 255.255.255.0 Default Gateway = 0.0.0.
www.dell.com | support.dell.com Administración de una pila Conmutadores maestro y miembro Cuando una pila de conmutadores está interconectada, puede administrarse como si fuera una sola entidad. La pila puede administrarse desde una interfaz basada en web, desde una estación de administración SNMP o desde una CLI. Cuando se crea una pila, uno de los conmutadores se convierte automáticamente en el conmutador maestro.
Comprobación de la versión del firmware Tras asignar las ID de pila, el conmutador maestro realiza una comprobación de coherencia para verificar que en todos los conmutadores de la pila se está ejecutando la misma versión del firmware. Si las versiones de software del conmutador no coinciden, no podrán utilizarse los puertos del conmutador miembro. Esta condición se denomina modo de apilamiento suspendido.
www.dell.com | support.dell.com Interfaz CLI/Telnet/web Con las interfaces CLI/WEB/SNMP puede sincronizar el firmware que está almacenado en el conmutador maestro con el de un conmutador miembro. Inserción y extracción de conmutadores Puede insertar conmutadores en la pila actual y extraerlos sin tener que realizar un ciclo de encendido. Toda la red puede verse afectada cuando se produce un cambio en la topología, ya que se producirá una reconfiguración de la pila.
Controles de usuario Para controlar esta función, utilice los comandos de la CLI siguientes. Para obtener más información sobre la sintaxis de cada comando, consulte el Manual de referencia de la CLI.
www.dell.com | support.dell.com 2 Introduzca los comandos siguientes para utilizar el puerto seleccionado para recibir la dirección IP. console#config console(config)#ip address dhcp La interfaz recibe la dirección IP automáticamente. 3 Para verificar la dirección IP, introduzca el comando show ip interface en la línea de comandos como se muestra en el ejemplo siguiente. console#show ip interface Management Interface: IP Address....................................... 10.240.4.125 Subnet Mask............
Gestión de la seguridad y configuración de contraseñas La seguridad del sistema se gestiona mediante el mecanismo AAA (autenticación, autorización y administración de cuentas), que administra los derechos de acceso, los privilegios y los métodos de administración de los usuarios. AAA utiliza las bases de datos de usuarios locales y remotos. El cifrado de datos se gestiona mediante el mecanismo SSH.
www.dell.com | support.dell.
Administración del conmutador Puede administrar el conmutador mediante la interfaz basada en web, la interfaz de línea de comandos (CLI) o SNMP. Para poder administrar el conmutador mediante un explorador web o SNMP, el conmutador debe tener una dirección IP y debe ser accesible desde la estación de administración. Para administrar el conmutador mediante la CLI, puede utilizar una conexión de consola directa o una conexión Telnet/SSH remota.
186 Guía de introducción www.dell.com | support.dell.
ניהול המתג ניתן לנהל את המתג באמצעות ממשק מבוסס-אינטרנט ,ממשק שורת פקודה ) (CLIאו SNMPכדי . לנהל את המתג באמצעות דפדפן אינטרנט או SNMPחייבת להיות למתג כתובת IPוהגישה אליו חייבת להיות אפשרית דרך תחנת הניהול .כדי לנהל את המתג באמצעות ממשק CLIניתן להשתמש בחיבור קונסולה ישיר או בחיבור Telnet/SSHמרוחק. כדי ליצור חיבור קונסולה ישיר ל-CLI ,ראה" חיבור המסוף למתג "בדף 10 .
הגדרה של סיסמת HTTPהתחלתית כדי להגדיר סיסמת HTTPהתחלתית ,הזן את הפקודות הבאות: console(config)#ip http authentication local console(config)#username admin password user1234 level 15 הגדרה של סיסמת HTTPSהתחלתית כדי להגדיר סיסמת HTTPSהתחלתית ,הזן את הפקודות הבאות: console(config)#ip https authentication local הערה :עליך להפיק אישור הצפנה חדש בכל פעם שאתה משדרג את יישום הבקרה במתג )מתקין גרסה חדשה שלו(.
הגדרת התצורה של סיסמאות אבטחה :ניתן להגדיר סיסמאות אבטחה לשירותים הבאים קונסולה • Telnet • SSH • HTTP • HTTPS • כלומר ההרשאה מאפשרת גישה1 , ברירת המחדל של העדיפות היא, בעת יצירת שם משתמש:הערה .15 כדי לאפשר גישה והרשאות תצורה במתג יש לקבוע עדיפות.
2הזן את הפקודות הבאות כדי להשתמש ביציאה שבחרת לצורך קבלת כתובת ה.IP- console#config console(config)#ip address dhcp הממשק יקבל אוטומטית את כתובת ה.IP- 3כדי לאמת את כתובת ה-IP ,הזן את הפקודה show ip interfaceבשורת הפקודה של המערכת ,כמו בדוגמה הבאה: console#show ip interface Management Interface: IP Address..................................... 10.240.4.125 Subnet Mask.................................... 255.255.255.0 Default Gateway.........................
פקדי משתמשים השתמש בפקודות CLIהבאות כדי להשתמש בתכונה זו .לפרטים נוספים על התחביר של כל פקודה ,עיין ב.
אתחול המערכת למצב הערמה מושהה לאחר שיושלם אתחול המערכת ,המתג הראשי ייכנס למצב הערמה מושהה אם גרסאות הקושחה של הערימה לא יהיו תואמות .במצב זה ,רק המתג הראשי מאותחל עם פרטי קובץ התצורה .לא מתבצע אתחול של מתג משני כלשהו .מצב זה מאלץ את כל המתגים-החברים להישאר במצב של היעדר פעולה. הערה :כל היציאות חסומות כברירת מחדל. CLI/ Telnet/ממשק אינטרנט ניתן להשתמש ב -CLI / WEB / SNMPלסינכרון הקושחה המאוחסנת במתג הראשי עם מתג משני.
הפעלת הערימה זיהוי טופולוגיה כאשר נוצרת ערימה ,תהליך זיהוי טופולוגיה בונה מסד נתונים שמכיל מידע בנוגע לכל המתגים בערימה ,כולל גרסת הקושחה ,גרסת חומרה ,העדפת ניהול ,כתובת MACשל המתג ומספר סידורי של המתג עבור כל יחידה .באפשרותך להשתמש בממשק שורת הפקודה ) (CLIאו בממשק האינטרנט כדי להציג מידע זה. הערה :עיין ב -CLI Reference Manualובמדריך למשתמש לקבלת סיוע לגבי CLIוממשק האינטרנט ,בהתאמה. הקצאת מזהה ערימה אוטומטי במהלך יצירת הערימה ,לכל מתג מוקצה מזהה ערימה .
שלב :5 Do you want to select the operational mode as Simple Mode? [Y/N] n שלב6: If the information is correct, please select (Y) to save the configuration, and copy to the start-up configuration file. If the information is incorrect, select (N) to discard configuration and restart the wizard: [Y/N] y Thank you for using Dell Easy Set up Wizard. You will now enter CLI mode. ניהול ערימה מתגים ראשיים ומשניים ניתן לנהל ערימה של מתגים כישות אחת כאשר הם מחוברים זה לזה .
:2 שלב Now we need to setup your initial privilege (Level 15) user account. This account is used to login to the CLI and Web interface. You may setup other accounts and change privilege levels later. For more information on setting up user accounts and changing privilege levels, see the user documentation. To setup a user account: Please enter the user name. [root]:root Please enter the user password:******** Please reenter the user password:******** :3 שלב Next, an IP address is setup.
מושבת כברירתSNMPv3. מופעל ומחרוזת הקהילה מוגדרת כמתואר לעילSNMPv1/2c .מחדל • . מוגדר כמתואר לעילadmin חשבון המשתמש • באפשרותך לגשת לממשקי, מתוך תחנת ניהול זו.התצורה של מערכת ניהול רשת נקבעת לגשת לממשקי ניהול אלה-IP תוכל גם לבחור לאפשר לכל כתובות ה-CLI . ו,HTTP SNMP .(0.0.0.0) IP-ידי בחירת כתובת ה-על • .( המשמש לניהול כברירת מחדל1) VLAN מוגדרת עבורIP כתובת • .מוגדרת כתובת שער המשמשת כברירת מחדל • כאשר, ] [ בנוסף.
לפני שתקבע את התצורה ההתחלתית של המתג ,השג את הפרטים הבאים ממנהל הרשת: • כתובת ה -IPשתוקצה ל -VLANשל הניהול. • מסכת רשת המשנה של IPעבור הרשת. • כתובת ה -IPשל שער ה -VLANלניהול שהוגדר כברירת מחדל. הליך לקביעת תצורה התחלתית באפשרותך לבצע את קביעת התצורה ההתחלתית באמצעות אשף ההתקנה הקלה של Dellאו באמצעות ממשק שורת הפקודה ) .(CLIאשף ההתקנה מופעל באופן אוטומטי כאשר קובץ התצורה של המתג ריק .
הערה :אם אתה משתמש בתוכנת היפר-מסוף ב-Microsoft Windows 2000 ,ודא שבמחשב שלך מותקן Windows 2000 Service Pack 2ואילך .כאשר מותקן ,Windows 2000 Service Pack 2 מקשי החצים פועלים כראוי בהדמיית VT100של היפר-מסוף .בקר בכתובת www.microsoft.com לקבלת מידע נוסף בנושא service packsשל .Windows 2000 3חבר את מחבר USB type Aבכבל ה -USBישירות אל יציאת ה -USBשל הקונסולה במתג .
הפעלה וקביעת התצורה של המתג לאחר השלמת כל החיבורים החיצוניים ,חבר מסוף למתג כדי לקבוע את תצורת המתג או הערימה .פונקציות מתקדמות נוספות מתוארות במדריך למשתמש שבתקליטור התיעוד למשתמש. הערה :לפני שתמשיך ,קרא את הערות המוצר עבור מוצר זה .תוכל להוריד את הערות המוצר מאתר התמיכה של Dellבכתובת .support.dell.com הערה :מומלץ להשיג את הגרסה העדכנית ביותר של התיעוד למשתמש מאתר התמיכה של Dell בכתובת .support.dell.
איור 1.חיבור ערימת מתגים יציאות ערימה - עליונה ותחתונה כבל ערימה הערה :טופולוגיית הטבעות שנוצרת מאפשרת לערימה לפעול כמתג אחד עם יכולות גמישות למעבר לגיבוי בעת כשל.
חיבור מתג למסוף 1חבר את מחבר ה -DB9של כבל USB-to-DB9למסוף VT100או למחשב שבו פועלת תוכנה להדמיית מסוף .VT100 2חבר את מחבר ה -USBבקצה השני ליציאת ה -USBשל המתג. הערה :אם אתה מתקין ערימה של מתגים ,חבר את המסוף למתג הראשי .לאחר שתחבר את הערימה לחשמל בפעם הראשונה ,נבחר המתג הראשי שיכול להיות ממוקם בכל מקום בערימה .אם אתה מחבר את המסוף למתג משני )לא ראשי( ,לא תוכל להשתמש בממשק שורת הפקודה ).
התקנה מסמך זה מכיל מידע בסיסי על התקנה ,קביעת תצורה והפעלה של מערכות Dell™ PowerConnect™ M6348לפרטים נוספים ,עיין מדריך לבעלים של החומרה שנמצא בתקליטור התיעוד למשתמש ,או בדוק באתר התמיכה של Dell ,בכתובת support.dell.com ,כדי לאתר את העדכונים האחרונים בתיעוד ובקושחה. הכנת האתר לפני התקנת המתג ,ודא שמיקום ההתקנה הנבחר עונה על דרישות האתר שצוינו במדריך לבעלים של החומרה.
פקדי משתמשים 202 ............................................................................................... תצורה מתקדמת 202 ............................................................................................... אחזור כתובת IPמשרת202 .....................................................................DHCP ניהול אבטחה וקביעת התצורה של סיסמאות 203 ................................................... ניהול המתג ניהול המתג באמצעות דפדפן אינטרנט 206 .........................
תוכן התקנה הכנת האתר 191 ...................................................................................................... הוצאת המתג מהאריזה 191 ...................................................................................... תכולת האריזה 191 ............................................................................................ שלבים להוצאת היחידה מהאריזה 191 .................................................................. חיבור מתג למסוף 192 .......................
הערות ,הודעות והתראות הערה :הערה מציינת מידע חשוב המסייע לך בשימוש טוב יותר במחשב. הודעה :הודעה מציינת אפשרות לנזק לחומרה או לאובדן נתונים ומסבירה כיצד להימנע מהבעיה. התראה :אזהרה מציינת אפשרות לנזק לרכוש ,פגיעה גופנית או מוות. ____________________ המידע הכלול במסמך זה נתון לשינויים ללא הודעה מוקדמת. © 2009 Dell Inc.כל הזכויות שמורות. חל איסור על שעתוק מסמך זה ,בכל דרך שהיא ,ללא קבלת רשות בכתב מאת .Dell Inc.
Dell™ PowerConnect™ M6348 מתגי מדריך תחילת עבודה PCM6348-דגם www.dell.com | support.dell.