
User Guide


BLACKICE GUARD SYSTEM CERTIFICATION REPORT ! DELL POWEREDGE 1550 ! 2
System Setup
This section describes how to setup the Dell PowerEdge 1550 to work with
BlackICE Guard.
Step One – Installing the Operating System
If necessary, follow the instructions located at
support.dell.com/docs/systems/ssabrepe/en/NT_TS/5D418am0.pdf to install
Windows NT 4.0. A printed version of this document is included with the server.
1. Install the Windows NT 4.0 operating system
2. Install Windows NT 4.0 Service Pack 6 or higher.
Step Two – Installing the NICs
Once the operating system is installed, turn the computer off to install the 3Com
NICs. For help removing the cover and installing items in the system, refer to:
support.dell.com/docs/systems/ssabrepe/en/sm/index.htm
on the Dell website.
1. Disconnect the power cord and remove the system case.
2. Install the vertical riser card in the system. This provides the adequate number of
PCI slots for the 3Com 3C905C NICs.
3. Install the two 3Com NICs in the system.
NOTE: Do not install the NDIS driver for the 3Com 3C905C NICs when
rebooting into Windows NT. BlackICE Guard does not use the NDIS driver for the
3Com 3C905C NICs.
Step Three – Configuring the System
The PowerEdge 1550 has two integrated Intel NICs. For Guard to run properly, one
of these NICs must be disabled. The other NIC should remain installed for use as a
reporting interface.
1. Turn on the system power. Allow the system to boot into Windows NT and
logon with administrative privileges.
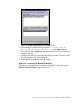
2. Right-click on the Network Neighborhood icon and select Properties. The
Network Properties dialog box is displayed.
3. Click the Adapters tab. This tab displays two NICs.