
Installation Manual

Installing a SATA Optical Drive 9
9
Replace the cooling shroud. See "Installing the Cooling Shroud" in your
Hardware Owner’s Manual
.
10
Close the system. See "Closing the System" in your
Hardware Owner’s
Manual
.
11
Reconnect the system to power and turn on the system and attached
peripherals.
Installing the SATA Optical Drive – PowerEdge 2900 and 1900
1
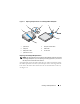
If the mounting screws are not attached to the drive, install them now.
2
Align the mounting screws with the bay slide slots and insert the optical
drive into the optical drive bay until the spring latch engages.
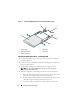
3
Connect the SATA cable to the back of the optical drive.
4
Use the appropriate power cable provided in the optical drive kit and
connect one end to the optical drive and the other to the power supply as
follows:
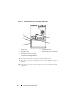
– For a PowerEdge 2900 system, connect to the CD/TBU connector on
the system backplane. See Figure 1-5.
– For a PowerEdge 1900 system, connect to an available power supply
cable.
5
Replace the center fan bracket. See "Replacing the Center Fan Bracket" in
your
Hardware Owner’s Manual
.
6
Replace the fans in the center fan bracket.
7
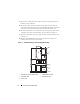
Route the SATA cable to the system board over the top of the fan bracket
and connect the cable to the SATA connector on the system board. See
Figure 1-5.
– For a PowerEdge 2900, use the SATA_B connector.
– For a PowerEdge 1900, use the SATA_D connector.