Dell™ PowerEdge™ 800 Systems Information Update 信息更新 Mise à jour des informations Aktuelle Informationen アップデート情報 정보 업데이트 Actualización de información w w w. d e l l . c o m | s u p p o r t . d e l l .
Dell™ PowerEdge™ 800 Systems Information Update w w w. d e l l . c o m | s u p p o r t . d e l l .
Notes, Notices, and Cautions NOTE: A NOTE indicates important information that helps you make better use of your computer. NOTICE: A NOTICE indicates either potential damage to hardware or loss of data and tells you how to avoid the problem. CAUTION: A CAUTION indicates a potential for property damage, personal injury, or death. Abbreviations and Acronyms For a complete list of abbreviations and acronyms, see the "Glossary" in your User’s Guide.
This document provides updated information for your system on the following topics: • Broadcom driver limitation with Red Hat® Linux • Using DRAC 4/P with Red Hat Enterprise Linux 3 (RHEL 3) • 64-bit capability • Microprocessor replacement Broadcom Driver Limitation With Red Hat Linux On systems running the Red Hat Linux operating system, if you use the IPMI Pass Through (IPMI PT) for remote manageability over a LAN and you want to configure VLAN, you must use the Broadcom Advanced Server Program (B
www.dell.com | support.dell.com Removing the Processor CAUTION: Many repairs may only be done by a certified service technician. You should only perform troubleshooting and simple repairs as authorized in your product documentation, or as directed by the online or telephone service and support team. Damage due to servicing that is not authorized by Dell is not covered by your warranty. Read and follow the safety instructions that came with the product.
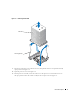
Figure 1-1. Removing the Heat Sink heat sink securing clips (2) 7 Press down on the processor socket release lever, then pull the release lever upward to the fully open position. See Figure 1-2. 8 Open the processor cover. See Figure 1-2. 9 Lift the processor vertically out of the socket. Leave the processor cover and release lever in the open position so that the socket is ready for the new processor. See Figure 1-2.
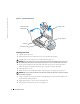
www.dell.com | support.dell.com Figure 1-2. Replacing the Processor processor socket release lever processor cover pin-1 locators (2) processor processor socket Installing a Processor 1 Unpack the new processor. 2 Ensure that the processor socket release lever is in the fully open position. 3 Align the pin 1 corners of the processor and socket. See Figure 1-2.
10 Secure the heat sink to the retention module. a Gently press down on the heat sink and then press one securing clip to secure it. b Repeat step a for the remaining securing clip. 11 Ensure that the back fan connector is connected to the BACK_FAN connector on the system board. See Figure A-3 in your Installation and Troubleshooting Guide. 12 Install the cooling shroud. See "Installing the Cooling Shroud" in "Installing System Components" in your Installation and Troubleshooting Guide.
8 Information Update www.dell.com | support.dell.
Dell™ PowerEdge™ 800 系统 信息更新 w w w. d e l l . c o m | s u p p o r t . d e l l .
注、注意和警告 注:注表示可以帮助您更好地使用计算机的重要信息。 注意:注意表示可能会损坏硬件或导致数据丢失,并告诉您如何避免此类问题。 警告:警告表示存在可能导致财产损失、人身伤害或死亡的潜在危险。 缩写词和缩略词 有关缩写词和缩略词的完整列表,请参阅 《用户指南》中的 “词汇表”。 ____________________ 本文中的信息如有更改,恕不另行通知。 © 2004 Dell Inc. 版权所有,翻印必究。 未经 Dell Inc. 书面许可,不得以任何方式进行复制。 本文件中使用的商标:Dell、 DELL 徽标和 PowerEdge 是 Dell Inc. 的商标; Intel 是 Intel Corporation 的注册商标; Red Hat 是 Red Hat, Inc. 的注册商标。 本文件中述及的其它商标和产品名称是指拥有相应商标和名称的公司或其制造的产品。 Dell Inc. 对本公司的商标和产品名称之外的其它商标和产品名称不拥有任何专有权。 2004 年 10 月 P/N H6440 Rev.
本说明文件针对您的系统提供了有关以下主题的更新信息: • 在 Red Hat® Linux 中 Broadcom 驱动程序的限制 • 在 Red Hat Enterprise Linux 3 (RHEL 3) 中使用 DRAC 4/P • 64 位能力 • 微处理器的更换 在 Red Hat Linux 中 Broadcom 驱动程序的限制 在运行 Red Hat Linux 操作系统的系统上,如果通过 LAN 使用 IPMI Pass Through (IPMI PT) 进行远程管理并希望配置 VLAN,则必须使用 Broadcom Advanced Server Program(BASP, Broadcom 高级服务器程序)和 bcm5700 驱动程序,而不能使用内置的 Linux tg3 驱动程序。如 果使用内置的 Linux tg3 驱动程序并启用 IPMI PT,则 VLAN 功能将无法正常工作。操作系统 公用程序将允许您配置 VLANS,但通过 VLAN 接口将不会收到任何流量。 在 Red Hat Enterprise Linux 3 中使用 DRAC 4/P 如果系统中安装了
www.dell.com | support.dell.
图 1-1.
www.dell.com | support.dell.com 图 1-2.
10 将散热器固定到固定模块上。 a 轻轻向下按压散热器,然后按下其中一个固定夹,将散热器固定。 b 对其余固定夹重复步骤 a。 11 请确保将后端风扇连接器连接至主板上的 BACK_FAN 连接器。请参阅 《安装与故障排除指南》中的图 A-3。 12 安装冷却护罩。请参阅 《安装与故障排除指南》中 “安装系统组件”的 “安装冷却护罩”部分。 13 安装主机盖。请参阅 《安装与故障排除指南》中 “排除系统故障”的 “装回主机盖”部分。 14 将系统直立放置。 15 安装挡板。请参阅 《安装与故障排除指南》中 “排除系统故障”的 “安装挡板”部分。 16 将系统 (包括连接的任何外围设备)重新连接至电源插座,然后开机。 17 进入系统设置程序,并确保处理器选项与新的系统配置相符。请参阅 《用户指南》中的 “使用系统设置程序”。 系统在引导时将检测是否存在新的处理器,并且自动更改系统设置程序中的系统配置信 息。屏幕上将显示与下面类似的信息: One 2.
16 信息更新 www.dell.com | support.dell.
Systèmes Dell™ PowerEdge™ 800 Mise à jour des informations w w w. d e l l . c o m | s u p p o r t . d e l l .
Remarques, avis et précautions REMARQUE : une REMARQUE indique des informations importantes qui peuvent vous aider à mieux utiliser votre ordinateur. AVIS : un AVIS vous avertit d'un risque de dommage matériel ou de perte de données et vous indique comment éviter le problème. PRÉCAUTION : une PRÉCAUTION indique un risque potentiel d'endommagement du matériel, de blessure corporelle ou de mort.
Ce document contient des informations mises à jour portant sur les sujets suivants : • Obligation d'utilisation du pilote Broadcom sous Red Hat® Linux • Utilisation de DRAC 4/P avec Red Hat Enterprise Linux 3 (RHEL 3) • Fonctionnalités 64 bits • Remplacement du microprocesseur Obligation d'utilisation du pilote Broadcom sous Red Hat Linux Si vous utilisez le module d'intercommunication IPMI PT sur un système Red Hat Linux pour procéder à des opérations de gestion à distance sur le LAN et souhaitez c
www.dell.com | support.dell.com Retrait du processeur PRÉCAUTION : la plupart des réparations doivent être effectuées uniquement par un technicien de maintenance certifié. Procédez uniquement aux dépannages et réparations indiqués dans la documentation du produit ou recommandés par les services de support en ligne ou par téléphone. Les dommages causés par des interventions de maintenance non autorisées par Dell ne sont pas couverts par votre garantie.
Figure 1-1. Retrait du dissipateur de chaleur Dissipateur de chaleur Clips de fixation (2) 7 Appuyez sur le levier d'éjection du support du processeur, puis relevez complètement ce levier. Voir la figure 1-2. 8 Ouvre le cache du processeur. Voir la figure 1-2. 9 Retirez le processeur de son support verticalement. Laissez le levier d'éjection et le cache du processeur en position ouverte, afin que le support soit prêt à accueillir le nouveau processeur. Voir la figure 1-2.
www.dell.com | support.dell.com Figure 1-2. Remplacement du processeur Levier d'éjection du support du processeur Cache du processeur Repères de la broche 1 (2) Processeur Support de processeur Installation d'un processeur 1 Déballez le nouveau processeur. 2 Vérifiez que le levier d'éjection est totalement ouvert. 3 Alignez les angles de la broche 1 du processeur et du connecteur. Voir la figure 1-2.
10 Immobilisez le dissipateur de chaleur à l'aide du module de fixation. a Appuyez doucement sur le dissipateur, puis sur l'une des languettes de fixation pour la mettre en position. b Répétez l'étape a pour l'autre clip de fixation. 11 Assurez-vous que le connecteur du ventilateur arrière est bien raccordé au connecteur BACK_FAN sur la carte système. Voir la Figure A-3 du Guide d'installation et de dépannage. 12 Installez le carénage de ventilation.
24 Mise à jour des informations www.dell.com | support.dell.
Dell™ PowerEdge™ 800-Systeme Aktuelle Informationen w w w. d e l l . c o m | s u p p o r t . d e l l .
Anmerkungen, Hinweise und Warnungen ANMERKUNG: Eine ANMERKUNG macht auf wichtige Informationen aufmerksam, die die Arbeit mit dem Computer erleichtern. HINWEIS: Ein HINWEIS warnt vor möglichen Beschädigungen der Hardware oder vor Datenverlust und zeigt auf, wie derartige Probleme vermieden werden können. VORSICHT: VORSICHT weist auf eine potentiell gefährliche Situation hin, die zu Sachschäden, Verletzungen oder zum Tod führen könnte.
Dieses Dokument enthält aktualisierte Informationen zum System.
www.dell.com | support.dell.com Prozessor entfernen VORSICHT: Viele Reparaturarbeiten dürfen nur von zugelassenen Servicetechnikern durchgeführt werden. Fehlerbehebungsmaßnahmen oder einfache Reparaturen sollten Sie nur dann selbst übernehmen, wenn dies mit der Produktdokumentation im Einklang steht oder Sie vom Team des Online- oder Telefonsupports dazu aufgefordert werden. Schäden durch nicht von Dell genehmigte Wartungsversuche sind nicht durch die Garantie abgedeckt.
Abbildung 1-1. Kühlkörper entfernen Kühlkörper Sicherungsklammern (2) 7 Drücken sie den Freigabehebel des Prozessorsockels nach unten, und ziehen Sie dann den Freigabehebel nach oben in die vollständig geöffnete Position. Siehe Abbildung 1-2. 8 Öffnen Sie die Prozessorabdeckung. Siehe Abbildung 1-2. 9 Heben Sie den Prozessor gerade nach oben aus dem Sockel heraus.
www.dell.com | support.dell.com Abbildung 1-2. Prozessor auswechseln Freigabehebel des Prozessorsockels Prozessorabdeckung Pin-1-Markierungen (2) Prozessor Prozessorsockel Prozessor installieren 1 Entnehmen Sie den neuen Prozessor der Verpackung. 2 Stellen Sie sicher, dass sich der Freigabehebel des Prozessorsockels in der vollständig geöffneten Position befindet. 3 Richten Sie die Pin-1-Ecken des Prozessors und des Sockels aufeinander aus. Siehe Abbildung 1-2.
7 Entfernen Sie die Wärmeleitpaste mit einem sauberen und fusselfreien Tuch von dem zuvor entfernten Kühlkörper. 8 Tragen Sie die Wärmeleitpaste gleichmäßig auf der Oberseite des Prozessors auf. 9 Setzen Sie den Kühlkörper auf den Prozessor. Siehe Abbildung 1-1. 10 Befestigen Sie den Kühlkörper in der Halterung. a Drücken Sie vorsichtig den Kühlkörper nach unten, und sichern Sie ihn dann mit einem der Halteclips. b Wiederholen Sie Schritt „a“ für den anderen Halteclip.
www.dell.com | support.dell.com 17 Rufen Sie das Setup-Programm des Systems auf und stellen Sie sicher, dass die ProzessorOptionen mit der neuen Systemkonfiguration übereinstimmen. Weitere Informationen finden Sie im Benutzerhandbuch unter „Verwenden des System-Setup-Programms“. Beim Startvorgang erkennt das System den neuen Prozessor und ändert automatisch die Systemkonfiguration im System-Setup-Programm. Eine Meldung ähnlich der folgenden wird eingeblendet: One 2.
Dell™ PowerEdge™ 800 システム アップデート情報 w w w. d e l l . c o m | s u p p o r t . d e l l .
メモ、注意、警告 メモ:コンピュータを使いやすくするための重要な情報を説明しています。 注意:ハードウェアの損傷やデータの損失の可能性を示し、その危険を回避するため の方法を説明しています。 警告:物的損害、けが、または死亡の原因となる可能性があることを示します。 略語について 略語の一覧は、『ユーザーズガイド』の「用語集」を参照してください。 ____________________ 本書の内容は予告なく変更されることがあります。 © 2004 すべての著作権は Dell Inc. にあります。 Dell Inc. の書面による許可のない複製は、いかなる形態においても厳重に禁じられています。 このマニュアルに使用されている商標:Dell、DELL ロゴ、および PowerEdge は Dell Inc. の商標です。 Intel は Intel Corporation の登録商標です。Red Hat は Red Hat, Inc. の登録商標です。 本書では、必要に応じて上記記載以外の商標や会社名が使用されている場合がありますが、これらの商標や会社名は、 一切 Dell Inc.
本書では、以下のトピックについて、お使いのシステムに関するアップデート情報を提供 します。 • Red Hat® Linux に関する Broadcom ドライバの制限事項 • Red Hat Enterprise Linux 3(RHEL 3)での DRAC 4/P の使い方 • 64 ビット機能 • マイクロプロセッサの交換 Red Hat Linux に関する Broadcom ドライバの制限事項 Red Hat Linux オペレーティングシステムを実行しているシステムでは、LAN を介してリ モート管理するために IPMI Pass Through(IPMI PT)を使用し、VLAN を設定する場合、 ネイティブの Linux tg3 ドライバの代わりに Broadcom Advanced Server Program (BASP)および bcm5700 ドライバを使用する必要があります。IPMI PT を有効に設定して ネイティブの Linux tg3 ドライバを使用すると、VLAN が正常に機能しません。オペレー ティングシステムのユーティリティで VLANS の設定はできますが
www.dell.com | support.dell.
図 1-1 ヒートシンクの取り外し ヒートシンク 固定クリップ(2) 7 プロセッサソケットのリリースレバーを押し下げた後に、完全に開いた位置まで起こ します。図 1-2 を参照してください。 8 プロセッサカバーを開きます。図 1-2 を参照してください。 9 プロセッサをまっすぐに持ち上げてソケットから取り出します。ソケットに新しいプ ロセッサをすぐに取り付けることができるように、プロセッサカバーとリリースレ バーは開いたままの状態にしておきます。図 1-2 を参照してください。 アップデート情報 37
www.dell.com | support.dell.
10 ヒートシンクを保持モジュールに固定します。 a ヒートシンクを静かに押し下げ、固定クリップの 1 つを押して固定します。 b もう 1 つの固定クリップについても同じ手順を繰り返します。 11 背面ファンコネクタがシステム基板の BACK_FAN コネクタに接続されていることを確 認します。『インストール&トラブルシューティング』の図 A-3 を参照してください。 12 冷却用エアフローカバーを取り付けます。『インストール&トラブルシューティング』 にある「システム部品の取り付け」の「冷却用エアフローカバーの取り付け」を参照 してください。 13 カバーを取り付けます。『インストール&トラブルシューティング』にある「システ ムのトラブルシューティング」の「カバーの取り付け」を参照してください。 14 システムを通常の状態に起こします。 15 ベゼルを取り付けます。『インストール&トラブルシューティング』にある「システ ムのトラブルシューティング」の「ベゼルの取り付け」を参照してください。 16 システムおよびシステムに接続されている周辺機器を電源コンセントに接続し、 電源
40 アップデート情報 www.dell.com | support.dell.
Dell™ PowerEdge™ 800 시스템 정보 업데이트 w w w. d e l l . c o m | s u p p o r t . d e l l .
참고 , 알림 , 주의 참고: 참고는 컴퓨터를 보다 효율적으로 사용하는데 도움이 되는 중요 정보를 제공합니다. 주의사항: 알림은 하드웨어의 손상 또는 데이터 유실 위험을 설명하며, 이러한 문제를 방지할 수 있는 방법을 알려줍니다. 주의: 경고는 재산상의 피해나 심각한 부상 또는 사망을 유발할 수 있는 위험이 있음을 경고합니다. 약어 및 머리글자 약어 및 머리글자의 전체 목록은 사용 설명서의 "용어집"을 참조하십시오. ____________________ 본 설명서에 수록된 정보는 사전 통보 없이 변경될 수 있습니다. © 2004 Dell Inc. All rights reserved. 어떠한 경우에도 Dell Inc.의 사전 승인 없이 무단 복제하는 행위는 엄격하게 금지되어 있습니다. 본 설명서에 사용된 상표인 Dell, DELL 로고 및 PowerEdge는 Dell Inc.의 상표입니다. Intel은 Intel Corporation의 등록 상표이며, Red Hat은 Red Hat, Inc.
본 설명서는 다음 내용에 관한 시스템 업데이트 정보를 제공합니다. • Red Hat® Linux 관련 Broadcom 드라이버 제한 • RHEL 3(Red Hat Enterprise Linux 3)에서 DRAC 4/P 사용 • 64비트 기능 • 마이크로프로세서 교체 Red Hat Linux 관련 Broadcom 드라이버 제한 Red Hat Linux 운영 체제를 실행하는 시스템에서 LAN을 통한 원격 관리 용이성을 위해 IPMI PT(IPMI Pass Through)를 사용하고 VLAN을 구성하려는 경우, 기본 Linux tg3 드라이버 대신에 BASP(Broadcom Advanced Server Program)와 bcm5700 드라이버를 사용해야 합니다. IPMI PT 가 활성화된 상태에서 기본 Linux tg3 드라이버를 사용하는 경우 VLAN 기능이 올바르게 작동 하지 않습니다.
www.dell.com | support.dell.com 프로세서 제거 주의 : 대부분의 수리 작업은 유자격 서비스 기술자에 의해서만 이루어져야 합니다 . 사용자는 제 품 설명서에서 허가한 경우나 온라인 또는 전화서비스 / 지원팀에서 지시한 경우에만 문제 해결 절차 및 단순 수리 작업을 수행할 수 있습니다 . Dell 의 승인을 받지 않은 서비스 작업으로 인한 손 상에 대해서는 보상을 받을 수 없습니다 . 제품과 함께 제공된 안전 지침을 읽고 따르십시오 . 1 시스템과 시스템에 연결된 모든 주변장치의 전원을 끄고 전원 콘센트에서 시스템을 분리 하십시오. 2 베젤을 분리하십시오. 설치 및 문제 해결 설명서에 있는 "시스템 문제 해결"의 "베젤 분리" 를 참조하십시오. 3 시스템을 오른쪽으로 눕히십시오. 4 덮개를 분리하십시오. 설치 및 문제 해결 설명서에 있는 "시스템 문제 해결"의 "덮개 분리" 를 참조하십시오. 5 냉각기 덮개를 분리하십시오.
그림 1-1. 방열판 분리 방열판 고정 클립(2) 7 프로세서 소켓 분리 레버를 아래로 누른 다음 분리 레버를 위로 당겨 완전히 젖혀지도록 하십시오. 그림 1-2를 참조하십시오. 8 프로세서 덮개를 여십시오. 그림 1-2를 참조하십시오. 9 소켓에서 프로세서를 수직으로 똑바로 들어 올리십시오. 소켓에 새 프로세서를 설치할 수 있도록 프로세서 덮개와 분리 레버를 열림 위치에 그대로 두십시오. 그림 1-2를 참조하십 시오.
www.dell.com | support.dell.com 그림 1-2. 프로세서 교체 프로세서 소켓 분리 레버 프로세서 덮개 1번 핀 위치 지정자(2) 프로세서 프로세서 소켓 프로세서 설치 1 새 프로세서의 포장을 제거하십시오. 2 프로세서 소켓 분리 레버가 완전히 젖혀졌는지 확인하십시오. 3 소켓과 프로세서 모서리에 있는 1번 핀을 맞추십시오. 그림 1-2를 참조하십시오. 주의사항: 시스템의 전원을 켰을 때 프로세서와 시스템 보드가 손상되지 않도록 프로세서를 소 켓에 정확하게 꽂아야 합니다. 소켓 핀에 닿거나 핀이 구부러지지 않도록 주의하십시오. 4 소켓에서 프로세서가 수평이 되도록 프로세서를 소켓에 살짝 내려 놓으십시오. 프로세서 가 제대로 놓여졌으면 프로세서를 천천히 눌러서 소켓에 끼우십시오. 5 컴퓨터 덮개를 닫으십시오. 6 제자리에 딸깍 소리를 내면서 설치될 때까지 분리 레버를 아래쪽으로 다시 돌려서 프로세 서 덮개를 고정시키십시오.
10 고정 모듈에 방열판을 고정시키십시오. a 방열판을 가볍게 아래로 누른 다음 고정 클립을 눌러 방열판을 고정시키십시오. b 나머지 고정 클립에 대해서도 단계 a를 반복하십시오. 11 후면 팬 커넥터가 시스템 보드 상의 BACK_FAN 커넥터에 연결되어 있는지 확인하십시오. 설치 및 문제 해결 설명서의 그림 A-3을 참조하십시오. 12 냉각기 덮개를 설치하십시오. 설치 및 문제 해결 설명서에 있는 "시스템 구성 요소 설치" 의 "냉각기 덮개 설치"를 참조하십시오. 13 덮개를 설치하십시오. 설치 및 문제 해결 설명서에 있는 "시스템 문제 해결"의 "덮개 다시 끼우기"를 참조하십시오. 14 시스템을 똑바로 세우십시오. 15 베젤을 설치하십시오. 설치 및 문제 해결 설명서에 있는 "시스템 문제 해결"의 "베즐 설치" 를 참조하십시오. 16 시스템을 전원 콘센트에 다시 연결하고 시스템과 시스템에 연결된 주변장치의 전원을 모 두 켜십시오.
48 정보 업데이트 www.dell.com | support.dell.
Sistemas Dell™ PowerEdge™ 800 Actualización de información w w w. d e l l . c o m | s u p p o r t . d e l l .
Notas, avisos y precauciones NOTA: una NOTA proporciona información importante que le ayudará a utilizar mejor el ordenador. AVISO: un AVISO indica la posibilidad de daños en el hardware o la pérdida de datos, e informa de cómo evitar el problema. PRECAUCIÓN: un mensaje de PRECAUCIÓN indica el riesgo de daños materiales, lesiones corporales o incluso la muerte. Abreviaturas y siglas Para ver una lista completa de las abreviaturas y las siglas, consulte el glosario de la Guía del usuario.
En este documento se proporciona información actualizada sobre los temas siguientes relativos al sistema: • Limitación de los controladores Broadcom con Red Hat® Linux • Uso de DRAC 4/P con Red Hat Enterprise Linux 3 (RHEL 3) • Capacidad de 64 bits • Sustitución del microprocesador Limitación de los controladores Broadcom con Red Hat Linux En los sistemas que se ejecutan en el sistema operativo Red Hat Linux, si utiliza IPMI Pass Through (IPMI PT) para la capacidad de administración remota en una LA
www.dell.com | support.dell.com Extracción del procesador PRECAUCIÓN: muchas reparaciones deben realizarlas únicamente los técnicos de servicio autorizados. El usuario tan sólo debe solucionar los problemas y realizar las reparaciones sencillas que se autorizan en la documentación del producto o si se lo indica el equipo de servicio y asistencia en línea o telefónica. La garantía no cubre los daños debidos a reparaciones no autorizadas por Dell.
Figura 1-1. Extracción del disipador de calor Disipador de calor Ganchos de fijación (2) 7 Presione la palanca de liberación del zócalo del procesador; a continuación, tire de la palanca hasta la posición totalmente abierta. Consulte la figura 1-2. 8 Abra la cubierta del procesador. Consulte la figura 1-2. 9 Levante el procesador verticalmente para extraerlo del zócalo.
www.dell.com | support.dell.com Figura 1-2. Sustitución del procesador Palanca de liberación del zócalo del procesador Cubierta del procesador Localizadores de la pata 1 (2) Procesador Zócalo del procesador Instalación de un procesador 1 Desembale el nuevo procesador. 2 Asegúrese de que la palanca de liberación del zócalo del procesador esté en posición completamente abierta. 3 Alinee las esquinas de la pata 1 del procesador y el zócalo. Consulte la figura 1-2.
10 Fije el disipador de calor al módulo de retención. a Presione suavemente el disipador de calor y luego presione un gancho de fijación para fijarlo. b Repita el mismo procedimiento para el otro gancho de fijación. 11 Asegúrese de que el conector de ventilador posterior esté conectado al conector VENT_POST en la placa base. Consulte la figura A-3 de la Guía de instalación y solución de problemas. 12 Instale la cubierta de refrigeración.
56 Actualización de información www.dell.com | support.dell.