
Users Guide


4 Information Update
www.dell.com | support.dell.com
Removing the Processor
CAUTION: Many repairs may only be done by a certified service technician. You should only perform
troubleshooting and simple repairs as authorized in your product documentation, or as directed by the
online or telephone service and support team. Damage due to servicing that is not authorized by Dell is
not covered by your warranty. Read and follow the safety instructions that came with the product.
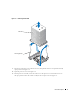
1
Turn off the system, including any attached peripherals, and disconnect the system from
the electrical outlet.
2
Remove the bezel. See "Removing the Bezel" in "Troubleshooting Your System" in your
Installation and Troubleshooting Guide
.
3
Lay the system on its right side.
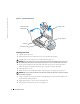
4
Remove the cover. See "Removing the Cover" in "Troubleshooting Your System" in your
Installation and Troubleshooting Guide
.
5
Remove the cooling shroud. See "Removing the Cooling Shroud" in "installing System
Components" in your
Installation and Troubleshooting Guide
.
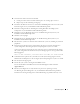
NOTICE: After removing the heat sink, place it upside down on a flat surface to prevent the thermal
interface material from being damaged or contaminated.
6
Remove the heat sink. See Figure 1-1.
a
Open one securing clip by pressing the end of the clip down and away from the retention
until it clears the securing tab on the retention module, and then lift the clip up.
b
Repeat step a for the remaining securing clip.
c
Rotate the heat sink slightly and then lift the heat sink off the processor. Do not pry
the heat sink off the processor.