
Users Guide


6 Information Update
www.dell.com | support.dell.com
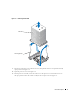
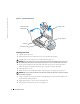
Figure 1-2. Replacing the Processor
Installing a Processor
1
Unpack the new processor.
2
Ensure that the processor socket release lever is in the fully open position.
3
Align the pin 1 corners of the processor and socket. See Figure 1-2.
NOTICE: You must position the processor correctly in the socket to avoid damaging the processor and
the system board when you turn on the system. Be careful not to touch or bend the pins on the socket.
4
Set the processor lightly in the socket and ensure that the processor is level in the socket.
When the processor is positioned correctly, press it gently to seat it in the socket.
5
Close the processor cover.
6
Rotate the release lever back down until it snaps into place, securing the processor cover.
NOTICE: Do not operate the system without the heat sink installed. The heat sink is required to maintain
proper thermal conditions.
7
Using a clean lint-free cloth, remove the existing thermal grease from the heat sink that you
removed earlier in this procedure.
8
Apply thermal grease evenly to the top of the processor.
9
Lower the heat sink onto the processor. See Figure 1-1.
pin-1 locators (2)
processor cover
processor socket
processor socket
release lever
processor