
Users Guide


Information Update 7
10
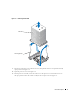
Secure the heat sink to the retention module.
a
Gently press down on the heat sink and then press one securing clip to secure it.
b
Repeat step a for the remaining securing clip.
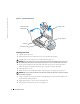
11
Ensure that the back fan connector is connected to the BACK_FAN connector on the system
board. See Figure A-3 in your
Installation and Troubleshooting Guide
.
12
Install the cooling shroud. See "Installing the Cooling Shroud" in "Installing System
Components" in your
Installation and Troubleshooting Guide
.
13
Install the cover. See "Replacing the Cover" in "Troubleshooting Your System" in your
Installation and Troubleshooting Guide
.
14
Stand the system upright.
15
Install the bezel. See "Installing the Bezel" in "Troubleshooting Your System" in your
Installation and Troubleshooting Guide
.
16
Reconnect the system to its electrical outlet and turn the system on, including any attached
peripherals.
17
Enter the System Setup program, and ensure that the processor options match the new
system configuration. See "Using the System Setup Program" in your
User's Guide
.
As the system boots, it detects the presence of the new processor and automatically changes
the system configuration information in the System Setup program. A message similar to the
following appears:
One 2.3 GHz Processor, Processor Bus: 533 MHz, L2 cache 256 KB
18
Confirm that the top line of the system data area in the System Setup program correctly
identifies the installed processor. See "Using the System Setup Program" in your
User's Guide
.
19
Exit the System Setup program.
20
Ensure that your system is running the latest BIOS version.
You can download the latest BIOS version from the Dell Support website located at
support.dell.com
21
Run the system diagnostics to verify that the new processor is operating correctly.
See "Running the System Diagnostics" in your
Installation and Troubleshooting Guide
for
information on running the diagnostics and troubleshooting any problems that may occur.