
Setup Guide


4
Getting Started With Your System
Installing the Tool-Less Rail Solution
WARNING:
Whenever you need to lift the system, get others to assist you. To
avoid injury, do not attempt to lift the system by yourself.
WARNING:
The system is not fixed to the rack or mounted on the rails. To avoid
personal injury or damage to the system, you must adequately support the system
during installation and removal.
WARNING:
To avoid a potential electrical shock hazard, a third wire safety
grounding conductor is necessary for the rack installation. The rack equipment
must provide sufficient airflow to the system to maintain proper cooling.
CAUTION:
The rail pegs must be flush with the rack posts to install
properly.
NOTE:
The rack rails are marked LEFT and RIGHT. The rail marked "LEFT" attaches
to the left rack posts and the rail marked "RIGHT" attaches to the right rack posts
when facing the front of the rack.
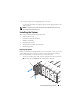
1
Determine where to place the rails in the rack. Make sure there is enough
space in the rack for the 4U chassis. In a standard rack, the height of a 4U
chassis will span 12 rack post holes.
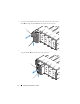
2
Use the marking indicated on the left and right sides of the rail to orient
the rail correctly to the rack posts.
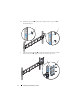
3
Attach the left rail and stopping bracket to the rack.
a
Position left rail marked "
LEFT
" to align with its mounting holes on the
rack posts.
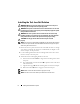
b
Press and hold the rail release button
to open the latch on the front
end of the left rail.
c
Align the three pegs
with the mounting holes on the front rack post.
d
Release the button
when it engages to the front rack post.
NOTE:
Make sure the rail release button is engaged correctly.
NOTE:
The rails can be used in both square-hole and round-hole racks.