
White Papers


Cable Routing Procedures for Dell PowerEdge T620 Systems
6
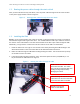
4. Once you have routed all of the cables through the CMA, dress the cable slack between the back of
the system and the entrance of the CMA using the tie wraps provided in the CMA kit.
5. Clip off the excess length of material from the tie wraps. Make sure that the heads of the tie wraps
are positioned so as to avoid interference with adjacent systems. Return the CMA to the closed
(retracted) position.
6. Extend the system out of the rack to verify that there is sufficient slack in the cables on both ends
of the CMA.
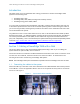
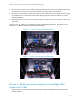
See Figure 4 for an example of a completed left-side mounted CMA installation. See Figure 5 for an
example of a completed right-side mounted CMA installation.
Left-side mounted CMA installation Figure 4.
Right-side mounted CMA installation Figure 5.
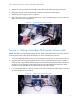
Section 2: Replacing a power supply on a PowerEdge T620
system with a CMA
1. Swing the CMA to its service position as described in the CMA Installation Instructions provided
with the CMA kit.