Dell™ PowerVault™ 132T LTO Tape Library Upgrading to LTO-2 Tape Drive Modules w w w. d e l l . c o m | s u p p o r t . d e l l .
Notes, Notices, and Cautions NOTE: A NOTE indicates important information that helps you make better use of your computer. NOTICE: A NOTICE indicates either potential damage to hardware or loss of data and tells you how to avoid the problem. CAUTION: A CAUTION indicates a potential for property damage, personal injury,or death. ___________________ Information in this document is subject to change without notice. © 2003–2006 Dell Inc. All rights reserved.
This document provides information about upgrading Dell™ PowerVault™ 132T LTO tape drive modules to LTO-2. You must perform the following procedures: • Installing drives • Updating tape library firmware Installing Drives If you have only one drive module installed in the library, that module must be in the centermost drive bay. CAUTION: Before performing this procedure, read and follow the safety instructions in your System Information Guide.
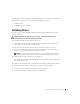
w w w. d e l l . c o m | s u p p o r t . d e l l . c o m Figure 2-1. 9 10 Removing the Drive Module Cover Plate Reconnect the tape library and the host system to an electrical outlet. Turn on the tape library. An error message may appear on the LCD that reads Drive Error or Drive Offline. This behavior is normal until the tape library firmware has been updated. 11 When the tape library is turned on and online, turn on the host system. 12 Update the firmware. See "Updating the Tape Library Firmware.
Updating the Tape Library Firmware You can update the firmware using one of the following methods: • Using a Web browser • Using a serial connection You must download the latest firmware package from the Dell Support website at support.dell.com. After you download the package, the firmware file will be located at c:\dell\drivers\rxxxxx\LTO-2 Library, where rxxxxx is the release number of the downloaded firmware package.
w w w. d e l l . c o m | s u p p o r t . d e l l . c o m Updating Firmware Using a Serial Connection 1 Turn on the tape library. 2 Connect one end of a straight-through serial cable to the serial port of the tape library (not the serial port for the remote management unit). 3 Connect the other end of the serial cable to a COM port on the system that has the updated firmware that you downloaded.
Dell™ PowerVault™ 132T LTO 磁带库 升级至 LTO-2 磁带驱动器模块 w w w. d e l l . c o m | s u p p o r t . d e l l .
注、注意和警告 注 : 注表示可以帮助您更好地使用计算机的重要信息。 注意 : 注意表示硬件的潜在损坏或数据丢失,并且告诉您如何避免此类问题。 警告 : 警告表示可能导致财产损失、人身伤害或死亡的潜在危险。 ___________________ 本说明文件中的信息如有更改,恕不另行通知。 © 2003–2006 Dell Inc. 版权所有,翻印必究。 未经 Dell Inc. 书面许可,严禁以任何方式进行复制。 本文件中使用的商标 :Dell、 DELL 徽标和 PowerVault 是 Dell Inc. 的商标 ; Microsoft 和 Windows 是 Microsoft Corporation 的注册商标。 本说明文件中述及的其它商标和商品名称是指拥有相应标记和名称的公司或其制造的产品。 Dell Inc.
本说明文件提供将 Dell™ PowerVault™ 132T LTO 磁带驱动器模块升级为 LTO-2 的有关 信息。必须执行以下步骤: • 安装驱动器 • 更新磁带库固件 安装驱动器 如果您在库中仅安装了一个驱动器模块,该模块必须位于最中间的驱动器托架中。 警告 : 在执行此步骤之前,请阅读并遵循 《系统信息指南》中的安全说明。 要安装驱动器模块,请执行以下步骤: 1 关闭主机系统和连接的外围设备 (包括磁带库),然后断开系统与电源插座的连 接。 2 断开将磁带库连接至主机系统的 SCSI 电缆的连接。 3 在库背面拧松指旋螺钉,卸下盖板 (参见图 4-1)或要更换的驱动器模块。 注 : 如果卸下盖板,请将其放置在一个方便拿取的地方。如果卸下可选驱动器,则必 须使用盖板来确保库的正常操作和良好冷却。 4 将驱动器模块滑入到位。参见图 4-2。 驱动器模块的金属边缘应插入驱动器托架左侧的塑料导轨中。 5 拧紧驱动器模块上的四颗指旋螺钉,直至与机箱保持齐平。 6 将 SCSI 电缆连接至驱动器模块上的任意一个 SCSI 连接器上。 7 将 SCSI 电缆的另一端连接至主机系统
www.dell.com | support.dell.com 图 4-1. 9 10 卸下驱动器模块盖板 将磁带库和主机系统重新连接至电源插座。 打开磁带库。 LCD 上可能会显示一个错误信息,即 Drive Error (驱动器错误)或 Drive Offline (驱动器脱机)。这属于正常,更新磁带库固件后即可消除。 11 磁带库打开并且联机后,请打开主机系统。 12 更新固件。请参阅 “更新磁带库固件”。 图 4-2.
更新磁带库固件 可选用下列任一种方法来更新固件。 • 使用网络浏览器 • 使用串行连接 必须从 Dell 支持网站 support.dell.
www.dell.com | support.dell.
Bibliothèque de bandes Dell™ PowerVault™ 132T LTO Mise à niveau vers les modules de lecteur de bande LTO-2 w w w. d e l l . c o m | s u p p o r t . d e l l .
Remarques, avis et précautions REMARQUE : Une REMARQUE fournit des informations importantes qui vous aident à mieux utiliser votre ordinateur. AVIS : Un AVIS vous avertit d’un risque de dommage matériel ou de perte de données et vous indique comment éviter le problème. PRÉCAUTION : Une PRÉCAUTION indique un risque potentiel de dommage matériel ou corporel, ou de mort. ___________________ Les informations contenues dans ce document sont sujettes à modification sans préavis. © 2003–2006 Dell Inc.
Ce document fournit des informations sur la mise à niveau des modules de lecteur de bande Dell™ PowerVault™ 132T LTO vers LTO-2. Vous devez effectuer les procédures suivantes : • Installation des lecteurs • Mise à jour du micrologiciel de la bibliothèque de bandes Installation des lecteurs Si un seul module de lecteur est installé dans votre bibliothèque de bandes, celui-ci doit se trouver dans la baie la plus centrale.
w w w. d e l l . c o m | s u p p o r t . d e l l . c o m Figure 6-1. 9 10 Retrait du capot du module de lecteur Reconnectez la bibliothèque de bandes et le système hôte à une prise électrique. Mettez sous tension la bibliothèque de bandes. Un message d'erreur indiquant Drive Error (Erreur du lecteur) ou Drive Offline (Lecteur hors ligne) peut alors s'afficher sur l'écran LCD. Cette situation est normale jusqu'à la mise à jour du micrologiciel de la bibliothèque de bandes.
Mise à jour du micrologiciel de bibliothèque de bandes Pour mettre à jour le micrologiciel, utilisez l'une des méthodes suivantes : • Utilisation d'un navigateur Web • Utilisation d'une connexion série Vous devez télécharger le progiciel le plus récent depuis le site Web Dell Support à l'adresse support.dell.com. Une fois le progiciel téléchargé, le fichier micrologiciel se trouvera dans c:\dell\drivers\rxxxxx\LTO-2 Library, où rxxxxx est le numéro de version du progiciel téléchargé.
w w w. d e l l . c o m | s u p p o r t . d e l l . c o m Mise à jour du micrologiciel à l'aide d'une connexion série 1 Mettez sous tension la bibliothèque de bandes. 2 Connectez l'une des extrémités d'un câble série intermédiaire au port série de la bibliothèque de bandes (et non au port série de l'unité de gestion à distance). 3 Connectez l'autre extrémité du câble série à un port COM du système sur lequel se trouve le micrologiciel mis à jour que vous avez téléchargé.
Dell™ PowerVault™ 132T LTO Bandbibliothek Aufrüsten auf LTO-2 Bandlaufwerk-Module w w w. d e l l . c o m | s u p p o r t . d e l l .
Anmerkungen, Hinweise und Vorsichtshinweise ANMERKUNG: Eine ANMERKUNG macht auf wichtige Informationen aufmerksam, die Ihnen die Arbeit mit dem Computer erleichtern. HINWEIS: HINWEIS warnt vor möglichen Beschädigungen der Hardware oder vor Datenverlust und erläutert, wie das vermieden werden kann. VORSICHT: Durch VORSICHT werden Sie auf Gefahrenquellen hingewiesen, die materielle Schäden, Verletzungen oder sogar den Tod von Personen zur Folge haben können.
In diesem Dokument befinden sich Informationen zum Aufrüsten von Dell™ PowerVault™ 132T LTO Bandlaufwerk-Modulen auf LTO-2. Die folgenden Verfahren müssen ausgeführt werden: • Installieren von Laufwerken • Aktualisieren der Bandbibliotheks-Firmware Installieren von Laufwerken Wenn die Bibliothek nur ein Laufwerkmodul enthält, muss dieses im mittleren Laufwerkschacht installiert werden.
w w w. d e l l . c o m | s u p p o r t . d e l l . c o m Abbildung 8-1. 9 10 Entfernen der Abdeckplatte des Laufwerkmoduls Schließen Sie die Bandbibliothek und das Host-System wieder an die Stromversorgung an. Schalten Sie die Bandbibliothek ein. Auf dem LCD wird möglicherweise eine von zwei Fehlermeldungen angezeigt: Drive Error (Laufwerkfehler) oder Drive Offline (Laufwerk offline). Dieses Verhalten ist normal, solange die Firmware der Bandbibliothek noch nicht aktualisiert wurde.
Bandbibliotheks-Firmware aktualisieren Zur Aktualisierung der Firmware stehen folgende Optionen zur Verfügung: • Über einen Web-Browser • Seriellen Anschluss verwenden Sie müssen das aktuellste Firmware-Paket von der Dell Support-Website unter support.dell.com herunterladen. Nachdem Sie das Paket heruntergeladen haben, befindet sich die Firmware-Datei im folgenden Verzeichnis c:\dell\drivers\rxxxxxLTO-2-Bibliothek, wobei rxxxxx die Versionsnummer des heruntergeladenen Firmware-Paket ist.
w w w. d e l l . c o m | s u p p o r t . d e l l . c o m 9 Überprüfen Sie die Firmwareversion auf der Haupt-Webseite der Fernverwaltungseinheit. Die Firmwareversion wird im Feld Library Firmware (Bibliotheks-Firmware) angezeigt. Aktualisieren der Firmware über eine serielle Verbindung 1 Schalten Sie die Bandbibliothek ein. 2 Verbinden Sie ein Ende eines seriellen Kabels mit der seriellen Schnittstelle der Bandbibliothek (nicht mit der seriellen Schnittstelle der Fernverwaltungseinheit).
Dell™ PowerVault™ 132T LTO テープライブラリ LTO-2 テープドライブ モジュールへのアップグレード www.dell.com | support.dell.
メモ、注意、警告 メモ : コンピュータを使いやすくするための重要な情報を説明しています。 注意 : ハードウェアの損傷やデータの損失の可能性を示し、その危険を回避するための方法を説明し ています。 警告 : 物的損害、けが、または死亡の原因となる可能性があることを示します。 ___________________ この文書の情報は、事前の通知なく変更されることがあります。 © 2003–2006 すべての著作権は Dell Inc. にあります。 Dell Inc. の書面による許可のない複写は、いかなる形態においても厳重に禁じられています。 この文書に使用されている商標について:Dell、DELL のロゴ、および PowerVault は、Dell Inc. の商標です。Microsoft お よび Windows は、Microsoft Corporation の登録商標です。 この文書では、上記記載以外の商標や会社名が使用されている場合があります。これらの商標や会社名は、一切、Dell Inc. に帰属するものではありません。 2006 年 1 月 P/N H1038 Rev.
本書は、Dell™ PowerVault™ 132T LTO テープドライブモジュールの LTO-2 へのアップグ レードに関する情報を記載しています。以下の手順を実行してください。 • • ドライブの取り付け テープライブラリファームウェアのアップデート ドライブの取り付け ライブラリにインストールされたドライブモジュールが 1 つだけの場合、そのモジュールは真ん 中のドライブベイになければなりません。 警告 : この手順を実行する前に、『製品情報ガイド』にある安全にお使いいただくための注意をよく 読み、指示に従ってください。 ドライブモジュールを取り付けるには、以下の手順を実行してください。 1 ホストシステムおよびテープライブラリを含めた付属の周辺機器のスイッチを切り、コン セントを抜いてシステムの電源を切ります。 2 テープライブラリとホストシステムを接続する SCSI ケーブルを取り外します。 3 ライブラリの背面で、蝶ネジを緩めカバープレートを取り外すか(図 10-1 を参照)または 交換したいドライブモジュールを取り外します。 メモ : カバープレートを取り外す場合は、適切な場
www.dell.com | support.dell.com 図 10-1. 9 10 ドライブモジュールカバープレートの取り外し テープライブラリおよびホストシステムをコンセントに接続します。 テープライブラリの電源を入れます。 LCD に、Drive Error(ドライブエラー)または Drive Offline(ドライブがオフラ イン)というエラーメッセージが現れる場合がありますが、これはテープライブラリ ファームウェアがアップデートされる際の正常な動作です。 11 テープライブラリの電源を入れてオンライン状態にし、ホストシステムの電源を入れます。 12 ファームウェアをアップデートします。「テープライブラリファームウェアのアップデー ト」を参照してください。 図 10-2.
テープライブラリファームウェアのアップデート 以下の方法のうち、どちらかを使用してファームウェアをアップデートできます。 • • Web ブラウザを使用する シリアル接続を使用する デルサポートのウェブサイト support.jp.dell.
www.dell.com | support.dell.
Dell™ PowerVault™ 132T LTO 테이프 라이브러리 LTO-2 테이프 드라이브 모듈로 업그레이드 w w w. d e l l . c o m | s u p p o r t . d e l l .
주 , 주의사항 및 주의 주 : 주는 컴퓨터의 활용도를 높이는 데 도움이 되는 중요한 정보입니다 . 주의사항 : 주의사항은 하드웨어 손상이나 데이터 손실의 가능성을 알리고 이러한 문제를 방 지하는 방법을 알려줍니다 . 주의 : 주의는 잠재적으로 물건의 손상 , 신체적 부상 또는 사망 등과 같은 결과를 초래 할 수 있 음을 뜻합니다 . ___________________ 이 문서의 정보는 사전 통보없이 변경될 수 있습니다 . © 2003–2006 Dell Inc. 저작권 본사 소유 . Dell Inc. 의 서면 승인 없이 어떠한 방법으로도 무단 복제하는 것을 엄격히 금지합니다 . 본 설명서에 사용된 상표 : Dell, DELL 로고 및 PowerVault 는 Dell Inc. 의 상표입니다 . Microsoft 및 Windows 는 Microsoft Corporation 의 등록 상표입니다 .
이 문서는 Dell™ PowerVault™ 132T LTO 테이프 드라이브 모듈을 LTO-2 로 업그레이드 하는 정보를 제공합니다 . 다음 절차를 수행하십시오 . • 드라이브 설치 • 테이프 라이브러리 펌웨어 업데이트 드라이브 설치 라이브러리에 하나의 드라이브 모듈만 설치한 경우 해당 모듈은 한복판 드라이브 베이 에 있어야 합니다 . 주의 : 이 절차를 수행하기 전에 " 시스템 정보 안내서 " 의 안전 지침을 읽어 보십시오 . 드라이브 모듈을 설치하려면 다음 단계를 수행하십시오 . 1 호스트 시스템과 테이프 라이브러리를 포함하여 연결된 주변 장치를 모두 끈 다음 전 원 콘센트에서 시스템을 분리하십시오 . 2 호스트 시스템에 테이프 라이브러리를 연결하는 SCSI 케이블을 분리하십시오 . 3 라이브러리 후면에서 고정 나사를 풀고 교체할 장착판 ( 그림 12-1 참조 ) 또는 드라이 브 모듈을 분리하십시오 . 주 : 장착판을 분리한 경우 이를 적절한 장소에 보관하십시오 .
www.dell.com | support.dell.com 그림 12-1. 드라이브 모듈 장착판 분리 9 10 테이프 라이브러리와 호스트 시스템을 전원 콘센트에 다시 연결하십시오 . 테이프 라이브러리를 켜십시오 . LCD 에 Drive Error 또는 Drive Offline 과 같은 오류 메시지가 표시될 수 있 습니다 . 오류 메시지는 테이프 라이브러리가 업데이트되기 전까지 나타나며 정상적 인 작동입니다 . 11 테이프 라이브러리를 켜고 온라인 상태가 되면 호스트 시스템을 켜십시오 . 12 펌웨어를 업데이트하십시오. "테이프 라이브러리 펌웨어 업데이트"를 참조하십시오. 그림 12-2.
테이프 라이브러리 펌웨어 업데이트 다음 중 한 가지 방법을 사용하여 펌웨어를 업데이트할 수 있습니다 . • 웹 브라우저 사용 • 직렬 연결 사용 Dell 지원 웹사이트 (support.dell.com) 에서 최신 펌웨어 패키지를 다운로드합니다 . 이 패키지를 다운로드하면 , 해당 펌웨어 파일은 c:\dell\drivers\rxxxxx\LTO-2 Library 에 위 치하게 됩니다 . 여기서 , rxxxxx 는 다운로드된 펌웨어 패키지의 출시 번호입니다 . 웹 브라우저를 사용한 펌웨어 업데이트 1 다운로드된 펌웨어 파일이 들어 있는 시스템에서 웹 브라우저를 열고 , 펌웨어를 업데 이드하려는 라이브러리에 설치된 원격 관리 단위의 IP 주소로 갑니다 . 2 기본 페이지에서 Firmware( 펌웨어 ) 를 클릭하십시오 . 3 라이브러리의 관리자 이름과 암호를 입력하십시오 . 기본 사용자 이름은 admin 이고 기본 암호는 password 입니다 .
www.dell.com | support.dell.com 직렬 연결로 펌웨어 업데이트 1 테이프 라이브러리를 켜십시오 . 2 직통의 직렬 케이블 한쪽 끝을 테이프 라이브러리의 직렬 포트에 연결하십시오(원격 관리 장치의 직렬 포트가 아님 ). 3 직렬 케이블의 반대쪽 끝을 다운로드한 업데이트된 펌웨어가 있는 시스템의 COM 포 트에 연결하십시오 . 4 Microsoft® Windows® 운영체제의 명령 프롬프트를 열고 , 다운로드된 펌웨어 파일이 들어 있는 디렉터리로 변경합니다 . 주 : 다운로드된 펌웨어 파일은 c:\dell\drivers\rxxxxx\LTO-2 Library 에 있습니다 . 여기서 , rxxxxx 는 다운로드된 펌웨어 패키지의 출시 번호입니다 . 5 명령 프롬프트에서 다음 정보를 입력하십시오 . PV132T_LTO2_Update x 여기서 x 는 직렬 케이블이 연결된 시스템의 COM 포트 번호입니다 . 6 를 누르십시오 .
Biblioteca de cinta Dell™ PowerVault™ 132T LTO Actualización a módulos de la unidad de cinta LTO-2 w w w. d e l l . c o m | s u p p o r t . d e l l .
Notas, avisos y precauciones NOTA: Una NOTA proporciona información importante que le ayuda a utilizar su equipo de la mejor manera posible. AVISO: Un AVISO indica la posibilidad de daños al hardware o pérdida de datos y le explica cómo evitar el problema. PRECAUCIÓN: Una PRECAUCIÓN indica un posible daño material, lesión corporal o muerte. ___________________ La información contenida en este documento puede modificarse sin aviso previo. © 2003–2006 Dell Inc. Todos los derechos reservados.
Este documento proporciona información sobre la actualización de los módulos de la unidad de cinta Dell™ PowerVault™ 132T LTO a LTO-2. Debe realizar los siguientes procedimientos: • Instalación de unidades • Actualización del firmware de la biblioteca de cinta Instalación de unidades Si tiene un módulo de unidad instalado en la biblioteca, dicho módulo debe encontrarse en el compartimento para unidades central.
www.dell.com | support.dell.com Figure 14-1. 9 10 Extracción de la cubierta del módulo de la unidad Vuelva a conectar la biblioteca de cinta y el sistema host a la toma eléctrica. Encienda la biblioteca de cinta. Es posible que aparezca el mensaje de error Drive Error (Error de unidad) o Drive Offline (Unidad desconectada) en la pantalla LCD. Este comportamiento es normal hasta que se actualiza el firmware de la biblioteca de cinta. 11 Cuando ésta esté encendida y en línea, encienda el sistema host.
Actualización del firmware de la biblioteca de cinta Puede actualizar el firmware utilizando uno de los siguientes métodos: • Mediante un explorador Web • Mediante una conexión en serie Debe descargar el último paquete de firmware del sitio web Dell Support support.dell.com. Una vez que haya descargado el paquete, el archivo del firmware se encontrará en c:\dell\drivers\rxxxxx\LTO-2 Library, donde rxxxxx es el número de publicación del paquete de firmware que ha descargado.
www.dell.com | support.dell.com Actualización del firmware mediante una conexión serie 1 Encienda la biblioteca de cinta. 2 Conecte un extremo del cable serie directo al puerto serie de la biblioteca en cinta (no al puerto serie de la unidad de administración remota). 3 Conecte el otro extremo del cable serie a un puerto COM del sistema que tenga el firmware actualizado que ha descargado.