
User guide


Upgrading Tape Drive Modules 3
This document provides information about upgrading Dell™ PowerVault™ 132T LTO tape
drive modules to LTO-2. You must perform the following procedures:
• Installing drives
• Updating tape library firmware
Installing Drives
If you have only one drive module installed in the library, that module must be in the
centermost drive bay.
CAUTION: Before performing this procedure, read and follow the safety
instructions in your System Information Guide.
To install drive modules, perform the following steps:
1 Turn off the host system and attached peripherals, including the tape library, and
disconnect the system from its electrical outlet.
2 Disconnect the SCSI cable that connects the tape library to the host system.
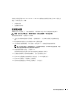
3 On the back of the library, loosen the thumbscrews and remove the cover plate (see
Figure 2-1) or the drive module that you want to replace.
NOTE: If you remove the cover plate, store it in a convenient place. The cover plate is
required for proper operation and cooling of the library if the optional drive is removed.
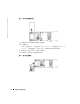
4
Slide the drive module into position. See Figure 2-2.
The metal edge on the drive module should be inserted into the plastic guide on the
left side of the drive bay.
5 Tighten the four thumbscrews on the drive module until it is flush with the chassis.
6 Connect the SCSI cable to either SCSI connector on the drive module.
7 Connect the other end of the SCSI cable to the host system.
8 Connect a terminator to the last device in the SCSI chain.