™ 'HOO 3RZHU9DXOW 6WRUDJH 6\VWHPV /2&.
1RWHV &DXWLRQV DQG :DUQLQJV Throughout this guide, blocks of text may be accompanied by an icon and printed in bold type or in italic type. These blocks are notes, cautions, and warnings, and they are used as follows: NOTE: A NOTE indicates important information that helps you make better use of your computer system.
'HOO 3RZHU9DXOW [6 6WRUDJH 6\VWHPV /RFN %DU 5HSODFHPHQW This document explains how to replace the lock bar in your Dell PowerVault 20xS storage system. Before you perform any of the procedures in this section, read the following warning for your personal safety and to prevent damage to the storage system from electrostatic discharge (ESD).
Perform the following steps to replace the lock bar in your Dell PowerVault 20xS storage system: 1. Turn off the system and remove all power and signal cables. 2. If the storage system is installed in a rack, it must be removed from the rack. Likewise, the storage system must be removed from its enclosure if it is used in a stand-alone configuration. See the Dell PowerVault 20xS Storage System Installation and Service Guide for rack and stand-alone information.
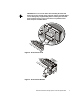
&$87,21 ([WUD FDUH PXVW EH WDNHQ ZKHQ KDQGOLQJ WKH KDUG GLVN GULYHV 7KH FDUULHUV SURYLGH VRPH SURWHFWLRQ EXW WKH KDUG GLVN GULYHV FDQ EH GDPDJHG E\ URXJK KDQGOLQJ :KHQ UHPRYLQJ WKH KDUG GLVN GULYHV IURP WKH VWRUDJH V\VWHP SODFH WKHP RQ D SDGGHG VXUIDFH 1HYHU GURS WKH KDUG GLVN GULYHV )LJXUH 'ULYH &DUULHU /RFN )LJXUH 'ULYH &DUULHU +DQGOH Dell PowerVault 20xS Storage System Lock Bar Replacement 3
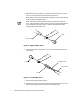
7. While facing the storage system, use a 9/64-inch Allen (hex) wrench to remove the screw on the right side of the lock bar tube (see Figure 4). With the Allen wrench, push into the tube to engage the screw head (the lock bar is spring-loaded on the opposite end). NOTE: If the entire lock bar tube rotates while you are trying to remove the screw, wrap some fabric or paper over the lock bar.
11. Attach the new left and right lock arm brackets to the storage system. 12. Replace the lock bar with the new lock bar. 13. Clean off the old Loctite on the left screw, and then place a new drop of Loctite halfway between the thread of the screw and the tip. 14. Use the Allen wrench and the screw with Loctite to attach the lock bar tube to the left lock arm. 15. Insert the spring and internal lock bar into the lock bar tube. Make sure that the spring is on the left end of the tube. 16.
6 Dell PowerVault 20xS Storage System Lock Bar Replacement
3ULQWHG LQ WKH 8 6 $ ™ & ZZZ GHOO FRP 3 1 3