
Release Notes
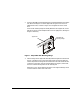


2. If the two adjustable rail mounting flanges are not already attached to the support
rails, attach one flange to one of the support rails using two 10-32 x 1/2-inch
Phillips-head screws, as shown in Figure 1. Do not tighten the screws at this
time.
If the two rail mounting flanges are already attached to the support rails, ensure
that the two 10-32 x 1/2-inch Phillips-head screws are slightly loose, allowing the
flanges to slide freely.
)LJXUH$GMXVWDEOH5DLO0RXQWLQJ)ODQJH
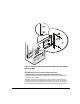
3. Place the flange of the support rail assembly behind the right front vertical rail of
the rack. Thread two 10-32 screws with a flat washer and a square alignment
washer and push them through the front vertical rail of the rack and into the two
center-most screw holes of the rail mounting flange (see Figure 2). Ensure that
the rail is centered vertically within the 3U mounting area.
Tighten the screws. Ensure that the full surface of the support rail flange comes
in contact with the surface of the vertical rail.
support rail
adjustable rail
mounting flange