
Release Notes
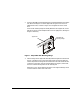


)LJXUH$WWDFKLQJWKH6XSSRUW5DLO$VVHPEO\WRWKH)URQW9HUWLFDO
5DLORIWKH5DFN
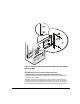
4. Slide the adjustable rail mounting flange out until it meets the rear vertical rail of
the rack. Ensure that the rail is level from front to back.
5. Thread two 10-32 screws with a flat washer and a square alignment washer and
push them through the rear vertical rail of the rack and into the two holes of the
adjustable rail mounting flange (see Figure 3). Tighten the two screws.
6. Tighten the two 10-32 screws that hold the adjustable rail mounting flange to the
support rail.
7. Repeat steps 3 through 6 to install the second support rail.
3U