
Owner's manual


support.dell.com Dell PowerVault NAS Appliances Boot Hard-Disk Replacement 1-3
5. If your replacement hard-disk drive is already installed in a drive carrier, skip to
step 2 of the procedure, “Hard-Disk Drive Replacement.”
6. If the replacement hard-disk drive has no drive carrier, you must remove the
faulty hard-disk drive from its drive carrier by performing the following steps:
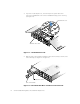
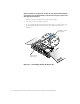
a. Remove the four screws that secure the drive to the drive carrier
(see Figure 1-3).
b. Remove the hard-disk drive from the drive carrier.
Figure 1-3. Removing the Hard-Disk Drive From its Drive Carrier
Hard-Disk Drive Replacement
To install a replacement hard-disk drive, perform the following steps.
NOTE: If your replacement hard-disk drive is already installed in a carrier, start
at step 2.
1. Install the replacement hard-disk drive into the drive carrier and secure it with the
four screws you removed in step 6 of the previous procedure.
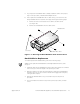
2. Open the handle on the drive carrier and slide the replacement hard-disk drive
and drive carrier into its slot. Close the handle until it engages the front panel,
locking the drive in place.
3. Reinstall the hard-disk drive lock you removed in step 3 of the previous
procedure.
4. If you removed the front bezel in step 2 of the previous procedure, reinstall
it now.
hard-disk drive
screws (4)
hard-disk drive carrier