Dell PowerVault MD-Series Storage Arrays Storage Replication Adapter (SRA) Best Practices Guide
Notes, Cautions, and Warnings NOTE: A NOTE indicates important information that helps you make better use of your computer. CAUTION: A CAUTION indicates either potential damage to hardware or loss of data and tells you how to avoid the problem. WARNING: A WARNING indicates a potential for property damage, personal injury, or death. © 2013 Dell Inc.
Contents 1 Storage Replication Adapter (SRA) Installation And Configuration................................... 5 Storage Replication Adapter (SRA) Download.........................................................................................................5 Installation Procedure.............................................................................................................................................. 5 Password-Protected Storage Arrays..................................................
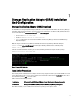
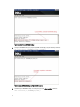
Storage Replication Adapter (SRA) Installation And Configuration 1 Storage Replication Adapter (SRA) Download The Dell MD-Series Storage Replication Adapter (SRA) 5.0 is used in conjunction with VMware Site Recovery Manager to facilitate datacenter failover between separate vCenter Server environments. To utilize the SRA, download the latest version of the SRA from the Drivers and Download page at dell.com/support. • Current version is 05.10.3600.00xx • Installer is SRAInstaller-05.10.3600.00xx.
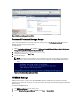
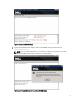
Figure 2. Site Recovery Manager (Rescan SRAs) Password-Protected Storage Arrays If your environment implements password security on the storage arrays, the SraConfigurationData.xml file must be modified to prompt for storage array password. To modify the files: 1. Edit the SraConfigurationData.xml file available at C:\Program Files (x86)\VMware\VMware vCenter Site Recovery Manager\storage\sra\Dell\config\SraConfigurationData.xml 2. Locate the tag. 3.
Figure 4. MD Storage Manager Execute Script 3. In the Script Editor window, to review your current NVSRAM settings, run the following command: show controller[0] NVSRAMByte[0x3b]; NOTE: From the Script Editor window, you can use the Tools → Verify and Execute option to both test your command syntax and execute your command. Your current NVSRAM setting for the specified RAID controller [0] is displayed.
Figure 5. Review Current NVSRAM Settings 4. Change the NVSRAM setting for your primary RAID controller [0] using the following command: set controller[0] NVSRAMByte[0x3b]=2;HTTP/1 Figure 6. Change NVSRAM Setting on Primary RAID Controller 5.
Figure 7. Confirm New NVSRAM Setting 6. Reset the primary RAID controller module to load the new NVSRAM setting into controller memory: reset controller[0]; NOTE: The reset controller command takes several minutes to complete. Do not perform I/O operations involving the RAID controller until the command successfully completes. Figure 8.
7. Repeat Step 3 through Step 6 on the secondary RAID controller by substituting [1] for [0] in the command syntax examples shown. 8. Close the Script Editor window. SRA Device Management Service The process monitors and synchronizes communications between the MD Storage Replication Adapter (SRA) and the MD storage arrays. Site Recovery Manager (SRM) workload is partitioned between a persistent server and multiple transient client programs which endure only during a single SRM command.
vmarg.1=-Xms256m vmarg.2=-Xmx512m NOTE: Any changes to the NesSvc.ini file requires you to stop and restart the service in order for the changes to take effect.
Asynchronous Remote Replication 2 From RAID controller firmware version 07.84.44.60, MD Storage Replication Adapter (SRA) supports asynchronous remote replication groups. This feature performs remote replication using Point-in-Time (PiT) snapshots and is supported on both Fibre Channel and iSCSI MD storage arrays. iSCSI-Based Remote Replication With added support for Remote Replication over iSCSI protocol, greater replication distances are now possible.
• Protection works on a datastore level (storage array virtual disk). All virtual machines on the same datastore that requires protection are also protected and replicated. • Multiple small-sized datastores and virtual disks must be used to limit the amount of data replicated to the recovery site. • Locate (migrate) protected virtual machines to the same datastore and migrate any VMs that do not require protection to other locations.
Figure 9. Site Recovery Manager Advanced Settings 2. Click storage and set the following values: – storage.commandTimeout = 900 – storageProvider.hostRescanRepeatCnt = 2 – storageProvider.hostRescanTimeoutSec = 900 3. Click OK to save your changes. 4. Click storageProvider and set the following values: storageProvider.fixRecoveredDatastoreNames = enabled ESX/ESXi Host Settings The following changes are recommended for ESX/ESXi host settings: • Disk.
Snapshot Repository Sizing 3 A new feature of firmware 07.83 are Point-in-Time Snapshots. These provide the ability to roll-back snapshots to previous point-in-time saves and optimize the data changes between snapshot images. This feature utilizes two separate repositories to facilitate tracking of changes to the base volume. They are the Snapshot Group repository and Snapshot Volume repository.
Figure 11. MDSM Snapshot Volume View How SRA Uses Snapshots The MD-Series SRA utilizes Point-in-Time Snapshots if the feature is enabled on the storage array During test failover, the SRA creates a Snapshot Group, Snapshot Image, and Snapshot Volume on the recovery site’s storage array for all volumes contained in the protection groups being tested.
Figure 12. MDSM Snapshot Volume View Details like available repository space, mode, or timestamps may be viewed by selecting the Snapshot Volumes or Snapshot Groups in the drop-down box.
Getting Help 4 Related Documentation NOTE: For all PowerEdge and PowerVault documentation, go to dell.com/support/manuals and enter the system Service Tag to get your system documentation. NOTE: For Dell Support Forums, go to en.community.dell.com/support-forums/default.aspx. NOTE: For Dell Advanced Search , go to search.dell.com/index.aspx. You product documentation includes: Getting Started Guide Provides an overview of system features, setting up your system, and technical specifications.
Documentation Feedback If you have feedback for this document, write to documentation_feedback@dell.com. Alternatively, you can click on the Feedback link in any of the Dell documentation pages, fill up the form, and click Submit to send your feedback. Locating Your System Service Tag Your system is identified by a unique Express Service Code and Service Tag number. The Express Service Code and Service Tag are found on the front of the system by pulling out the information tag.