Dell™ 3100MP Projector User's Guide The information below is provided by the supplier of the referenced device without independent verification by Dell and is subject to the restrictions and disclaimers. Safety Instructions About Your Projector Installation Using Your Projector Troubleshooting Specifications Regulatory Notices Contacting Dell Notes, Notices, and Cautions NOTE: A NOTE indicates important information that helps you make better use of your computer.
Back to Contents Page Safety Instructions: Dell™ 3100MP Projector CAUTION Use the following safety guidelines to help protect your projector from potential damage and to ensure your own personal safety: The lamp becomes very hot with use. Do not attempt to replace the lamp after use until the projector has been allowed to cool down for at least 30 minutes, and follow all instructions in "Changing the Lamp." Do not touch the bulb or the lamp glass at any time.
Back to Contents Page About Your Projector: Dell™ 3100MP Projector Features Equipment Panel Control Main Unit Connection Ports Remote Control With Mouse Function and Laser Pointer Features Single chip 0.7" Texas Instruments DLP™ technology True XGA, 1024 x 768 addressable pixels 3.5 lb (1.
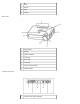
DVI-I signal cable for HDTV/component remote mouse Y-cable remote control with mouse function and laser pointer batteries (2) Dell 3100MP Projector User's Guide Dell 3100MP Projector Quick Start Card Dell 3100MP Projector Safety and Warranty Guide carrying case mini pin to mini pin cable Panel Control 1 temperature warning light 2 four directional keys 3 power button 4 lamp warning light 5 Menu
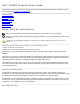
6 Enter 7 Source 8 Mute 9 Volume 1 panel control 2 speaker 3 power connector 4 zoom ring 5 focus ring 6 zoom lens 7 remote control receiver 8 elevator button 1 remote-mouse input connector Main Unit Connection Ports
2 HDTV/component video and computer input connector 3 audio input connector 4 composite video connector 5 S-video connector 6 monitor loop-through connector Remote Control With Mouse Function and Laser Pointer 1 light 2 Power button 3 PU button (page up) 4 laser pointer 5 volume controls 6 Mute button 7 Freeze button 8 directional pad 9 R-Sync button 10 Source button 11 PD button (page down) 12 keystone correction 13 zoom in/zoom out 14 Menu button
CAUTION: The remote control has a Class II laser that emits radiation. To reduce the risk of injury to the eyes, do not look directly into the laser light on the remote control and do not point the laser light into anyone's eyes. Battery Disposal: Your projector remote control uses zinc-manganese batteries. If you need to replace the batteries, see your Dell 3100MP Projector Quick Start Card. Do not dispose of used batteries along with household waste.
Back to Contents Page Installation: Dell™ 3100MP Projector Connecting the Projector Powering On/Off the Projector Adjusting the Projected Image Changing the Lamp Connecting the Projector 1 power cord 2 USB 3 remote mouse Y-cable 4 D-sub to DVI-I cable Powering On/Off the Projector Powering On the Projector NOTE: Turn on the projector before you turn on the source. 1. Remove the lens cap. 2. Ensure that the power cord and D-sub to DVI-I cable are securely connected.
1 power button 2 lens cap Powering Off the Projector 1. Press the power button to turn off the projector. The Power off the lamp? message appears on the OSD. 2. Press the power button again. The cooling fans continue to operate for about 30 seconds. 3. Disconnect the power cord from the electrical outlet and the projector. 4. If the LAMP light is solid orange, replace the lamp. 5. If the TEMP light is solid orange, the projector has overheated. The display automatically shuts down.
1 elevator button 2 elevator foot 3 tilt adjustment wheel Adjusting the Projector Zoom and Focus CAUTION: To avoid damaging the projector, ensure that the zoom lens is fully retracted before moving the projector or placing the projector in its carrying case. 1. Rotate the zoom ring to zoom in and out. 2. Rotate the focus ring until the image is clear. The projector focuses at distances from 3.3 ft to 39.4 ft (1 m to 12 m).
1 zoom ring 2 focus ring Adjusting Projection Image Size Max. Screen (Diagonal) Min. 25" 21" 98" 82" 123" 102" 196" 163" 245" 204" 294" 245" Max. 20.0"X15.0 78.4"X58.8" 98.4"X73.8" 156.8"X117.6" 196"X147" 235.2"X176.4" (WXH) Min. 16.8X12.6" 65.6"X49.2" 81.6"X61.2" 130.4"X97.8" 163.2"X122.4" 196.0"X147.0" (WXH) Distance 3.3' 13.1' 16.4' 26.2' 32.8' 39.4' Screen Size * This graph is for user reference only.
Changing the Lamp Replace the lamp when you see the Lamp may fail soon! Replacement suggested! message on the screen by carefully following these instructions. CAUTION: The lamp becomes very hot with use. Do not attempt to replace the lamp after use until the projector has been allowed to cool down for at least 30 minutes. Lamp Changing Procedure: 1. Turn off the projector and disconnect the power cord. 2. Let the projector cool for at least 30 minutes. 3.
Back to Contents Page Using Your Projector: Dell™ 3100MP Projector Panel Control Remote Control On-Screen Display Panel Control Power See "Powering On/Off the Projector." Source Press to choose RGB, Digital RGB, S-video, and composite sources. R-Sync (Resync) Press to synchronize the projector to the input source. R-Sync will not operate if the OSD is displayed. Menu Press to activate the OSD. Press and to navigate through the menu tabs.
The Enter button functions as the left mouse button. If the remote control cover is open, use the directional pad to navigate through the OSD tabs. 1 directional pad 2 Enter button 3 laser radiation caution Power See "Power On/Off the Projector." Source Press the Source button to choose RGB, Digital RGB, S-video, and composite sources. R-Sync If the remote control cover is open, the R-Sync button synchronizes the projector to the input source.
Zoom In/Out (Computer Mode Only) Press the In button to digitally magnify an image up to 32 times on the screen. Press the Out button to reduce the zoomed image. This function cannot be used with SXGA+ and UXGA. Freeze Press the Freeze button to temporarily stop video motion. Press the button again to resume video motion. Mute Press the Mute button to mute or unmute the projector speaker. Volume Increases/decrease the speaker volume. Keystone Adjusts image distortion caused by tilting the projector.
Image-I (Computer Mode) Brightness Adjusts the brightness of the image. Press to darken the image. Press to lighten the image. Contrast Controls the degree of difference between the lightest and darkest parts of the picture. Adjusting the contrast changes the amount of black and white in the image. Press to decrease the contrast. Press to increase the contrast. Color Temp. Adjusts the color temperature. The range is from 6500K to 9000K, and the default is 7050K.
Image-I (Video Mode) Brightness Adjusts the brightness of the image. Press to darken the image. Press to lighten the image. Contrast Controls the degree of difference between the lightest and darkest parts of the picture. Adjusting the contrast changes the amount of black and white in the image. Press to decrease the contrast. Press to increase the contrast. Color Adjusts a video image from black and white to fully saturated color. Press to decrease the amount of color in the image.
Image-II (Computer Mode) Frequency Changes the display data frequency to match the frequency of your computer graphic card. If you experience a vertical flickering bar, use the frequency function to make an adjustment. Tracking Synchronizes the signal timing of the display with that of the graphic card. If you experience an unstable or flickering image, use the tracking function to correct it. 16 : 9 / 4 : 3 Select this function to fit your desired aspect ratio type.
Image-II (Video Mode) Keystone Correction Adjusts image distortion caused by tilting the projector. (± 16 degrees) 16 : 9 / 4 : 3 Select this function to fit your desired aspect ratio type. Color Temp. Adjusts the color temperature setting. The range is from 6500K to 9000K, and the default is 7050K. With the higher temperature settings, the screen looks colder; with the lower temperature, the screen looks warmer. Reset Select Yes to reset the display to its factory default settings.
Press to decrease the treble. Press to increase the treble. Bass Controls the lower frequencies of your audio source. Press to decrease the bass. Press to increase the bass. Stereo / Mono Mono : Mono sound effect. Stereo : Stereo sound effect. Mute Select the left icon to mute the volume. Select the right icon to unmute the volume. Language Language Press or to select the language you prefer. Management Menu Location Selects the location of the OSD on the screen.
The projector turns the image upside down for ceiling-mounted projection. Rear-Ceiling The projector simultaneously reverses and turns the image upside down. You can project from behind a translucent screen with a ceiling-mounted projection. Signal Type Select signal type from RGB, HDTV, and component video sources. Lamp Reminder The Lamp may fail soon! Replacement suggested! message appears on the screen 30 hours before the end of lamp life. Use this function to show or hide the message.
Back to Contents Page Troubleshooting: Dell™ 3100MP Projector No image appears on the screen Partial, scrolling, or incorrectly displayed image The screen does not display your presentation Image is unstable or flickering Image has vertical flickering bar Image is out of focus The screen is outstretched when displaying 16:9 DVD Image is reversed Lamp burns out or makes a popping sound If you experience problems with your projector, see the following troubleshooting tips.
The screen does not display your presentation If you are using a portable computer, press . Image is unstable or flickering Adjust the tracking in the OSD Image-II tab. Change the monitor color setting on your computer. Image has vertical flickering bar Adjust the frequency in the OSD Image-II tab. Check and reconfigure the display mode of your graphic card to make it compatible with the projector. Image is out of focus Adjust the focus ring on the projector lens.
Back to Contents Page Specifications: Dell™ 3100MP Projector Light Valve single-chip DLP™ technology Contrast Ratio 280:1 (Full On/Full Off) Lamp 130-watt, user-replaceable P-VIP lamp Number of Pixels 1024 x 768 Displayable Color 16.7M colors Projection Lens F/2.21–2.47, f=28.55–34.28 mm with 1.2x manual zoom lens Projection Screen Size 21–294 inches (diagonal) Projection Distance 3.3–39.4 ft (1m–12m) Video Compatibility NTSC, NTSC 4.
VGA 640X400 85 37.9 85 37.9 VGA 640X480 60 31.5 60 31.5 VGA 640X480 72 37.9 72 37.9 VGA 640X480 75 37.5 75 37.5 VGA 640X480 85 43.3 85 43.3 VGA 720X400 70 31.5 70 31.5 VGA 720X400 85 37.9 85 37.9 SVGA 800X600 56 35.2 56 35.2 SVGA 800X600 60 37.9 60 37.9 SVGA 800X600 72 48.1 72 48.1 SVGA 800X600 75 46.9 75 46.9 SVGA 800X600 85 53.7 85 53.7 XGA 1024X768 43.4 35.5 XGA 1024X768 60 48.4 60 48.4 XGA 1024X768 70 56.
Back to Contents Page Regulatory Notices: Dell™ 3100MP Projector Federal Communications Commission (FCC) Notice (U.S.
* For the following named product: DLP Projector 3100MP/DELL CHC7229 * Manufactured at: Coretronic Corporation We hereby declare that this device complies with Part 15 of the FCC Rules. Operation is subject to the following two conditions: 1. This device may not cause harmful interference, and 2. This device must accept any interference received, including interference that may cause undesired operation.
I, the undersigned, hereby declare that the equipment specified above conforms to the above Directive(s) and standards. Hsinchu, Taiwan March 29, 2002 Mr. Vincent Lin Head of RD Center Canadian Regulatory Information (Canada Only) This digital apparatus does not exceed the Class B limits for radio noise emissions from digital apparatus set out in the Radio Interference Regulations of the Canadian Department of Communications.
MIC Notice (South Korea Only) B Class Device Please note that this device has been approved for nonbusiness purposes and may be used in any environment, including residential areas. Polish Center for Testing and Certification Notice The equipment should draw power from a socket with an attached protection circuit (a three-prong socket). All equipment that works together (computer, monitor, printer, and so on) should have the same power supply source.
NOM Information (Mexico Only) The following information is provided on the device(s) described in this document in compliance with the requirements of the official Mexican standards (NOM) Exporter: Dell Computer Corporation One Dell Way Round Rock, TX 78682 Importer: Dell Computer de México, Paseo de la Reforma 2620, 11th Floor Col. Lomas Altas México DF CP 11950 Ship to: Dell Computer de Mexico, S.A. de C.V. al Cuidado de Kuehne & Nagel de México S. de R.I., Avenida Soles No. 55 Col.
Supply voltage: > 100–240 VAC Frequency: 50–60 Hz Current consumption: 1.
Back to Contents Page
Back to Contents Page Contacting Dell: Dell™ 3100MP Projector Overview Europe Contact Numbers International Dialing Codes Asia and Other Regions Contact Numbers Americas Contact Numbers Overview When you need to contact Dell, use the telephone numbers, codes, and electronic addresses provided in the following sections. "International Dialing Codes" provides the various codes required to make long-distance and international calls.
International Dialing Codes Click a listed country to obtain the appropriate contact numbers.
Portugal 00 35 — 005 65 Not required 09/091 27 11 Spain (Madrid) 00 34 91 Sweden (Upplands Vasby) 00 46 8 Switzerland (Geneva) 00 41 22 Taiwan 002 886 — Thailand 001 66 — U.K. (Bracknell) 010 44 1344 U.S.A.
Canada (North York, Ontario) Sales Website: www.dell.
El Salvador General Support 01-889-753-0777 Guatemala General Support 1-800-999-0136 Jamaica General Support 1-800-682-3639 Latin America Customer Technical Support (Austin, Texas, U.S.A.) 512 728-4093 Customer Service (Austin, Texas, U.S.A.) 512 728-3619 Fax (Technical Support and Customer Service) (Austin, Texas, U.S.A.) 512 728-3883 Sales (Austin, Texas, U.S.A.) 512 728-4397 SalesFax (Austin, Texas, U.S.A.
Panama General Support 001-800-507-0962 Peru General Support 0800-50-669 Puerto Rico General Support 800-805-7545 St. Lucia General Support 1-800-882-1521 Trinidad and Tobago General Support 1-800-805-8035 U.S.A.
(Return Material Authorization Numbers) Dell Sales toll free: 1-800-289-3355 toll free: 1-800-879-3355 Spare Parts Sales toll free: 1-800-357-3355 Desktop and Portable Fee-Based Technical Support toll free: 1-800-433-9005 Sales (Catalogs) toll free: 1-800-426-5150 Fax toll free: 1-800-727-8320 TechFax toll free: 1-800-950-1329 Dell Services for the Deaf, Hard-ofHearing, or Speech-Impaired toll free: 1-877-DELLTTY (1-877-335-5889) Switchboard U.S.
Care Home/Small Business Technical Support 01 795676-04 Preferred Accounts/Corporate Technical Support 0660-8779 Website: support.euro.dell.com E-mail: tech_support_central_europe@dell.com Belgium (Brussels) Technical Support 02 481 92 88 Customer Care 02 481 91 19 Home/Small Business Sales Denmark (Horsholm) NOTE: Customers in Denmark call Sweden for fax technical support.
E-mail: den_support@dell.com E-mail Support for Servers: Nordic_server_support@dell.com Finland (Helsinki) France (Paris) (Montpellier) Technical Support 09 253 313 60 Technical Support Fax 09 253 313 81 Relational Customer Care 09 253 313 38 Home/Small Business Customer Care 09 693 791 94 Fax 09 253 313 99 Switchboard 09 253 313 00 Website: support.euro.dell.com E-mail: fin_support@dell.
Home/Small Business Customer Care Global Segment Customer Care 06103 766-9570 Preferred Accounts Customer Care 06103 766-9420 Large Accounts Customer Care 06103 766-9560 Public Accounts Customer Care 06103 766-9555 Switchboard 06103 766-7000 Website: support.euro.dell.com E-mail: tech_support_central_europe@dell.
support.euro.dell.com/it/it/emaildell/ Corporate Technical Support 02 577 826 90 Customer Care 02 577 825 55 Fax 02 035 30 Switchboard 02 577 821 Website: support.euro.dell.com E-mail: support.euro.dell.com/it/it/emaildell/ Luxembourg Technical Support (Brussels, Belgium) 02 NOTE: Customers in Luxembourg call Belgium for sales, customer, and technical assistance.
support. Switchboard 671 16800 00 46 08 590 05 594 Fax Switchboard 671 16865 Website: support.euro.dell.com Fax Technical Support (Upplands Vasby, Sweden) E-mail: nor_support@dell.com E-mail Support for Servers: Nordic_server_support@dell.com Poland (Warsaw) Portugal Customer Service Phone 22 57 95 700 Customer Care 22 57 95 999 Sales 22 57 95 999 Switchboard 22 57 95 999 Customer Service Fax 22 57 95 806 Fax 22 57 95 998 Website: support.euro.dell.
Sweden (Upplands Vasby) E-mail: support.euro.dell.com/es/es/emaildell/ Corporate Technical Support 902 100 130 Customer Care 902 118 546 Switchboard 91 722 92 00 Fax 91 722 95 83 Website: support.euro.dell.com E-mail: support.euro.dell.
U.K.
Corporate Accounts Technical Support Customer Experience toll free: 800 858 2333 toll free: 800 858 2060 Home and Small Business toll free: 800 858 2222 Preferred Accounts Division toll free: 800 858 2062 Large Corporate Accounts North toll free: 800 858 2999 Large Corporate Accounts East toll free: 800 858 2020 Large Corporate Accounts South toll free: 800 858 2355 Large Corporate Accounts GCP toll free: 800 858 2055 Large Corporate Accounts HK toll free: 8
Global Segment Japan 044 556-3469 Large Corporate Accounts Sales (Over 3500 employees) 044 556-3440 Faxbox Service 044 556-3490 Switchboard 044 556-4300 Web site: support.jp.dell.
Sales 011 709 7700 Fax 011 706 0495 Switchboard 011 709 7700 Website: support.euro.dell.com E-mail: dell_za_support@dell.