
User's Manual


Back to Contents Page
Installation: Dell™ 3100MP Projector
Connecting the Projector
Powering On/Off the Projector
Adjusting the Projected Image
Changing the Lamp
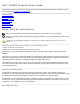
Connecting the Projector
1 power cord
2 USB
3 remote mouse Y-cable
4 D-sub to DVI-I cable
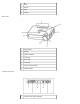
Powering On/Off the Projector
Powering On the Projector
NOTE: Turn on the projector before you turn on the source.
1. Remove the lens cap.
2. Ensure that the power cord and D-sub to DVI-I cable are securely connected. The power button light blinks
green.
3. Press the power button to turn on the projector. After approximately 5 seconds, the startup screen appears,
and the LAMP light blinks orange. After 20 seconds, the LAMP light stops blinking orange.
4. Turn on your source (computer, notebook, VCR, and so on). The projector automatically detects your source.
If the No Signal - check video cable message appears on the screen, ensure that the D-sub to DVI-I
cable is securely connected.
If you are connecting multiple sources to the projector simultaneously, press the Source button on the remote
control or panel control to select the desired source.