Dell Wyse ThinOS Version 9.1 Migration Guide July 2021 Rev.
Notes, cautions, and warnings NOTE: A NOTE indicates important information that helps you make better use of your product. CAUTION: A CAUTION indicates either potential damage to hardware or loss of data and tells you how to avoid the problem. WARNING: A WARNING indicates a potential for property damage, personal injury, or death. © 2021 Dell Inc. or its subsidiaries. All rights reserved. Dell, EMC, and other trademarks are trademarks of Dell Inc. or its subsidiaries.
Contents Chapter 1: Introduction ................................................................................................................ 4 Supported systems..............................................................................................................................................................4 Supported Wyse Management Suite versions..............................................................................................................
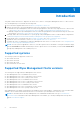
1 Introduction This guide contains instructions to migrate from ThinOS 8.6 to ThinOS 9.1 using Wyse Management Suite 3.1 or later versions. The overall migration process includes the following tasks: 1. Review the before upgrade instructions-see Before you migrate to ThinOS 8.6. 2.
Prerequisites before you migrate from ThinOS 8.6 or upgrade to ThinOS 9.x ● If you are using ThinOS 8.6, you must upgrade to ThinOS 8.6_805 and apply the latest BIOS updates before upgrading to ThinOS 9.1.3112. ● If you are using earlier versions of ThinOS 9.0, you must upgrade to ThinOS 9.0.4024 before upgrading to ThinOS 9.1.3112. ● All device settings are erased after you upgrade from ThinOS 8.6 to 9.1.
○ WMS server or group is changed. System is going to reboot to load full configuration. Press cancel in 60 seconds to prevent reboot. ○ A new firmware or application is available, do you want to upgrade now or defer to the next reboot? The changes will automatically be applied in 120 seconds. If you do not select an option, the thin client reboots after 60 seconds. After reboot the new application or firmware is installed and the thin client reboots again.
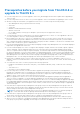
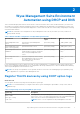
2 Wyse Management Suite Environment Automation using DHCP and DNS ThinOS automated deployment features can be used to create environments where units can be attached to your network. It also helps in receiving the required configurations and software updates that are defined by your management software or file servers.
Table 2. Registering device by using DHCP option tags (continued) Option Tag Description Description—WMS Server FQDN Name—MQTT This tag directs the device to the Wyse Management Suite Push Notification server (PNS). For a private cloud installation, the device gets directed to the MQTT service on the Wyse Management Suite server. For example, wmsservername.domain.com:1883. WDA automatically fetches the MQTT details when devices check in for the first time.
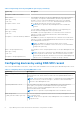
Table 3. Configuring devices by using DNS SRV record (continued) Option tag Description WMS CA Validation (_WMS_CAVALIDATION, Type Text) You can enable or disable CA validation option if you are registering your devices with Wyse Management Suite on private cloud. By default, the CA validation is enabled in the public cloud. You can also disable the CA validation in the public cloud.
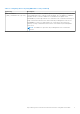
3 Register ThinOS devices using Wyse Device Agent If you do not use DHCP or DNS as described in the previous section, you can configure the WDA agent from within the ThinOS GUI. This has to be configured on every thin client. Steps 1. From the desktop menu of the thin client, go to System Setup > Central Configuration. The Central Configuration window is displayed. NOTE: Privilege must be set to High or Admin Mode must be activated to gain access to the ThinOS Central Configuration menu. 2.
4 Add a ThinOS 8.6 device to a group in Wyse Management Suite This section is recommended for ThinOS 8.6 users transitioning from file server configuration and imaging to Wyse Management Suite. ThinOS 9.1 does not support FTP and WDM. The file storage and device management features are replaced by Wyse Management Suite. About this task Adding a ThinOS 8.
5 Download the ThinOS firmware, BIOS, and application packages About this task This section describes the steps to download the ThinOS firmware from Dell support site. Steps 1. Go to the www.dell.com/support site. 2. Locate the required ThinOS Image entry and click the download icon. Table 4. ThinOS 9.1.3112 image Scenario ThinOS image title Upgrade your ThinOS 8.6_807 to 9.1.3112 ThinOS 8.6 to ThinOS 9.1.3112 Base Image file for Dell Wyse 5070, 5470 and 5470 All-in-One Thin Clients. ThinOS 8.
Table 6. ThinOS 9.1.1131 image (continued) Scenario ThinOS image title ThinOS 8.6 to ThinOS 9.1.1131 Base Image file for Dell Wyse 5070, 5470 and 5470 All-in-One Thin Clients with PCoIP. ThinOS 8.6 to ThinOS 9.1.1131 Base Image file for Dell Wyse 3040 Thin Clients. ThinOS 8.6 to ThinOS 9.1.1131 Base Image file for Dell Wyse 3040 Thin Clients with PCoIP. Upgrade your ThinOS 9.0 to 9.1.1131 ThinOS 9 to ThinOS 9.1.1131 Base Image file for Dell Wyse 3040, 5070, 5470 and 5470 All-in-One Thin Clients.
Table 7. ThinOS packages (continued) ThinOS packages ThinOS image title Identity Automation QwickAccess ThinOS 9.1 Identity Automation QwickAccess package for Dell Wyse 3040, 5070, 5470 and 5470 All-in-One Thin Clients. 4. Extract the downloaded package. The image filename depends on your hardware model. For example, A10Q_wnos or X10_wnos. NOTE: After you upgrade to the latest version of ThinOS 9.1, you can only downgrade to ThinOS 8.6 or previous versions of 9.0 or 9.
6 Add ThinOS firmware to the Wyse Management Suite repository Steps 1. Log in to Wyse Management Suite using your tenant credentials. 2. In the Apps & Data tab, under OS Image Repository, click ThinOS. 3. Click Add Firmware file. The Add File screen is displayed. 4. To select a file, click Browse and go to the location where your file is located. 5. Enter the description for your file. 6. Select the check box if you want to override an existing file. 7. Click Upload.
7 Upgrading ThinOS firmware ThinOS 9.1 conversion from ThinOS 8.6 is a two-step process. You must first upgrade your existing ThinOS 8.6 thin client using a ThinOS policy for ThinOS 8.6. After the upgrade is complete, use a ThinOS 9.x policy to manage your ThinOS 9.1-based thin clients. Upgrade ThinOS 8.6 to ThinOS 9.1 Prerequisites ● Ensure that you upgrade the thin client to ThinOS 8.6_807 with the latest available BIOS. For more information about how to upgrade BIOS on your ThinOS 8.
Steps 1. Go to the Groups & Configs page, and select a group. 2. From the Edit Policies drop-down menu, click ThinOS 9.x. The Configuration Control | ThinOS window is displayed. 3. In the left pane, click Standard. 4. From the Standard menu, expand Firmware, and click OS Firmware Updates. NOTE: If you cannot locate the operating system firmware option under the Standard tab, use the Advanced tab. 5. Click Browse and select the ThinOS firmware to upload. NOTE: The ThinOS 9.1.3112 has two images.
NOTE: After upgrade, install the Citrix Workspace app package first, and then reinstall the Citrix-related application packages. Example: HID, Cisco WebEx Meeting.
8 Configuring a ThinOS 9.1 client using Wyse Management Suite It is recommended to optimize centralized configuration server groups for better performance and manageability by maximizing the number of unique customer device configuration groups. A minimal number of Wyse Management Suite groups and settings should be used to maximize the unique customer device configurations groups. This is applicable to both multitenant and on-premises scenarios.
Table 9. ThinOS configuration grouping overview (continued) Group Types Configurations Management Settings All other global configurations Device configurations for a group of clients Group-based Broker Configurations Group-based Printer Settings Group-based Time Zone Settings Device configurations for a single device Client-based Terminal Name Client-based Location Client-based Location and Custom 1, 2, 3 Device configurations dynamically selected ThinOS 8.
Table 10. ThinOS system variables (continued) Variable Description $SN Serial number or Service tag $VN Version number Right($xx, i) or and Left($xx, i) Specifies that the variable is to be read from left or right. The $xx is any of above parameters and the parameter i specifies the digits for the offset of right or left.
Table 11. Relationship between INI and Wyse Management Suite group-based configurations (continued) Configuration ThinOS 8.6 with INI ThinOS 9.1 with Wyse Management Suite SignOn=NTLM, Groups and Configs (WNOS\INI\ AD.INI) User Policy Group SignOn=Yes or NTLM Users (WNOS\INI\username.ini) User Exceptions NOTE: The Select Group feature is not available when using Wyse Management Suite Standard. A Wyse Management Suite Pro license is required to enable this feature.
● Site B printer configurations ● Device exception configurations Similarly, at Login, Wyse Management Suite applies user policies based on the Active Directory Group Name or User Exception Policies based on username information. For more information on how to configure active directory group settings and user exceptions, see the Wyse Management Suite Administrators Guide at www.dell.com/support. Configuring a ThinOS 9.
9 BIOS Installation Upgrade BIOS Prerequisites ● Ensure that you have downloaded the BIOS file from Dell.com/support to your device. ● Ensure that you have registered the thin client to Wyse Management Suite, if you are upgrading BIOS using Wyse Management Suite. Steps 1. Open the Admin Policy Tool on the thin client or go to the ThinOS 9.x policy settings on Wyse Management Suite. 2. On the Configuration Control | ThinOS window, click the Advanced tab. 3. Expand Firmware and click BIOS Firmware Updates. 4.
NOTE: If the BIOS does not have a password and if you are setting a new password, then the password is applied after the first reboot. Other setting changes are applied after the second reboot. NOTE: You cannot change the BIOS password through a select group. Use the device group to change the BIOS password.
10 Delete ThinOS application packages You can use the ThinOS local UI or the Wyse Management Suite to delete one or more ThinOS packages. About this task This section describes steps to delete ThinOS packages using the ThinOS local UI. Steps 1. Log in to the ThinOS client. 2. From the system menu, go to System Tools > Packages. All the installed ThinOS packages are listed. 3. Select a package that you want to delete and click Delete. NOTE: To delete all the packages, click Delete all. 4.
11 Downgrade to previous versions of ThinOS If you want to downgrade to ThinOS 8.6 or 9.0 or you want to downgrade from ThinOS 9.1.3112 to the previous ThinOS 9.1 versions, disable the secure boot option in the BIOS setup. Downgrading from ThinOS 9.1 to previous ThinOS versions using Wyse Management Suite is not supported. You can downgrade from ThinOS 9.1.3112 to ThinOS 8.6, 9.0 or ThinOS 9.1 previous versions by using the USB Imaging Tool and Merlin Images posted on the www.dell.com/support site.
12 Resources and support Accessing documents using the product search 1. Go to www.dell.com/support. 2. In the Enter a Service Tag, Serial Number, Service Request, Model, or Keyword search box, type the product name. For example, Wyse 3040 thin client or Wyse ThinOS. A list of matching products is displayed. 3. Select your product. 4. Click Documentation. Accessing documents using product selector You can also access documents by selecting your product. 1. 2. 3. 4. 5. 6. 28 Go to www.dell.com/support.
13 Contacting Dell Prerequisites NOTE: If you do not have an active internet connection, you can find contact information on your purchase invoice, packing slip, bill, or Dell product catalog. About this task Dell provides several online and telephone-based support and service options. Availability varies by country and product, and some services may not be available in your area. To contact Dell sales, technical support, or customer service issues: Steps 1. Go to www.dell.com/support. 2.