
Operation Manual


Electric Fryer F17331
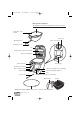
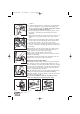
Replacing the timer battery
• Remove the timer from its compartment (fig. 7).
• Remove the screw from the back cover (fig. 8).
•Turn the battery cover (fig. 9) on the back in an anticlockwise
direction until it is released.
• Replace the battery.
• Reassemble.
If the appliance is to be replaced or thrown away, the bat-
tery must be removed and disposed of in accordance with
current laws as it represents an environmental hazard.
After frying
When the cooking time has finished raise the basket and check the
food is cooked as required. In models fitted with a viewing win-
dow the food can be checked by looking through the window
without opening the lid.
When cooking is completed switch the appliance off by turning the
thermostat knob to the “OFF” position until you hear the click of
the internal switch.
Allow excess oil to drip off by leaving the basket in the raised posi-
tion.
Note: when cooking in two phases (e.g. potatoes) raise the basket
at the end of the first phase and wait for the indicator light to
switch off again.Then immerse the basket slowly back in the oil for
a second time (see enclosed tables).
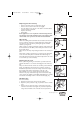
Filtering the oil or fat
Before performing cleaning or maintenance operations, turn the
machine off, allow it to cool down and unplug from the mains soc-
ket.
This procedure should be carried out each time you have finished
frying, especially when the food has been coated in crumbs or
flour.The food particles tend to burn if they remain in the liquid,
thus causing much quicker deterioration of the oil or fat.
Check that the oil is cool enough (wait around two hours).
Move the deep fryer towards the edge of the work surface (Fig.
10).To prevent the appliance from falling while filtering the oil, make
sure that the feet always remain on the work surface (Fig. 10).
Oil drain tube
Proceed as follows:
1. Open the lid of the fryer and remove the basket.
2. Open the panel (as shown in Fig. 11) and take out the oil drain
hose.
3. Remove the cap (as shown in Fig. 11) and at the same time
hold the hose between two fingers to prevent the liquid from
being released until the end of the tube has been placed in a
X
fig. 7
fig. 8
fig. 9
fig. 10
fig. 11
5
GB-5725111500 30-09-2003 14:23 Pagina 5