
Operation Manual


9
OPERATING INSTRUCTIONS
Before using the deep fryer for the first time, carefully
clean, using warm water and dishwashing detergent,
the basket, the bowl and the cover. The control unit,
power cable and heating element may be cleaned using
a damp cloth. Check that water does not enter into the
control unit and that there is no residual water in the bot-
tom of the removable bowl. Carefully dry all the parts.
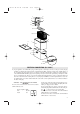
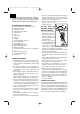
Check that the control unit is properly fastened to the
deep fryer body. The safety micro-switch “C” will not
allow the appliance to be operated if the control unit “S”
is not correctly positioned in the casing “H”.
The deep fryer is now ready for use.
FILLING WITH OIL OR FAT
• Remove the cover “K”, lifting it by the handle. Turn the
folding handle of the basket until it locks into place
(pos. 2, Fig. 2). Remove the basket “M” by lifting it
upwards.
• Remove the length of cable required to connect the
appliance to the mains, from the cable compartment
“O” (see Fig. 3).
• If oil is used, pour it into the bowl “L” until reaching
the maximum level indicated (see Fig. 4). Never
exceed this limit, as oil may overflow from the contai-
ner. The level of oil must always be between the maxi-
mum and minimum limits, “D” (max. 4 lt. - min.
2,850 lt.). For best results, use good quality peanut
oil.
• If lumps of fat are used, cut the lumps into pieces and
melt them in another container, then pour the lique-
fied fat into the deep fryer bowl. Never melt the fat in
the basket or on the deep fryer heating element (see
Fig. 5).
• Close the cover “K”.
PREHEATING
• Move the switch “R” to position 1 (see Fig. 6). The
light on the switch will turn on.
• Place the food to be fried in the basket “M”, without
overfilling (max 1.3 kg of fresh potatoes). Check that
the handle of the basket is correctly positioned (pos.
2 in Fig. 2).
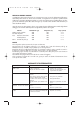
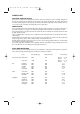
•Move the thermostat knob “A” (see Fig. 7) to the
required temperature (see cooking table).
• When the set temperature is reached, the light “B” will
turn off.
STARTING FRYING
• As soon as the light goes off, place the basket “M”
into the oil, lowering it very slowly to prevent the hot
oil from spraying or overflowing.
•A significant amount of steam will be released: this is
completely normal.
SETTING THE TIMER (IF FEATURED)
Press the button “G”; the display will show “OO”. Keep
the button “G” pressed until the required time is shown
on the display. The set time can range from 01 to 99
minutes.
Once the required time has been set, release the button
“G”. The display will start counting down:
•from 99 to 01 minutes, the display will count down
minute by minute;
•from 01 minutes on, the countdown will be in
seconds.
An audible signal will indicate the end of the set time; to
switch off the audible signal, simply press the timer but-
ton “G”.
To change the setting of the timer, reset it by holding the
button “G” for a number of seconds.
The timer signals the end of the set time, but does not
stop the appliance.
To replace the battery, access the inside of the casing
(H), proceeding as follows:
• Remove all the deep fryer components;
• Unscrew the two screws that support the timer;
• Lever open the hatch using a screwdriver and remo-
ve the timer, being careful not to let go of the button;
• Open the hatch on the rear of the timer and replace
the battery with another of the same type; to re-insert
the timer, perform the same operations in reverse.
When either replacing or disposing of the appliance,
the battery must be removed and disposed according to
the laws in force, in that it may damage the environ-
ment.
END OF FRYING TIME
• When the set cooking time has elapsed, lift the basket
“M” and check that the food has been cooked to the
required colour.
• If the food is completely cooked, turn the appliance
off by moving the thermostat knob “A” to the “MIN”
position, until it clicks.
•Turn off the switch “R”. The light on the switch will go
off.
• Allow the excess oil to drain by hooking the basket
“M” onto the support “E” on the bowl.
• N.B. When cooking in two phases or if more food
needs to be cooked, at the end of the first phase hook
the basket ”M” onto the basket support “E” and wait
for the light to go off again. Then slowly place the
basket “M” in the oil a second time.
I GB F D NL E P GR 2-08-2002 13:51 Pagina 9