
Instructions / Assembly


11
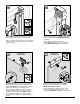
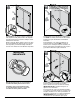
Place bottom track (D) on the ledge with leg facing out.
If bottom track is too long or the middle does not sit flush
against the ledge, use a metal file to remove additional
metal and smooth rough edges.
Coloque el riel inferior (D) sobre el listón con la patilla
orientada hacia fuera. Si el riel inferior es demasiado
largo, o el riel de en medio no asienta al ras con la
saliente, utilice una lija para metales para eliminar el metal
que sobra y suavizar los bordes ásperos.
For added clearance, remove a bottom bumper (BB) from
wall jamb (C) before installing bottom track.
Para mayor espacio libre, quite el tope central (BB) de la
jamba de pared (C) antes de instalar el riel inferior.
1
2
Leg
Patilla
17
D
C
D
D
2
1
16
C
BB
1
3
2
15
D
G
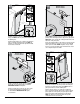
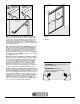
Insert the gasket (G) into the groove on the bottom
track (D). Pull to the end of the bottom track (D) and
trim gasket to be flush.
Inserte la junta (G) en la ranura del riel inferior (D). Jale
hasta el extremo del riel inferior y recorte la junta de
manera que quede al ras del riel.
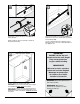
Double-check measurement before cutting. Using a miter box,
cut the bottom track (D) with fine-toothed hack saw. If needed,
use a metal file to smooth rough edges. Clean metal shavings
from bottom track with a vacuum. IMPORTANT: DO NOT stand
on or use a vice to hold bottom track while cutting.
Compruebe de nuevo la medición antes de cortar. Usando
una caja de ingletes, corte el riel inferior (D) con una sierra
de dientes finos para metales. Si fuera necesario, utilice una
lija para metales para suavizar los bordes ásperos. Limpie
las virutas metálicas del riel inferior con una aspiradora.
IMPORTANT: NO utilice su peso ni con un tornillo de banco
para sujetar el riel inferior mientras lo corta.
14
D