
Installation Guide


9
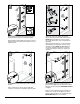
Remove wall jamb. Drill three 5/16" holes into the wall
through pilot holes. Repeat for remaining wall jamb.
Retire la jamba de pared. Taladre tres orificios de 5/16" en
la pared a través de los orificios piloto. Repita con la otra
jamba de pared.
1
1
2
5/16"
7
C
Push in the center of the wall anchor (AA) and
squeeze clips together. Insert wall anchor into wall.
NOTE: Wall anchors MUST be used. For ceramic
tiles, smaller wall anchors can be used (purchased
separately).
Ejerza presión hacia dentro en el centro del anclaje
de pared (AA) y junte las pinzas. Inserte el anclaje
de pared en la pared. NOTA: Es NECESARIO usar
los anclajes de pared. Para paredes de cerámica
se debe usar pequeños anclajes (se compran por
separado).
1
2
3
3
3
8
AA
x3
AA
Reposition wall jamb (C). Secure with screws (CC).
Attach a bumper (BB) at the top and bottom locations.
Repeat for remaining wall jamb. IMPORTANT: DO NOT
overtighten.
Vuelva a colocar la jamba de pared (C). Sujétela con
tornillos (CC). Coloque un tope (BB) en los orificios
superior e inferior. Repita con la otra jamba de pared.
IMPORTANTE: NO apriete excesivamente.
1
1
2
2
3
10
C
x2
CC
x2
BB
9
x6
AA
Gently tap wall anchors (AA) into place with a small ping
hammer.
Golpee suavemente los anclajes de pared (AA) para
colocarlos en su lugar con un martillo pequeño de punta.