
Installation Guide

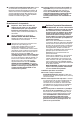


Cleaning and Care
Care should be given to the cleaning of this
product. Although its finish is extremely durable,
it can be damaged by harsh abrasives or polish.
To clean, simply wipe gently with a damp cloth
and blot dry with a soft towel. Glass cleaner
can be used on SS (Stainless) finish to remove
fingerprints and maintain color match. You can
avoid turning the faucet on and off by closing the
handle.
40
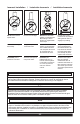
LED Guide
If LED (6) is:
Solid Blue - Solenoid valve is open, water
temperature is less than 80
°F (27°C).
Solid Magenta -
Solenoid valve is open, water
temperature is between 80
°F (27°C) and
110
°F
(43
°C).
Solid Red -
Solenoid valve is open, water
temperature is greater than 110
°F (43°C).
Solenoid Troubleshooting
Note: Normal operation of the faucet will turn
off water flow if faucet is not touched for 2
minutes.
1. If your spout flashes a red light three times
and then keeps repeating this,
replace the batteries.
Note: If low battery indication is on after
installing fresh batteries, please check that
batteries are loaded in the proper direction
in the battery box.
If the spout still flashes a red light, please
replace solenoid and electronics kit**. (see
manual bypass of electronics section*)
2. If your spout displays the proper light, but no
water is coming out of the spout,
a. Verify the handle is in the “on” position.
b. Verify the water supplies are turned to the
“on” position.
c. Move handle to the “off” position. Remove
the hose from the solenoid and move handle
to the “on” position to check for ow coming
from the solenoid. Reconnect hose to
solenoid.
d. With handle in the “off” position, remove
the hose from the faucet to the solenoid.
Move handle to the “on” position to check if
water is going through the manual valve and
reaching the solenoid. If water is getting to
the solenoid, but it is not getting through the
solenoid, replace solenoid and electronics
kit**.
3. If your LED base indicator is not displaying
any lights,
a. Check to make sure the spout connector
is attached to the spout and the wire
from the solenoid / electronics kit. If it is
disconnected, or loose (see step 3), reattach
and check for proper operation.
b. Replace batteries.
c. If it is attached and the light still does not
display on the indicator at the base of the
spout, replace electronic base or spout
assembly**.
*For immediate and temporary operation of your
faucet.
** Refer to part diagram included in this document
for correct RP number.
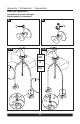
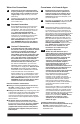
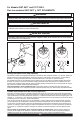
Maintenance
If faucet exhibits very low flow:
A. Remove aerator (1) with supplied
wrench (2) and clean
MODELS 561T-DST & 761T-DST
Refer to step 3 of installation to flush debris at
the outlet. Clean and reinstall the flow restricter
(13).
MODELS 574T-DST & 774T-DST
Refer to step 3 of installation to flush debris at
the outlet. Clean and reinstall the flow restricter
(13). If low flow still persists remove and replace
stream straightener.
B. SHUT OFF WATER SUPPLIES. Replace valve
cartridge (3). When reinstalling parts, make
sure bonnet nut (4) is tightened securely with
a wrench.*
If faucet leaks from under handle:
Remove handle and remove trim cap (5). Using
a wrench, ensure bonnet nut (4) is tight.
MODELS 552TLF or 752TLF: remove cover
(7), set screw (8), bonnet (9), glide ring (10) and
handle (11). Using provided wrench (12), ensure
bonnet nut (4) is tight.*
If leak persists–SHUT OFF WATER SUPPLIES.
Replace valve cartridge (3). When reinstalling
parts, make sure bonnet nut (4) is tightened
securely with a wrench.*
If faucet leaks from spout outlet–SHUT OFF
WATER SUPPLIES. Replace valve cartridge (3).
When reinstalling parts, make sure bonnet nut (4)
is tightened securely with a wrench.*
* WARNING: Failure to securely tighten bonnet
nut with a wrench could result in water
damage.
Note: Do not attempt to disassemble cartridge (3).
There are no repairable parts inside.
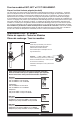
De-activating Hands-free Mode:
a. Tap spout 6 times within 4 seconds.
b. The LED indicator light will ash red/blue.
c. Tap spout an additional 6 times within 4
seconds of ashing red/blue LED indicator
light.
d. The LED indicator light will ash red/blue a
second time to indicate the hands-free mode
has been de-activated.
e. The tapping sequence can be done with the
handle in the ON or OFF position.