
User guide

Appendix C: Parameter Field Reference
C-33
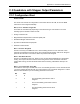
fault type and click OK. Changes to this parameter do not take effect until you issue a Set
Parameters (P) command.
Manual Parameter Entry
This parameter can also be edited manually, but this is discouraged since it is much easier to use
the popup editor. You can enter hexadecimal numbers by typing a leading 0x, as in 0x1FE0.
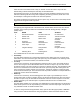
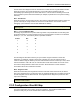
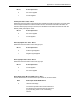
Each of the eight faults listed above has two bits assigned to it, labeled S and H in the table
below:
Bit
Description
Bit
Description
15
Fault 7 - Bit
S
7 Fault 7 - Bit H
14
Fault 6 - Bit
S
6
Fault 6 - Bit H
13
Fault 5 - Bit
S
5 Fault 5 - Bit H
12
Fault 4 - Bit
S
4
Fault 4 - Bit H
11
Fault 3 - Bit
S
3
Fault 3 - Bit H
10
Fault 2 - Bit
S
2
Fault 2 - Bit H
9 Fault 1 - Bit
S
1 Fault 1 - Bit H
8
Fault 0 - Bit
S
0
Fault 0 - Bit H
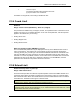
For each fault, the two bits in the Auto Stop parameter define the action as follows:
Bit
H
Bit
S
Description
0
0
Status Only
0
1
Soft Stop
1
0
Hard Stop
1
1
Disable Drive
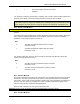
If you select Status Only for a fault that cannot use that action, then the axis will use a Soft Stop
action for that fault. Similarly, if you select Disable Drive for a fault on an axis that does not have
an Amp Enable output, the axis will use the Hard Stop action for the fault.
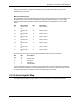
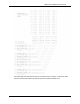
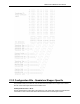
C.2.19 Auto Stop Bit Map
The table below provides an easy method to convert bit patterns to hexadecimal numbers.